Wednesday, November 28, 2012

Finishing What I Started...

I hope all my American friends had a wonderful Thanksgiving holiday!  We had a fun and busy one, with family visiting from out of state, and a couple get-togethers with friends over the weekend.  And now we're full swing into Christmas around here (although the tree isn't quite finished yet).

Earlier this month, I showed this partially finished mini album that was made up for a challenge at The Shabby Tea Room.


But before I show you the now-completed inside pages, here's a little star box I made to sit next to the album on the table.  It's made using craft-store supplies - a round papier mache box, a wooden spool, a wooden circle, and a grapevine wreath, covered in papers and laces to blend with the album front.  I left the box lid removeable, so I can put some wrapped candies inside for those "sweet attacks" that happen so often during the holidays...


Before doing anything else, I painted the box and wooden pieces with white craft paint as a base. Some older Basic Grey papers were decoupaged to the box (inside and out are finished), and the wooden spool.  I lightly glittered the grapevine wreath, and wrapped a strand of white pearls around it to mimic the wreath on the album front.  To secure the wreath to the (painted) wooden circle, I used lots of hot glue...to camouflage the dull glue, I used Glossy Accents and large coarse clear glitter over the dried hot glue. Now it looks like a glittery moss beneath the wreath.


Of course, you know I had to glue lots of lace around the box edges, and the spool...LOL. Little pink pearls in the center of the scalloped lace flowers add an accent to the blue and white theme, and the scrunched seam binding bow and pink poinsettia on the top add a bit more.


The star is made of two medium-weight chipboard stars glued together...then covered with silver German glass glitter on the front, back, and side edges to camouflage the seam from the layers of chipboard. (It will be fun to watch this glitter tarnish over the years.)  Again, I had to use a good amount of hot glue to keep that star standing firm on the top of the box, so I covered the glue with coarse glitter.

And now, here are the finished inside pages for the "Believe" decorative mini album.  I'm glad I took the time now to finish this...I have this bad habit of putting things away to finish "later" and "later" never comes...LOL

Because of the lumpiness of my embellishments, I did have to remove one of the 8 chipboard pages that come with the album...so I have a total of 14 pages.  I won't clutter up the photos with descriptions of all the supplies used, so if you have a question or two about anything in particular, please leave me a comment or drop me an email and I'll fill you in on the details!

Page 1...

 Pages 2-3...


Pages 4-5...


 Pages 6-7...


Pages 8-9...


Pages 10-11...


Pages 12-13...


And the last page, 14...


Thanks so much for stopping by for a visit today...I hope you're having a great week so far!


Monday, November 19, 2012

Shadowbox Card...Take Two...

A couple weeks ago, I posted a shadowbox front card, with links to a video by another talented cardmaker, Olga,  and some step-by-step instructions.  I had so much fun making the first one, I also made one for an upcoming baby shower, and one for my husband's birthday!  I can't post the baby card yet (the shower's not for a couple more weeks) but I can show you how well the design lends itself to a masculine card, too.

A little change to the aperture (cutout) shape on the front, along with more masculine colors, heavier and more rustic-toned embellishments, some dry embossing and light sanding for texture on the solid-colored background paper, and here's how it turned out...


Instead of my usual flower cluster, I made up a cluster of leafy branches, rust-colored leaves, brown-toned buttons, and dark grey pearls...


Some more small branches in the upper left corner, with larger dark grey pearls...


And rather than using all gems on the "swags," I used punched circles from dark brown cardstock along with a few chocolate-colored clear gems for just a hint of sparkle...


And here's a vew from the side...

Supplies:
Patterned papers: My Minds Eye Wild Asparagus      Embossing folder: Sizzix "Diamond"
Dies: Spellbinders Labels 22; Sizzix Flowers Branches and Leaves; My Favorite Things Royal Leaves
Bookplate and "wish" ticket: Tim Holtz idea-ology      Chocolate clear gems & grey pearls: Creative Imaginations
Miscellaneous: buttons, twine, crochet thread, white acrylic paint


Thanks so much for visiting today!  I'll be taking a short break from blogging until next week...the Thanksgiving holiday has my calendar filled with "to-do's" and fun times. Until then, I hope you all have a wonderful week and a joy-filled Thanksgiving holiday!

Saturday, November 17, 2012

Thinking of You...

It's a rainy and grey weekend around here...perfect time to do some chores around the house, catch up on some laundry..nestle in when the night comes early, and watch a movie after dinner.  Less time is spent in the Korner these days, getting ready for Thanksgiving...but there's still a card or two coming to life now and then. :)

As much as I favor soft shades when I make cards, now and then I need a change, and like to use some bolder tones.  When I saw Crate Paper's new On Trend collection pad, I saw it as a perfect mix of soft and strong colors, and couldn't wait to start playing with the fun prints.  Here's the first, of what will probably be several, cards using some of those fun papers...


The three flowers, leaves, and branches sit on top of a couple scrunched seam binding bows and a piece of scrunched cheesecloth...


Initially, the mini pearls around the sentiment chip started out as Liquid Pearls. I was so happy that for once, they came out uniform in size and pretty evenly spaced.  Then the phone rang, and as I reached for it, I hit a piece of scrap cardstock that landed smack dab on top of my beautiful handiwork!  So I decided I wasn't going to sweat it anymore...I wiped off the what was left of the Liquid Pearls...and adhesive mini pearls took their place...LOL


I still have colored wire lying around from years ago when I used it on my scrapbook layouts.  I love that I can now put it to use by stringing it with mini pearls and using the wire loops as embellishments on my cards...

Supplies:
Patterned papers: Crate Paper On Trend collection (6x6)      Sentiment stamp: Hero Arts
Punches: Martha Stewart Doily Lace and Medium Branch    Scalloped crocheted lace: TheFunkieJunkie.com
Dies: My Favorite Things Royal Leaves; Spellbinders Fancy Framed Tags Two      Mini Pearls: Recollections
Flowers: local scrapbook store      Hug Snug seam binding     Miscellaneous: cheesecloth; handcrafted pearl wires


Thanks for stopping by for a visit...I hope you're having a wonderful weekend!


Wednesday, November 14, 2012

Christmas Poinsettias...

Here's a trio of Christmas cards that went together fairly quickly...well, after an hour or so of die cutting and glittering, that is. 

First up...traditional Christmas colors of red, green, and white...


A monochromatic color scheme, with just a touch of pine green...


And finally, a dramatic black and white combo with touches of holiday red and green...


Supplies:
Spellbinders dies: Grand Labels Four (card shape); Floral Ovals; Classic Ovals Large; Twisted Metal Tags and Accents: Layered Poinsettia
Punch: Martha Stewart Medium Branch      Pearls: Basic Grey and Recollections
Patterned papers: Basic Grey Eskimo Kisses collection (red); Authentique Peaceful collection (cream); Basic Grey Jovial collection (black print)
Miscellaneous:  Clear coarse glitter; medium coarse glitter; white acrylic paint


This design lends itself well to an "assembly line" type of process...

1) die cut the frames and ovals; die cut the flower layers...
2) glitter the flower layers and frames and allow to dry, while you...
3) die cut the card bases...
4) die cut the patterned paper fronts and inside papers...
5) punch the branch pieces...  
(I dry-brushed the edges of the die cut papers with white acrylic paint, but since so little paint is used in this step, it's dry in under a minute.)
6) assemble flowers...
7) layer and adhere the frames, flowers, and branches to the card fronts...
8) add gems...
9) adhere paper layers to card insides...
and your cards are finished!

The finished cards are flat enough to fit easily inside a standard U.S. A2 size envelope (4.375" x 5.75") with a piece of cardstock over the front of the card to protect it during the mailing process. (But if you're like me, you'll attach that extra $.20 surcharge stamp just in case the P.O. doesn't agree that it falls below the thickness requirement for a single stamp...LOL.)

Thanks so much for visiting today!

Sunday, November 11, 2012

TSTR - Sweet Shabby Christmas

I'm so happy that this is the week I was asked to be a Guest Designer for The Shabby Tea Room (not that I'm not happy for that any week!).  But this week's photo inspired me to start, and nearly complete, a project that's been percolating in my brain since *last* Christmas...hopefully some of you know how that goes. :)

For Halloween and Thanksgiving seasons, I have mini albums that I put out as part of my table top decorations.  They're not photo mini albums, but purely decorative - with vintage holiday images, poems and sayings, and lots of fun embellishments.  I got as far as purchasing this Maya Road 4x4 chipboard album for my Christmas album, but it was put up in the supply closet for another day...until I saw this week's inspiration photo.
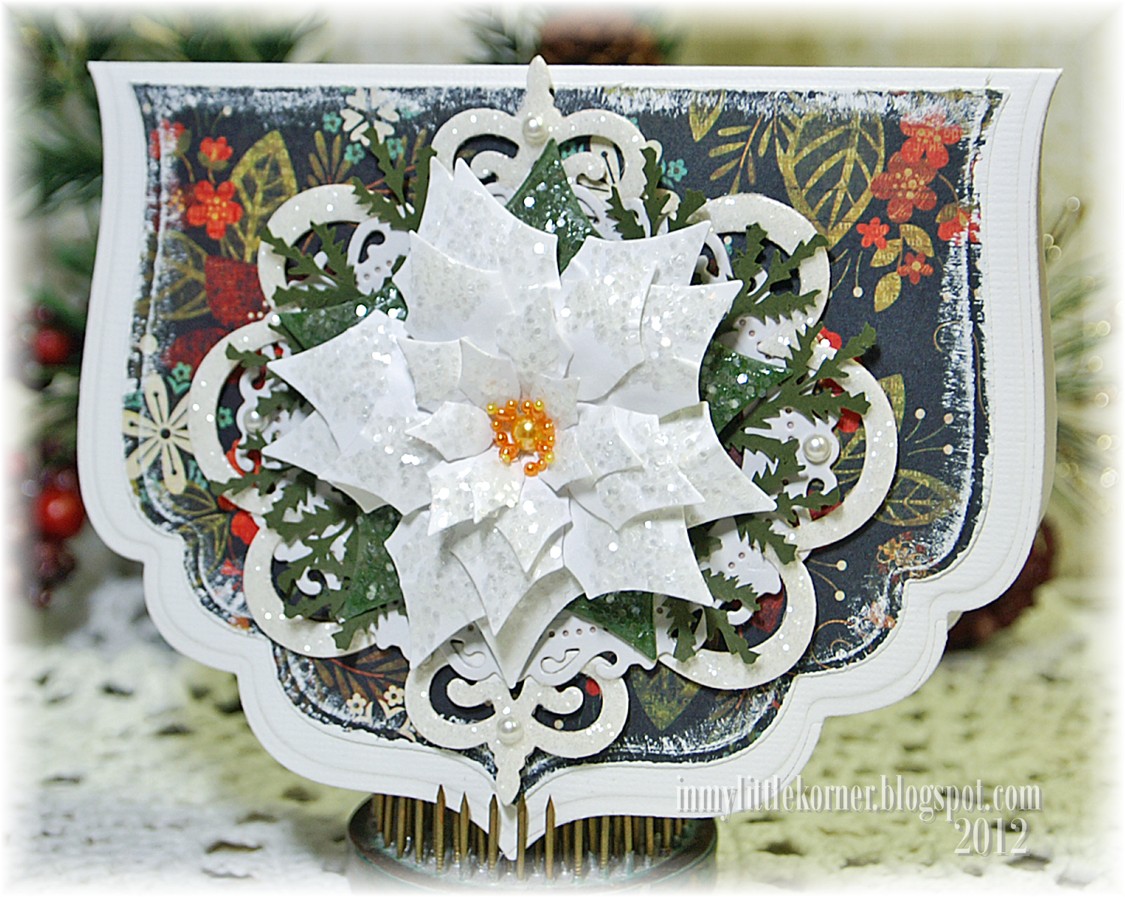
So this...


came about after seeing this week's beautiful inspiration photo that Lenet chose for us, along with the challenge to include some shimmer or glimmer...


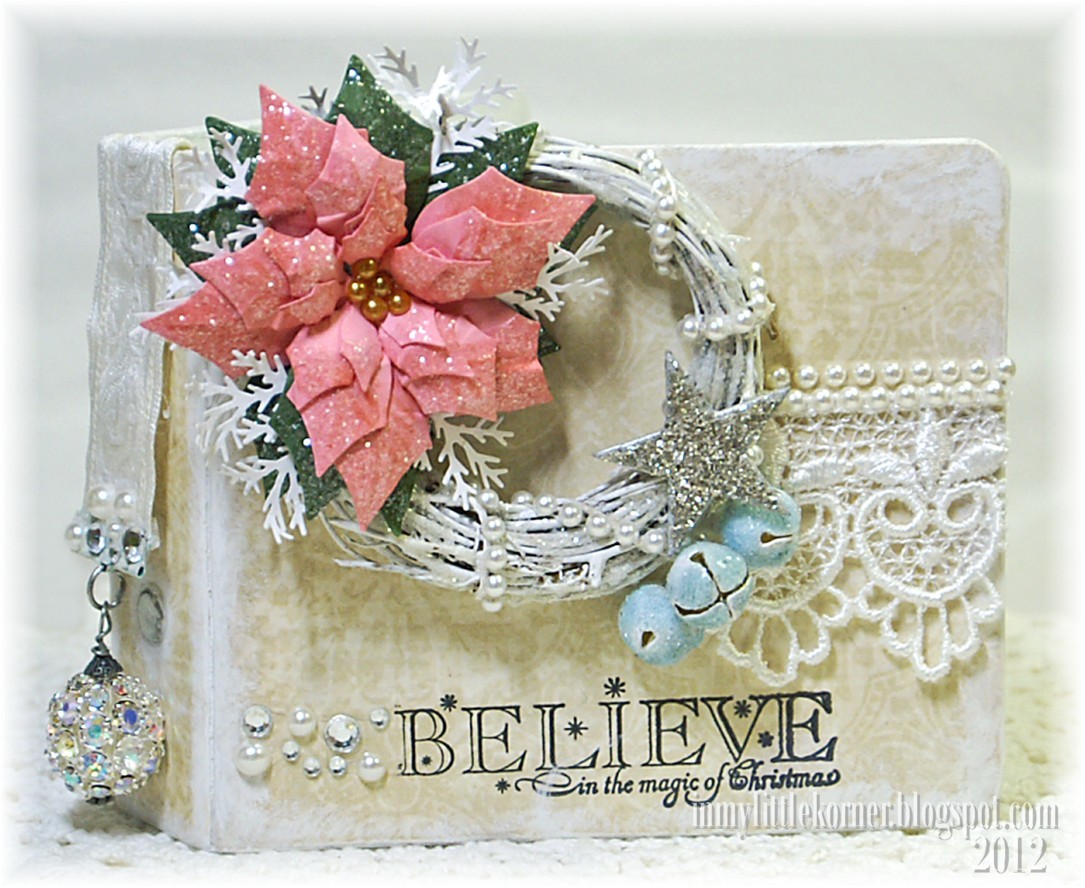
Here's a better side view of the faux ribbon bookmark and large sparkly charm...


Supplies for cover (inside and outside):
Patterned papers: BoBunny Kitchen Spice/Allspice (b side) (cream); Basic Grey Figgy Pudding collection (aqua/white on inside covers); Basic Grey Manila Basics collection (cream dot/inside covers)
Poinsettia dies: Spellbinders Layered Poinsettia      Punch: Martha Stewart Medium Branch
White pearls and clear crystals: Recollections      Crocheted lace: TheFunkieJunkie.com     
Sentiment stamp: Inkadinkado      Crystal ball charm: Art-i-cake by Amy Labbe     Gold pearls: Queen & Co.
Miscellaneous & craft store supplies:  mini grapevine wreath (painted and glittered);  silver bells (painted and glittered); chipboard star;  silver German glass glitter;  ribbon clamp;  embossed ribbon;  clear coarse glitter;  white acrylic paint; matte decoupage glue

And here's where another crafty "accident" worked totally in my favor.  See those glittery blue jingle bells? Yep, pure accident. 

I had coated the silver bells with white acrylic paint to start...so far, so good.   Then I coated them with Glossy Accents, and sprinkled on some Martha Stewart Clear Coarse glitter - still in HappyLand.  As I watched them dry, an "oh no!" look appeared on my face. Some sort of chemical reaction between the metal, paint, Glossy Accents, and glitter made those areas turn light blue (the parts that didn't have Glossy Accents and glitter didn't turn, so although I'm no chemist, I think it's the metal and Glossy Accents/glitter combo that did the trick).  But heck, I had a dozen of them like this, so surely something would come up that required blue accents...and this week's challenge did just that.  :)

Although I haven't completely finished adding the quotes/poems/sayings to all the pages, I can show you how far I have gotten and share a few of the pages with you.

Here's an open view of the mini album. The album comes with 8 chipboard pages, but because I'm such a "lumpy" embellisher, I'm going to have to remove one or two of the pages to make room for them to move on the binder rings.  (When I get closer to finishing, I'll know for sure if I have to do this.)


Here are a few shots of some of the pages that are close to being complete. On the inside pages, I used patterned papers from the (6x6) Carta Bella Winter Fun collection, Authentique Peaceful collection, and Fancy Pants St. Nick collection.


That cute little snowman is a Royal Langnickel rub-on that I found at the craft store last year.  He's applied to a piece of white cardstock, then to a piece of lightweight chipboard, then cut out and adhered to the page with foam tape over a snowbank of glitterey white German glass glitter.  The star is a Martha Stewart punch - it's punched from blue glitter paper, then a couple more times from light grey cardstock. All the layers have a tiny 1/16" high foam dot between them to give the snowflake dimension.

The large wooden snowflake is a craft store purchase, with a Basic Grey Bling-It crystal snowflake applied over the top, and a few white pearls added for fun.  The "merry Christmas" stamp came from the $1 bin at the craft store last year. :)


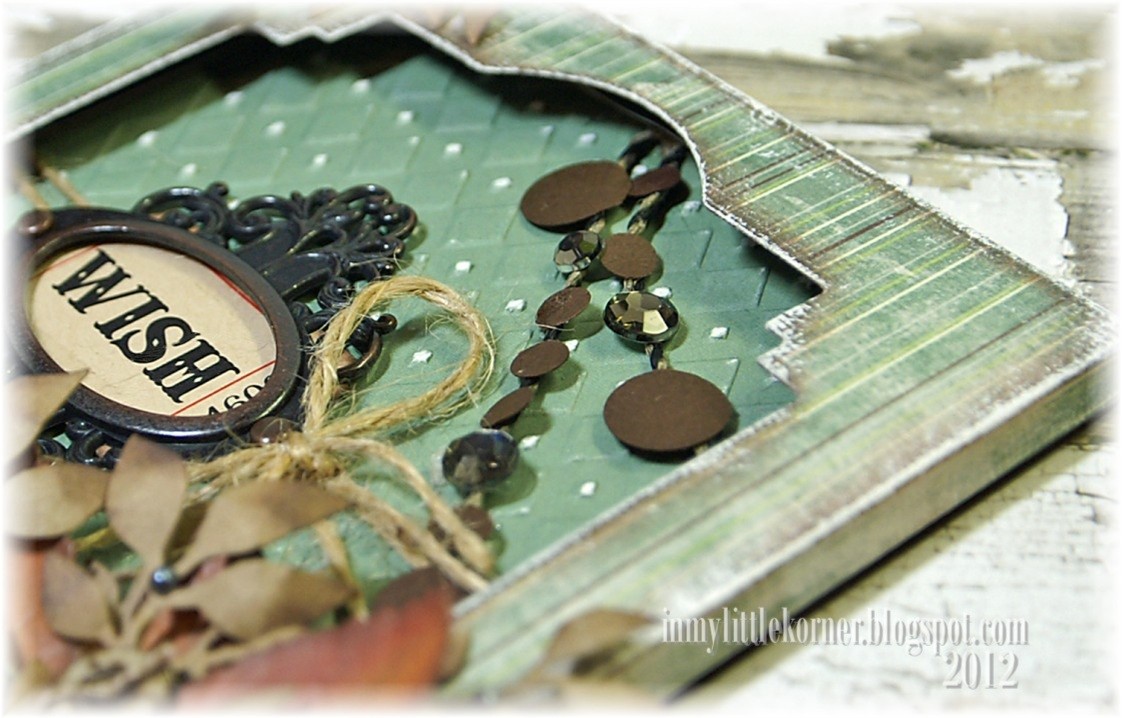
These are the two pages that are closest to being finished.  The Maya Road chipboard window on the left side is painted, inked, and glittered.  A little vintage Christmas scene is adhered behind it, and a silver tinsel stick (we used to call these "pipe cleaners" back in the old days) is bent around the window.  A K&Co chipboard sentiment chip fits perfectly beneath the window (the binder ring hole was punched through the chipboard using my Crop-a-dile).

On the other side, there's another happy Royal Langnickel snowman looking up at a couple Maya Road chipboard hearts (again, painted, inked, and glittered) with some Maya Road sentiment tickets peeking out from behind.  The background doily is a Lifestyle crafts die ("Antique Doily").


One of my favorite purchases from last year is the Tim Holtz/Sizzix "Mini Reindeer & 25 set" used on the left page.  I cut them from Claudine Hellmuth sticky-back canvas, inked and distressed the edges, and popped the little reindeer over a small fabric poinsettia layer.

On the right are a couple more stacked chipboard stars covered with silver German glass glitter (the fun part about this glitter is that, because it's made from real silver pieces, they will tarnish and darken over time and turn a beautiful, rich, dark silver color).


These are two of the pages that need a little more work..LOL  But you can see where it's going.  The Christmas stamp on the left is by Bo Bunny ("Noel Clearly Stamps").  I embellished the tree with little "ornaments" of pink pearls and crystals, and double-stamped the Christmas sentiment with both pink and black inks. The little glittered dove at the tree top is from a K&Co chipboard sticker set from last season.

On the right, the Tattered Angels chipboard frame is inked and glittered, embellished with Hug Snug bows, a silver glitter star, and some white punched branches.

Phew! Another wordy post from me today...hope it was worth your time, though. :)  Thanks so much for visiting...and I hope your week is starting with a smile!


Thursday, November 8, 2012

And So It Begins...

...the crafter's countdown to Christmas, that is! I finally got a small start on Christmas cards over the weekend.  I usually make and mail between 50-60 cards each year, each style in quantities of 2-3, with slight changes to each of those, so that no two people get exactly the same card.  I'm not sure this year I'll be able to get that many made and sent, but at least a start has been made. (I'm one of those crafters who just can't get enthused about making Christmas cards when it's still summer weather outside, but when the weather cools a bit, away I go!)

A couple Victorian Santa images were in the Christmas supply box, left from last year's projects, so I used them on the first two cards of this year.  Spellbinders Decorative Labels 8 seemed like a fun card base shape to try...mixing the formal with the shabby...and a little bit of funky texture added to the mix - the results are two very eclectic holiday cards.


 I added just a few light touches of clear glitter to the images...the white fur areas on Santa's suit...and a shabby dusting of white paint dry-brushed around the edges...


I used a couple handmade jewelled stick pins, but this time, added the clusters of pearls at the centers of the bows in a way that it appears they're part of the stick pin jewels...


and lastly, a peek at the insides...

Supplies:
Dies: Spellbinders Labels 8 and Decorative Labels 8      Patterned paper: Simple Stories 25 Days of Christmas collection
Embossing folders: Cuttlebug Polka Dots and Distressed Stripes      White burlap & crocheted lace: TheFunkieJunkie.com
Pearls: Recollections      Hug Snug seam binding      Handcrafted stick pins


Thanks for visiting today...I'll be back on Monday with a new "non-card" project.  Until then, I hope you have a wonderful weekend!


Monday, November 5, 2012

A New Week...A New Card...

Happy Monday!  For those of you who, like us, participate in the Daylight Savings/Standard Time exercise each year, are you happy for that extra hour we got on Saturday night? To be honest, it's my favorite night of the year, because I use that extra hour for sleep...LOL  Although, I will admit, the darkness that comes even earlier each day messes up my body clock and my late-afternoon energy levels for a week or so.  I've been busy here and there in the Korner, mostly working on a project that I'll share next week, but I did get a card or two done, too...so I have something to share this week. :)

Today's card is another birthday card with supplies that are a mix of new items, with items from my "leftover bag"...bits and pieces that were originally meant to be used on another project but weren't and ended up being saved for use another time. They all ended up coming together like this...


It all started with the pretty digital background paper from By Digital Paper on Etsy (I had used one of the aqua papers from this set on another card last week...this is one of the white sheets, even though it does appear a bit "blue" in these photos).  My leftover bag contained the chipboard heart frame that had already been painted, inked, and stitched...and I found a digi collage I had made that fit inside the frame and blended beautifully with the digital background paper.  Then it was just a matter of gluing on the crystal trim and adding a light coat of clear coarse glitter...


...a couple little dyed seam binding bows topped with a smattering of clear crystals and white pearls...


...and finally an embellished leaf stick pin fashioned into a sentiment tag holder slipped beneath the chipboard frame, and it's done...

Supplies:
Patterned paper: Color Labels from ByDigitalPaper.etsy.com      Chipboard heart frame & Leaf stick pin: Maya Road
Rose collage elements: The Feathered Nest (rose image); The Vintage Workshop (carte postale)
Diecut border: Spellbinders Ironwork Accents      Hug Snug seam binding      Crystal trim: local craft store

Thanks so much for visiting today...I hope your week is starting with a smile!

Related Posts Plugin for WordPress, Blogger...