Sunday, October 23, 2011

Green Tangerines October, Part 3

Last, but certainly not least, are these three cards made with the October Card Kit Add-On.

The first thank you card uses 4 of the chipboard buttons in the kit - I threaded them with pieces of narrow ribbon and matted them to squares of cream cardstock.  A couple pieces of some of the kit's patterned papers, a strip of the scalloped trim, a bottom edge punched with an EK Success edge punch (Daisy Scallop in this case), a little bit of machine stitching around the edges, and a sentiment stamp by Technique Tuesday/Ali Edwards (this one is not from the kit), and it's ready to send!


I originally had this next card laid out with just the two patterned paper pieces on the cardstock base, but then I found a scrap of blue cardstock in my stash that didn't exactly "match" either of the blues in the patterned papers, but it did sit right between the two shades...I guess that's what made it work!  I left the chipboard frame in it's natural color, threaded a piece of the brown sheer ribbon under and over the frame, and glued one of the gold bead sprays, included in the kit, behind the sheer bow.  The sentiment is from a Hero Arts sentiment set, and as I often find I have to do, I cut the words apart so they'd fit on the small oval tag.


And finally, a card not necessarily in "fall" colors, but I still had some of the cute black and white dotted paper left, and that gingham ribbon...how could I not do a black & white card with them?  I like mixing black & white with lime green - it's a color combo that seems to work in any season. 

I used one of the Tattered Angels chipboard stamp-edge frames from the kit, and covered it with Martha Stewart coarse clear glitter.  To match the edges of the frame (I like to have details/colors in duos on my cards wherever possible), I used a Fiskars stamp edge punch on the bottom edges.  The white label is a Spellbinders die, but any rectangular label shape will work well as long as it fits inside the chipboard frame. I ran the die through an embossing folder, then applied one of the "thankful for you" rub-ons included in the kit to the label. The paper leaves, mini white flower, and Maya Road pearl stick pin are from my stash.


And now you've seen all 10 cards I made up with this month's card kit. They'll be on display at the store if you live nearby and would like to see them in person.

There will be another card kit add-on in November, and after that, the card kit add-on will be taking a break until January.  So stay tuned for some winter holiday cards coming up in a few weeks!


Saturday, October 22, 2011

Green Tangerines October, Part 2

You're probably beginning to see that the main theme of the October card kit add-on is "thankful" - just in time for you to make up some fun cards celebrating the upcoming Thanksgiving holiday season.

This first card is a side-step card. I found a great tutorial for this technique here.  The finished size is A2 (4-1/4x5-1/2") so mailing is simple...but wouldn't it also make a fun and festive place card at your Thanksgiving table, with the menu on the left side (you could move the flower cluster to the upper right) and a personalized handwritten message to your guest inside?

For my card, I used a vintage image I found on the net, cropped into a circle, for the decoration on the right side.  The gold cotton lace and the gold adhesive pearls on the doily are from the last card kit, and I added a crocheted flower that I made, along with an inked Wilton doily cut in half, twine, and a couple leaves and flowers from my stash.  The gold and black button, gold bead spray, white loop ribbon, and Happy Thanksgiving sticker are from this month's kit, as are all the papers and cardstock.


This next card uses a technique I've used in months past on other kits - a cutout on the front with the embellishments on the inside showing through.  Here's a little hint to the easiest way I've found to do this: adhere all your patterned papers to the front of the card base first, then die cut or punch out the shape.  This way, all the papers are adhered to your punch-out piece perfectly matching the arrangement of the papers on the outside front, so when you adhere the cutout on the inside of the card, everything will align and match up easily.

The decorative bottom edge on this card was made using the Tim Holtz Ornate On-the-Edge die. I used both the gem circles in the kit on this card- the larger one on the outside of the cutout edge.  Then I punched another circle of off-white cardstock, adhered the turkey sticker in the kit to it, and used the second gem circle around this. I centered this second circle over the first cut-out and attached it to the inside of the card to show through when the card is closed. Everything else on this card is included in your kit, with the exception of the Hug Snug and narrow green ribbon used for the bows. (The sentiment sticker is also in your kit - I adhered it to a piece of cream cardstock then punched out the scalloped circle.)


This final card for today is made up in traditional autumn colors, and just a fun and playful way to say thanks. I added a trio of small white flowers and some dyed Hug Snug seam binding for bows, but all the rest of the materials for this card are in the kit, including the Technique Tuesday sentiment stamp (the same sentiment stamp as used in the "million and one thanks" card posted yesterday). 

The banner flags are cut from the banner patterned paper in the kit. I punched a couple tiny holes in each (I used a large push pin) and threaded a piece of crochet thread through them. The chipboard scalloped frame is dry-brushed with blue acrylic paint.  Again, I handcut the scalloped edge on the brown patterned paper by simply following the edge of the circles in the pattern - easy peasy! 


Tomorrow I'll be back with the last three cards I made up with this month's kit.  They're my attempt at a more "clean and simple" style.

Have a great Saturday!

Friday, October 21, 2011

Green Tangerines October Card Kit Add-on, Part 1

I'm going to split this into three posts this month, and by request, try to give you a little more detail about each card. This month's kit was a lot of fun for me to play with, and hopefully you have as much fun with it as I did!

This first card uses the cute vintage Halloween tag included in each kit -  I just love that little girl in the picture and was happy that the "luck of the draw" landed that tag in my kit! I added some hand-dyed Hug Snug seam binding from my stash, a button and some twine, and a black chipboard button that's been around too long for me to remember who made it- :)


On this thank you card, I dry brushed one of the chipboard frames in the kit with white pearl paint, and inked the edges dark brown. I added a silver bead and white pearl to a Maya Road leaf stick pin, and a small pearl flourish from my stash. I applied Liquid Pearls across the green ribbon...I wanted a more casual, "shabby" look here than more small adhesive pearls would give.  The fabric loops under the button are formed using the ribbon in the kit and just baste-stitching and pulling it into a circle. There's a little of the tulle on top of the button, too. I hand-cut around the circle pattern on the brown paper to form the "scalloped" edge, and used Fiskars' Upper Crest edge punch for the white and green bottom edges.


This card was fun, because, until I saw the patterned paper and how well the colors looked together there, I would never have thought to use these colors together!  The sentiment is one of the "thankful for you" rub-ons included in the kit - I just cut the words out from the center of the black print rub-on and applied it to a small die cut label. The pink decorative tag is cut using a Spellbinders die; the large plum print doily uses paper from the kit and Spellbinders' Picot Edge Circle die.  I added 1/2 of a Wilton doily inked with Distress Ink, pink and tan Hug Snug seam binding for the bows, and a small Crafty Secrets die cut flower (from their "Greetings & Sentiments" sheet) behind the bows.  The gold bead flourish is from the kit, as is the strip of white cotton lace up the side, and the pink button over the bows. (The two gold pearls were from last month's card kit.)


Lastly for tonight, this "Thanks so much" card uses one of the large chipboard flowers from the kit, along with some of the tulle, the white ruffled ribbon, and banners cut from a piece of patterned paper from the kit. The large fabric flower is made using a strip of fabric from my stash, and a Cosmo Cricket "Glubers" 2" adhesive circle.  The pearls, pearl stick pin and paper leaves are from my stash, also. The sentiment on this card is stamped with Papertrey Ink stamps.


I'll be back tomorrow with some festive Thanksgiving cards made with this month's add-on kit.  See you then!

Tuesday, October 18, 2011

It's Almost Here...

A little birdie told me it's just another day or so until the Green Tangerines October Add-On Card Kit is live. I really hope you have as much fun with this month's add-on kit as I did!  Once it goes live, I'll show you the 10 cards I made up with this kit...until then, here's a little taste of what's to come.


Patience, Grasshopper...I'll be back soon with full-on pics!


Friday, October 14, 2011

Christmas Minis - Part One

I've been working on quite a few cards lately, but a new part-time job means a new schedule. So although the cards were made, most of the photos weren't done until today when I could take advantage of the natural light in our kitchen eat-in area that's so perfect for project photos.  I'll miss that perfect lighting when the cloudy and rainy days of fall and winter arrive (at this point, we're starting to wonder if those days will be here before Thanksgiving...ha!). 

So here are the first two sets of the Christmas minis (3-1/2" x 5") that I've made up recently. And I can't wait to spend a good part of this weekend back in the Korner playing and creating!


Supplies:
Patterned Papers: Bo Bunny Father Christmas Collection (dotted),
MyMindsEye Signature Christmas/Festive (gold & red)
Spellbinders 2011 Heirloom Ornaments Die        Sentiment Stamps: Inkadinkadoo
Tinsel Glitter: Martha Stewart      Hug Snug Seam Binding      Gems: TPS Studio 
Acrulic Paint: Plaid Folk Art Winter White      Laces, Bells, Twine: Local craft store


Supplies:
Patterned Papers: Simple Stories 25 Days of Christmas Collection (first card),
K&Company Yuletide (holly), Authentique Wonder Collection (green gingham)
Date Ticket: Making Memories      Admit 2 Ticket: Lettering Delights
German Glass Glitter: Etsy      Edge Punch: Martha Stewart      Pearls: Recollections
Mini Pompom Trim, Lace: Etsy

Have a wonderful weekend!

Tuesday, October 4, 2011

Ho, Ho, Ho...

I hope you're having a great week so far - it's a busy one here!

As I mentioned the other day,  I did get a start on some Christmas cards last weekend. (If I'm going to send out handmade cards this year, I have a lot more work to do!  But it's a start, right?)  I'm still making some holiday embellishments and formulating ideas, so you'll see more Christmas cards popping up here on the blog for a while.  And even though I promise myself every year that all my cards will be ready to send by Thanksgiving, it never happens that way.  Now it's become more of a game to see how close to that self-imposed deadline I can get. LOL

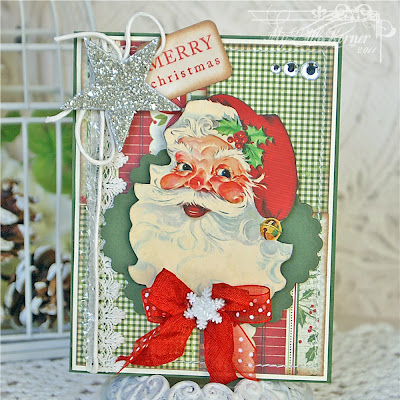
I had made the two red and green Santa cards last week, but put them aside for a bit, and then got 3 more made this past weekend. So here are the first 5 cards to roll out of the Korner for Christmas, 2011...


Supplies:
Patterned Papers: Authentique Wonder collection
Spellbinders Ornate Artisan Tags & Accents Die
Tinsel Glitter: Martha Stewart      Dotted Sheer Ribbon: Offray      German Glass Glitter: Etsy
Sentiment Stamp: Papertrey Ink      Lace: local craft store      Hug Snug Seam Binding


Supplies:
Patterned Paper: Graphic 45 Christmas Past Collection (sky), BasicGrey Eskimo Kisses/Rooftop (house,trees) 
Deer: Cricut Christmas Noel Cartridge      Tinsel Glitter: Martha Stewart
Copper German Glass Glitter: Etsy      Bell & Ribbon: local craft store      Glitter Glue: Ranger Stickles/Diamond


Supplies:
Patterned Papers: Simple Stories 25 Days of Christmas Collection
Vintage Image: Graphic 45      Hug Snug Seam Binding
Gems: Creative Imaginations      Bells: local craft store      Coarse & Tinsel Glitters: Martha Stewart


Supplies:
Patterned Papers: BoBunny Father Christmas Collection, Graphic 45 (red)
Rub-on: BoBunny Father Christmas      Frame: Tattered Angels      German Glass Glitter: Etsy
Gem: Creative Imaginations      Bells: local craft store      Tinsel Glitter: Martha Stewart      Hug Snug Seam Binding


Supplies:
Patterned Paper: Simple Stories 25 Days of Christmas collection
Vintage "Merry" Bingo Card: Lettering Delights
Spellbinders 2011 Snowflake Pendant die      Clear Coarse Glitter: Martha Stewart
Heart dies: Papertrey Ink      Hug Snug Seam binding

I'll have some photos of cards made using the Green Tangerines October card kit add-on to show soon, so stay tuned!

Monday, October 3, 2011

A Crafty Weekend...

I got a good start on a few holiday cards this weekend - appropriate, since Saturday was National Cardmaking Day.  I feel most creative at night for some reason, so I was able to put in a late night both Friday and Saturday and got 5 more holiday cards made.  That's a good number for me, since most of my cards average 1-1/2 to 2 hours each to make.  I create "on the fly" and let the embellishments and crafty experiments lead the way, so it doesn't make for quick completion of my projects, but a more fun and creative one. (and isn't that what having a hobby is all about?)

So here are the two Thanksgiving cards I made up this weekend...


Supplies:
Patterned Papers: Graphic 45 LeCirque Collection/Extravaganza &
MyMindsEye Breaking Free Collection/Wild Ride Hot Dots
Spellbinders Labels 23 & Grand Labels 23
Fabric Leaf: local craft store    Hug Snug Seam Binding   


Supplies:
Patterned Papers: Pink Paislee Queen Bee Collection      Maya Road heart stick pin
Pearls: Prima      Lace: local craft store      Hug Snug seam binding    

I'll be back in a day or so with more card pics from my weekend...have a great Monday!
Related Posts Plugin for WordPress, Blogger...