Thursday, January 30, 2014

No One Like You...

Hello, all. Remember the clean/purge/reorg project I told you about Monday? It's going along pretty well, with just a few hiccups....of my own making. :)  If you've ever seen the movie "Up" and remember the dog in the movie who gets distracted easily by a "squirrel!"....that's me while I'm reorganizing...haha.

I happened to come across a small baggie of leftover pieces from a previous project, and then a bag of die cut hearts, and while I had them all out on the table sorting which pieces to keep, I happened to notice a few pieces that would go together pretty nicely together on a new card. Sooooo...guess who stopped cleaning, cleared a spot to work, and put together a new card? Yep..."squirrel!" I haven't photographed it yet, but I hope to have it ready to show you next week.

I'm now waiting for some freshly spray-painted storage containers and racks to cure completely so I can reload them, and make more room on my work surface. It will be nice not to have to sort on the floor anymore!

In the meantime, here's another little number that I made up last week. Funny thing is that this card is also made with some pieces of background paper that I originally cut for another project, then changed my mind and went a different direction. When I went back and pulled them out again, I had a whole new idea for them. It's almost spring-like with its pale yellows and greens, so if you're one of those dealing with frigid temps and snow right now, I hope it helps you think of warmer days ahead...


I found this gathered muslin and pearl trim at the craft store a while back, hidden at the bottom of a clearance bin. I wish I could have found more than the two pieces I did find...it's just my style...


I could only find some cream lilies in my stash...but remembered that originally in that batch were some lilies with brown edge accents, so I recreated some with dark brown ink along the edges of the cream lilies...


I had fun with the lace trim and flower cluster. They started out straight and vertical side-by-side, but once I started playing with the line of the fabric/pearl trim, the arrangement of the flowers just seemed to happen naturally...


The sentiment tag is nestled among the flowers in the lower corner, backed with lightweight chipboard and popped up just a bit with foam tape...


Supplies:
Patterned papers:   Authentique Peaceful collection
Dies:   Spellbinders Fancy Framed Tags Two;   Sizzix Flowers Branches & Leaves
Sentiment stamp:   Hero Arts          Pearl/muslin trim, pearls:   Recollections          Lilies:   Wild Orchid Crafts


Back "into the fray" I go...I know I'll be glad when this cleanup is done again, but it sure is a mess while it's happening. LOL. I hope you all have a wonderful weekend!


Monday, January 27, 2014

Heartfelt Wishes...

Happy Monday, everyone! I'm starting off the week with a shabby layered and feminine birthday card to share with you. I'm in the midst of another "reorg" of my workroom...loosely translated, that means this room is a total mess! LOL I have a few more cards already made to share with you here in the next week or two, and that's my inspiration to get this reorg project finished before I run out of new projects...wish me luck!

Months ago my talented husband made and installed some 18" deep cabinets and shelves along two walls of my room, that make a big difference getting the clutter off the tops of my work surfaces and large storage cabinet (that he also built!). Supplies that I use often are just a reach away, organized in pretty baskets and boxes within the two sections that are open shelves...and those that can't be made to look pretty, or are dust and/or light sensitive, are behind doors in the two closed cabinets.

All that was left was to pull everything else below them out and redo the "lower" portion of the room, by changing the layout of the work surfaces and building more lower storage. Life and holidays got in the way, and that hasn't happened yet, and instead of becoming more organized, slowly but surely I have another group of clutter to purge and rework storage for. Funny how that happens. :)

I purchased some spray paint to recolor some of my desktop storage, and you can guess what that means. Yep, for a couple days all those bottles of acrylic paint from the paint carousels, and tiny plastic drawers with doo-dads in them, and contents of the metal buckets, will be scattered all over the room while the storage containers dry. That's when I decided it's time to get serious and reorganize things again. Since there's no more room in the closet, and no more room in the new upper cabinets, a big purge-and-donate project is about to begin!

In the meantime, here's a cute little birthday card to liven up this little Korner of the Web...


I used a piece of lace to resemble a "trellis" up the side of the card, and then added bunches of coral roses. The large label across the front was die cut from medium chipboard, then painted with both Viva Precious Metal Effects paint and a lighter Lumiere Pearl paint, then white craft paint was dry-brushed around the edges...


A Tim Holtz memo pin was shabbied with acrylic paint, and pearls and sparkly spacers were added before the sentiment tag was slipped in...


Supplies:
Patterned papers:   Graphic 45 Couture collection
Dies:   Tim Holtz Styled Labels;   My Favorite Things Royal Leaves
Punch:   Martha Stewart Medium Branch           Sentiment stamp:   Hero Arts
Flowers:   Wild Orchid Crafts           Pearls:   Recollections          Lace:   local craft store
Miscellaneous:   Tim Holtz memo pin, white hemp cording, Viva Precious Metal Effects paint (turquoise);
Lumiere Pearl paint (turquoise), cream acrylic craft paint


And lastly, a very fun little P.S. for you from Lili of the Valley


Lili of the Valley is running a great promo deal until noon on Friday, January 31 (that's British time), or while supplies last. When you purchase any two (2) A5 stamp sets, you'll get this great Love Sentiments stamp set *free!* There's still time to use this adorable set for Valentine's Day this year (and I have plans to use it soon for an anniversary card).


Thanks for visiting today...I hope your week is starting with a smile!


Thursday, January 23, 2014

LOTV-Knowing You Are My Friend...

Good morning, all! As I slowly but surely work my way back to a "regular" posting schedule, today I have another Lili of the Valley card that shows off one of the sentiments from Set 62 Quotables/Friendship.

While so many of my friends and family are dealing with the effects of an extremely cold and snowy winter, we're having unseasonably warm and dry weather around here...we're about to set a record for the number of days without winter rain. So I let the weather put me in a springtime mood when I was choosing colors and embellishments for this card. I've combined papers from LOTV's Always and Forever paper pad (pinks) and Antebellum paper pad (green with pink floral).

And if you look closely when you enlarge the photo, you'll see that I did, indeed, stamp the sentiment twice...once with black ink, and a second time with pink. I always hold my breath a little when I decide to try this. Even though clear stamps make this so much easier than rubber, when your eyes aren't perfect (as mine aren't), and your hand is just a tad too unsteady (yep...apparently I had a little too much coffee the other day), double stamping to get the effect you really want can be a roll of the dice. Lucky for me, this time the roll went my way! :)


Pink, pink, and more pink roses are accented with just a few white sweetheart blossoms in the floral cluster that wraps around the upper corner of the card...


Once again, the largest rose in the center of the cluster is made with Spellbinders Rose Creations dies. I did have to add pale pink craft paint to the rose after it was made so it would blend more closely with the colors of the card...it's so nice to have that flexibility!


Rather than run one long piece of lace across the front, I ran one across the pink layer, and a second across the sentiment block layer above it and placed the pieces to they matched horizontally...


Supplies:
Patterned papers:   Lili of the Valley Always and Forever collection, Antebellum collection
Sentiment stamp:   Lili of the Valley Set 62 Quotables-Friendship
Dies:   Spellbinders Timeless Rectangles, and Rose Creations;   My Favorite Things Royal Leaves;
Sizzix Flowers Branches & Leaves
Lace:   TheFunkieJunkie.com          Small Flowers:   Wild Orchid Crafts          Pearls:   Recollections
Miscellaneous:   hemp cording


Thanks so much for stopping by for a visit today!


Monday, January 20, 2014

Take Two...

Happy Monday, everyone! As  some of you may also do, sometimes I make cards for specific occasions, then end up using a different card when the occasion rolls around. That's what happened with today's card. I originally made it as a sympathy card for a challenge last year at The Shabby Tea Room and posted all the details on my blog here.

When I didn't send it off, I put it in my basket of ready-made cards. Then a day rolled around when I was making up a shabby flower for another card, and ended up pulling the one from this card to use. So now I had a partially-deconstructed card sitting in my basket looking for a better day. :)

I finally pulled the card out and decided it was time for a little make-over and update...and here's how it looks now...


I removed the panel of black and cream numbers that was originally along the bottom to lighten up the overall appearance of the card. Where originally there was a stamped sentiment in the upper left corner, I put a Martha Stewart paper doily (inked with Spun Sugar Distress Ink) and placed it so it covered the sentiment and was framed by the larger doily already beneath it. On top of the smaller doily, there's now a small metal clock face that's shabbied up with a coating of dry-brushed acrylic paint...


In place of the large fabric flower on top of the tea-stained lace, there's now a trio of paper roses and leaves and a cording bow...


The last addition is a beaded pearl stick pin in place of the trio of larger pearls that was originally in the upper right corner...


Supplies:
Patterned papers:   Bo Bunny Chiffon Dot;   Authentique Gathering collection;   Pink Paislee Butterfly Garden collection
Edge punch:   Martha Stewart Daisy Edge
Dies:   My Favorite Things Royal Leaves and Decorative Doily Duo;   Memory Box Elegant Scrollwork
Pearls:   SuhaFuha on Etsy, and Recollections          Metal clock face:   Prima
Flowers:   LayoutsFromTheHeart on Etsy          Sentiment stamp:   Papertrey Ink
Miscellaneous:   Martha Stewart paper doily,  cotton laces,  embellished pearl stick pin


Lastly, Lili of the Valley is having a 48-hour sale...and I mean SALE! Check out the details on the great deals here. It runs until noon (UK time), Wednesday, January 22. (Noon UK time is 4 AM PST Wednesday, 5 AM MST, 6 AM CST, and 7 AM EST in continental U.S.) 

Thanks so much for visiting today...I hope your week is starting with a smile!


Friday, January 17, 2014

Lots of Love...

Happy Friday! I'm back to end the week with a pink and grey card that, as I went along with the making of it, realized it might make an appropriate Valentine for a mom, or daughter, or sister, or aunt...hmmmm.

It's definitely *full* of embellishments, but it was made for fun, so I just let my long-lost "mojo" take me along for the ride...


A couple small tags were large enough for the start of the sentiment, and they're nestled in among the flower and stamen clusters...


"Love" is diecut from two different shades of pink cardstock, offset before glued together to give a shadowed effect. I adhered the little pearls to the heart-shaped "o" before sprinkling clear glitter over the other letters...


The little heart shaped center of the "o" in the "love" diecut was colored to deep red with a Marvy pen, a little pearl added to the center, and more clear glitter applied, before nestling it at the top of the leafy stem...


Supplies:
Patterned papers:  Echo Park Be Mine collection (grey solid);   My Minds Eye Bramble Rose collection (grey damask)
Dies:   Sizzix Flowers Branches & Leaves;   Papertrey Ink Wonderful Words Love;   Papertrey Ink Tiny Tags
Sentiment stamp:   Papertrey Ink Wonderful Words Love
Flowers:   LayoutsFromTheHeart on Etsy (grey roses);   Wild Orchid Crafts  (sweetheart blossoms, red roses, 
white stamen cluster)
Pearls:   Recollections        Hug Snug seam binding          Miscellaneous:   Wilton doily, cheesecloth, clear coarse glitter


Thanks so much for visiting today...have a wonderful weekend!


Tuesday, January 14, 2014

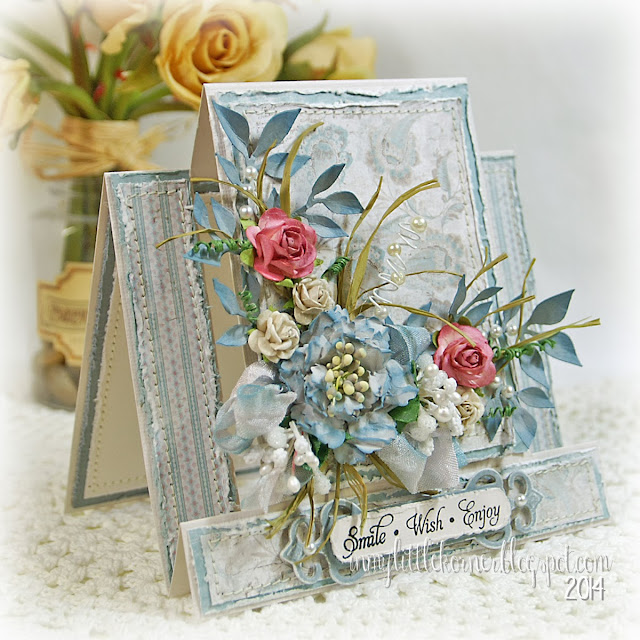
Smile Wish Enjoy...

Hello, all! I'd like to say a big "THANK YOU" to you who took the time to comment on my last LOTV blog hop post, and "CONGRATLATIONS" to Keeley and Laila  who won the drawings for a set of all the newest stamps! And because we all had so many wonderful comments on our blog posts, Anne added one more third prize of a choice of one of the newest stamps, and the winner of that third price was Saxon and Jaedyn. I know you'll enjoy your prizes, ladies!

I was able to make some time to craft this past weekend, so I made up a center step card for my mom's upcoming birthday (she doesn't follow blogs online so I'm safe to post it....heehee). I had made several of these center step bases before Christmas, thinking I'd use them for holiday cards, but that didn't happen. So you may see this style pop up now and again in the near future, since I still have a few pre-made bases left. :)  (If you've never made this style card before and wish to, there's an easy-to-follow tutorial by Frances Byrne on Splitcoast Stampers here. )


Here's a side view, and a peek at the inside. (I haven't added the verse yet, as you can see.) The card measures a total of 5-1/2" square and will fit easily into a 6"x 6" envelope to mail, but I'll be hand-delivering it in this case...


The sentiment die cut along the bottom piece is attached with foam tape. I diecut the tag first in light teal, then again in pale grey, and simply handcut the grey center portion away from the rest of the tag before stamping the sentiment and attaching it with foam tape to the larger tag background...


The floral cluster was so fun to make on this card! I found a small basket of raffia that I had put away in the closet the last time I cleaned my work room. It's sad to say, but when I organize, clean, and put things away nicely, I tend to forget I have them! So when I ran across this bag of raffia, I pulled out the green and used it on this card to give the cluster an element of what I like to call "whimsy"...


Beneath the corner of the cluster, I placed a couple bows of seam binding that had been spritzed with a mix of water and Weathered Wood Distress Ink. The largest flower in the cluster was made using the two smallest dies in Spellbinders' Grand Peony Creations die set. I shabbied the edges first with a spritz of water and some pinching, then when dry, formed the petals with a round embossing tip, and assembled the flower. But it was made with pale grey cardstock, and looked a little too "matchy-matchy" with the background for my taste. So I inked the edges with a dark teal chalk ink, and since I had pinched the outside of the petals and formed creases, it gave the inking a fun effect. All it needed then was a cluster of stamens in the center...


I purchased these white pearl and berry cluster stamen clusters from Wild Orchid Crafts (I think I need to order more, since I can see these being used a lot in the coming months)...

Supplies:
Patterned papers:   Maja Designs, Vintage Summer Basics (can be found at TheFunkieJunkie.com )
Dies:   Spellbinders Grand Peony Creations and Fancy Tags;   Sizzix Flowers Branches & Leaves
Flowers & stamens:   LayoutsFromTheHeart on Etsy (dark mauve roses);   Wild Orchid Crafts (dove grey roses and white bead/stamen clusters);   ChocolateLetters on Etsy (yellow/grey stamen clusters)
Sentiments:   Papertrey Ink Tiny Tags stamp set          Hug Snug seam binding          Raffia


Thanks so much for stopping by...I hope your week started with a smile!


Thursday, January 9, 2014

LOTV-Hopping into 2014...

Happy 2014, everyone, and thanks for stopping by! There's a whole new set of 10 adorable Lili of the Valley stamps in the first launch of 2014, so we're celebrating with another blog hop and a chance for two lucky people to win the new sets. The newest sets feature the very popular James the Bear, and some more of the newest characters, Jack, Patch, and Puss.

Again, there are 2 full sets of the new stamps to give away...2 lucky winners will each receive all 10 new designs!

The new stamps will be available for purchase from the website starting midday (UK time) on Monday, January 13. (If you're near the Leeds shop, it will be open this Saturday, January 11, from 10-4, and you'll be able to purchase the newest sets at the shop.)

If you've hopped with us before, you know how this goes. Just "hop" from one blog to the next, following the list below. Be sure to leave a comment on each card for the best chance to win the new stamp sets. The prizes are "hidden"...the winners will be drawn at random from the comments left on the participating blogs, and even we don't know whose lucky blog commenters will be chosen for the drawing.

Be sure to stop by the Ideas to Inspire blog on Monday morning to see which were the "lucky" blogs and to see if you're one of the winners!

Here's a full list of the blogs taking part in the hop. Remember, to have the best chance at winning a complete new set of the newest release, leave a comment on each blog:

Kathy (you're here!)


And now you're ready for me to move on to the pictures, hmmm? :)  I focus mainly on using the LOTV papers and sentiments stamps, so this time, I chose some of the green papers from LOTV's Beach Bliss paper pad, and a couple different sentiment stamp sets. On the diecut tag is a sentiment from Set 10, A5 Verses, and across the bottom, a sentiment from Set 25, Handwritten Phrases...


The paper doily was white to start...I shaded it down using Pumice Stone Distress Ink, and used the same color around the edges of the die cut tag. I wanted this card to have a neutral background so the coral-pink flowers would serve as the contrasting interest. 

There's lots of layering and foam tape on this card...you know how I love my foam tape...heehee. It's such a simple way to add dimension, and with all the embellishments I like to use, it often makes little "wells" that I can nestle things down inside to keep the cards from becoming so thick they're unmailable...


The lace was white at the start, too. A little bit of Tattered Rose and Victorian Velvet Distress Inks applied with a water brush, along with some random dabs of a paper towel, made it easy to make a "dyed-to-match" lace trim.


The largest of the roses was made with Spellbinders' Rose Creations dies...it's surrounded with smaller ready-made flowers...


Supplies:
Patterned papers:    Lili of the Valley Beach Bliss paper pad
Sentiment Stamps:   LOTV Set 10, A5 Verses;   Set 25, Handwritten Phrases
Dies:   Spellbinders Fancy Framed Tags Two, and Rose Creations;   Sizzix Flowers Branches & Leaves
Lace:   TheFunkieJunkie.com          Pearls:   Recollections
Flowers:   LayoutsFromTheHeart on Etsy (taupe roses);   Wild Orchid Crafts (pink roses)


Your next stop on the hop is Kim's blog. But if you get lost, you can always go back to the complete list above, or back to the beginning at the Ideas to Inspire blog...and don't forget to check the I2I blog on Monday to see if you're one of the lucky winners!

Lastly, I'd like to take a moment to remind you of  LOTV's monthly challenge  (there's always a "hot" link to it over on my sidebar to the right, too).  January's challenge is "Anything Goes," so it's a fun one, and there's still plenty of time left to enter for this month.

Thanks so much for stopping by for a visit. I'll be back on a regular basis soon...in the meantime, good luck on the hop!!


Related Posts Plugin for WordPress, Blogger...