Showing posts with label Wild Orchid Crafts. Show all posts

Monday, September 14, 2015

Mixed Media - DREAM canvas...

Happy Monday, everyone! Today's share for Mixed Media Monday is an 8x8 canvas that I made just for fun. I played with a few of my newest colors of Golden heavy body acrylic paints for the background, then layered some stenciling, and finally lots of findings with a twist...


Instead of layering all the findings and fun pieces flat across the center of the canvas, I turned two 3x3 mini canvases upside down, adhered them to the center of the 8x8, and layered the pieces inside and out of the mini canvases...it adds lots of fun dimension...


Here are a few stepouts showing how it came about. The first step was to gesso the backs of the mini canvases with black gesso, and pencil in their final position on the larger canvas. Then I randomly added some of my favorite acrylics for the background, and splattered with white gesso...


Then I added some molding paste through a stencil...only in two corners, since the other two would most likely be covered with embellishments...


Then it was time for fun. The first step was to glue the two mini canvases to the larger one - I used fabric glue for that, since it was canvas-to-canvas. Once it was good and dry, I started adding...and adding...and adding...chipboard die cuts, wood cut shapes, lots of layers of metal findings...the works!

I coated most of the pieces with black gesso before I glued them to the canvas, so I'd only have to do light touchups after they were all secured. I didn't want to risk having some of the black gesso cover areas of the background where I wanted color to show. Once I photographed that step, I thought the middle looked like a big black blob (and who wants to look at that? - haha). So I painted some of the pieces with one of the colors I planned to use, and added the seed beads for contrast, so you can see a bit more where it's going...


Once I had the embellishments secured, and painted that first small area, I thought the stenciled background areas looked a bit too bright. I was using Inka Gold metallic paints on the embellishments throughout the center, and I wanted that area to be the brightest part of the canvas. So I got out a black Stabilo pencil and shaded the stenciled areas to tone them down just a little, and add more dimension to the unembellished corners...


Here are some more detail shots. Once I had glued all the embellishments down, I touched up some of the areas with more black gesso, then started applying several different colors of Inka Gold metallic paints.

I love how some of my very-old metallic-colored buttons are so perfect for this type of project. Many years ago, you could find bags of these silver and gold buttons in the craft stores. There would be mixes of wonderful shapes - butterflies, hearts, stars, keys, zipper pulls - all sorts of goodies all in one bag, for about $5. Years later, I'm finally starting to get to the end of the supply from these button bags, and sad that they're not available anymore. You can see in this first pic one of the butterfly buttons, and on the left, the rope-edged pull-type button beneath the wooden scroll...


paper and metal flowers, hearts, buttons, findings...lots of goodies brushed with metallic colors...


This pretty round medallion was in my stash, so I topped it with a silver button, then put a Finnabair finding right in the center of the beautifully-edged button...


The "dream" key in this next photo was the inspiration for the title of the canvas and the small phrase stickers that were added around the finished canvas...


Supplies:
Color Mediums:   Golden heavy body acrylic paints:  Teal, Primary Yellow, Ultramarine Violet, Quin Nickel Azo Gold, Quin Magenta
Viva Decor Inka Gold metallic paints:   Aquamarine, Green Yellow, Steel Blue, Orange, Magenta, Violet
Stencil:   Prima "Circular Lattice"             Stamp:   Prima/Finnabair "Messy"
Dies:   Sizzix "Flowers Branches & Leaves             
Word stickers, pen nib, arrow:   Tim Holtz Idea-ology            
Metal flowers, large metal butterfly, "dream" key, floral medallions:   TheFunkieJunkie.com
Paper flowers:   Wild Orchid Crafts             Small metal findings:   Prima/Finnabair
Wood scrolls, buttons, hearts, stars, butterflies, seed beads:   local craft stores
Miscellaneous mixed media supplies:   Stabilo All pencil (black),  drywall tape,  black & white gessos,  Golden molding paste 


Thanks so much for visiting today...I hope your week is starting with a smile!


Thursday, August 27, 2015

Pretty in Pinks...

Hi again, everyone! Today's share is a shabby sweet card in one of my favorite "soft color" combos-rose pink and taupe...


Beautiful patterned papers from Maja Design's Vintage Summer Basics collection are still some of my favorites, so much so that I save all the smaller leftover pieces from other projects because I know I'll eventually use them on cards, such as this one! 

In the center of the florals, there are three cherry blossom flowers made with LaLa Land Crafts' die...they're surrounded with premade mulberry paper lilies and sweetheart blossoms from Wild Orchid Crafts. Those bunches of beautiful dark stamens peeking out from top and bottom of the cluster are from my go-to source for stamens, ChocolateLetters on Etsy...


The lace is a piece of cream lace dyed with Distress Inks to blend with the dusty pinks in the rest of the embellishments ("Spun Sugar" mixed with a bit of "Victorian Velvet" and just the littlest bit of "Picked Raspberry")...


The little die cut palm fronds branches are made using My Favorite Things' Wild Greenery die...it's another of my newest favorites...


Supplies:
Patterned papers:   Maja Design "Vintage Summer Basics" collection
Dies:   LaLa Land Crafts "Cherry Blossom Flowers";   My Favorite Things "Wild Greenery"
Mulberry paper flowers:   Wild Orchid Crafts             Stamens:   ChocolateLetters on Etsy
Pearls:   Recollections             Liquid paints:   Lindy's Stamp Gang "Bodacious Blush" & "Toto's Tornado Black"
Miscellaneous:   cheesecloth,   twine


Thanks so much for visiting today...have a wonderful weekend!


Monday, July 27, 2015

Flowery Mixed Media All Occasion Card...

Happy Monday, everyone! Today's share for Mixed Media Monday is a summery all-occasion card.

I did take step-out photos as I went along this time, but then I pulled a total Homer-Simpson-DOH! move and reformatted the card in my camera before I double-checked to be sure I had transferred the photos to my computer. (It was a busy and stressful week around here last week with a very ill family pet, so I prefer to think that was the reason for my distraction....more than likely it was simply lack of good sleep...LOL)

So if you see items on the supply list and wonder "where are they?" they're most likely on the base of the multi-layered background, and now slightly covered with the flowers and embellishments...


I started by coloring a piece of mixed media paper with Lindy's Stamp Gang sprays, then adding some die cut lattice shapes in two corners, and molding paste through a stencil across most of the front. 

In the lower left corner, I die cut a couple pieces of paper doily, colored them with the same sprays, and layered one on top of the other, with foam tape and a piece of lace between the two. Then both upper right and lower left corners got more stenciled molding paste for texture.

Here are a few closeups around the page...in this photo, you can barely see the edges of the two die cut doilies with the lace between them...


The two fuchsia-colored flowers were made using Spellbinders Rose Creations dies, but forming them into generic flower shapes instead of roses...


One day while we were out shopping together at a fabric store, my friend was searching through the remnant bin for animal prints, and found a beautiful piece of wide, sheer lace...she told me it was destined to go home with me...LOL...so it did...and a piece of it was a perfect subtle addition to the lower right corner of this card...


Lately I find I love to add little details up in the corners of my cards...and this one was no exception...


Supplies:
Color mediums:   Lindy's Stamp gang sprays - Screamin' Banshee Black,  Pink Ladies Pink,  Tilt a Wheel Teal
Stencils:   Prima "Flourish";   The Crafters Workshop "Mini Circle Explosion"
Dies:   Cottage Cutz "Tea Time Doily";   My Favorite Things "Wild Greenery";   Spellbinders "Rose Creations" and "Grateful Lattice"
Lace:   TheFunkieJunkie.com and local fabric store             Small roses:   Wild Orchid Crafts
Stamens:   ChocolateLetters on Etsy            Pearls:   Recollections
Miscellaneous:   Golden molding paste,  cheesecloth


Thank you for visiting today...I hope your week is starting with a smile!

Tuesday, July 14, 2015

Mixed Media Shabby Chic Meets LSG Color Challenge...

Hello again, friends! Blog-worthy projects are happening less than usual lately while I play with a few new (to me) mediums and practice some new (to me) techniques, but now and then I like to take time out to go back to what I know and create something from start to finish.

I love combining a bit of the shabby-chic style with mixed media, and this month, Lindy's Stamp Gang has a beautiful palette of colors in their monthly color challenge. So out came my sprays and the fun started. Here's the finished result...


And here's the color board the card is based on. The fun part is that this color palette lends itself to soft pastel colors, as well as bright sassy colors. I chose a little of both - a little softer with the background, and a little sassier with the flower colors. :)


I created the background paper by spraying 4 colors of Lindy's sprays onto a piece of mixed media paper. For this background, I used Bonjour Butter Flat FabioAloha Avocado Flat FabioQueen of Hearts Red Flat Fabio, and Blue Hawaiian Blue Starburst sprays. 

I started randomly spritzing a little of each of the colors around the page, using a small mask to cover part of the page. Then I removed the mask, and filled in the white space left with more of the same colors, but this time, dropping the color in using the wand portion of the sprayer, and spritzing with water to spread them out. Here and there I dabbed excess color off the page with a paper towel, so you can still see some of the original lines from the stencils in parts of the background.

When that was dry, I applied some molding paste through a stencil for some subtle texture...


I added a large floral cluster over some twine and lace strips run vertically down the left side of the front.  I began with the pale yellow flowers, then added the medium blue roses, and finally the bright red lilies - a little potpourri of color intensities ...


The large yellow rose in the center is made using Spellbinders' Rose Creations dies-it was a little too bright, so I toned it down with cream colored craft paint to blend with the soft yellow of the lilies...


Supplies:
Color Mediums:   Lindy's Stamp Gang sprays
Stencil:   Prima "flourish"          Dies:   My Favorite Things "Wild Greenery";   Spellbinders "Rose Creations"
Lace:   Tim Holtz idea-ology            Small flowers:   Wild Orchid Crafts
Stamens:   ChocolateLetters on Etsy            Pearls:   Recollections
Miscellaneous:   twine,  Golden molding paste


Thanks so much for visiting today...I hope your week started with a smile!

Tuesday, June 30, 2015

Bright and Sunny Shabby...

It's been sunny and hot-hot-hot here lately, so I guess that's what put me in the mood for a bright shabby chic card...and that's what I ended up making to share with you today. :)


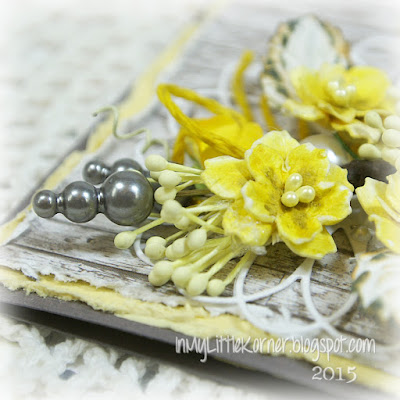
I made this flower stem a while back, using Prima leaves, a couple stamen clusters, die cut flowers using the LLLC Cherry Blossom Flowers die, and some bright yellow premade sweetheart blossoms to fill in the small spaces. Against the taupe woodgrain paper, it was a nice contrast, so it became the center of attention for this card.

A couple Maya Road grey pearl stick pins were the perfect addition to the top of the stem...


and white pearls were added after the stem was glued down to give a little luster to the niches between the flowers...


The loopy white diecut doily made a fun base for the stem, and twine dyed with Distress Ink added some colorful loopy accents to go along with the diecut...


Supplies:
Patterned paper:  Maja Design "Vintage Summer Basics" collection
Dies:   Memory Box "Whimsy Circle";   LaLa Land Crafts "Cherry Blossom Flowers"
Punch:   Martha Stewart "Vintage Doily PATP"
Stamens:   ChocolateLetters on Etsy            Sweetheart blossoms:   Wild Orchid Crafts
Leaves:   Prima            Ribbon:   local craft store             Pearls:   Recollections
Pearl stick pins:   Maya Road             Miscellaneous:   twine, cheesecloth, "Mustard Seed" Distress Ink


Thanks so much for visiting today...I hope your week started with a smile!

Monday, June 22, 2015

Mixed Media Canvas - Where There is Love...

Happy summer Monday...it's now official...there's a reason for the hot, and very dry, weather we're having! LOL

Today I have another photo-heavy Mixed Media Monday share for you...an 8x10 canvas board with a fun and *very* colorful background...


Do you remember this photo from a while back?


This is a pic of some of my "smoosh" papers - pieces of mixed media and watercolor paper colored by "smooshing" them into the leftover paints from previous projects and/or my handmade color charts of Lindy's Stamp Gang sprays and Magicals. (On Thursday, I'll be back to show you a card made with the bronze/gold/grey piece in the front...but today's piece features a bit of three of the papers in this stack, along with a few others not pictured here.)  

I wanted to make a brightly colored background for a canvas, and that's when I remembered my smoosh papers...and realized I already had the background in my basket all along! So I pulled out an 8x10 canvas board as a base, and started laying out and rearranging and re-sizing pieces. I stamped the final-choice pieces with a few fun mixed media stamps using grey Archival Ink to add some muted background images, then began gluing the pieces to the canvas with matte medium. I wound up with a starting canvas looking like this...


Then I took some smaller pieces, punched and played with the edges and ends, added stitching to a few, and glued them down with matte medium on top of the base pieces to add texture and more color variety ...


The next step was to pull out a couple coordinating stencils and add crackle texture paste...


Next up, splatter some white acrylic ink over the background, just for fun. Then I added some more LSG Magicals to color and shadow the crackle paste areas once they were completely dry.

Before adding embellishments, I needed to add an "anchor" for the large floral cluster and little pieces that would fill the center of the canvas.  I die cut two of the "Sketchy Rings" dies and glued them together in the center to form one long piece of distressed circles. 

The clear frame in the center is a Making Memories frame that's been in my stash forever...I knew I'd find the perfect use for it one day! 

And finally, black Archival Ink was brushed around the outside edges. I think the dark contrasting edges keep the eye from drifting off the edges of the canvas, and bring it back to all the fun embellishments and sentiments that will be in the center...


And now on to some closeups of the finished piece. There were quite a few "happy accidents" as I was pulling embellishments for the canvas, and I love how so many long-stashed pieces, in addition to the clear acrylic frame in the center, finally found the perfect use.

The "love" key was a recent purchase, but it was gold and didn't have enough contrast with the background, so I covered it first with black gesso, then accented with a couple different colors of Lumiere paints - and now it's perfect...


And then I found this in my metal charms drawer, and how perfect a fit is it? It's an old Making Memories plaque with the perfect quote to go with the "love" key. I accented the lettering with pink acrylic craft paint, then added more Lumiere paint around the edges, popped some foam adhesive on the back, and nestled it into the sides of the flowers...


There's still a bit of the black diecut circles peeking through at the top...I didn't cover them completely...LOL. ..


The metal butterfly was originally a dark bronze color. I had added Alcohol Inks in magenta and copper to it for another project, but didn't use it then. I pulled it out again for this canvas, dry-brushed black gesso around the outer edge for contrast, then added some Lumiere paints to the inside to bring all the colors of the canvas onto the butterfly...


I discovered that one of the Tim Holtz Idea-ology clock faces fit inside one of the diecut circles perfectly...the color was just not right. Dry brushing a little more black gesso and Lumiere paints took care of that, and a couple small black watch hands in another tiny stash drawer add the perfect finishing touches. 

Below that, another happy find...a long-held Making Memories word charm, this time the word "life," the second half of the quote in the larger sentiment charm...perfect! :)


Supplies:
Color mediums:  Lindy's Stamp Gang assorted Sprays and Magicals;  Lumiere paints "Halo Blue Gold" and "Halo Violet Gold"
Stamps:   Unity Stamp Co. "graffiti art";   LOTV "Set 66-Grunge Elements"
Stencils:   The Crafters Workshop "Mini Chicken Wire" and "Mini Chicken Wire Reversed"
Art Mediums:   Studio 490 Crackle Texture Paste;  Art Basics Heavy Black Gesso;  Liquitex Ink!-Titanium White
Dies:   Memory Box "Sketchy Rings"             "Love" key,  metal butterfly,  lace:   TheFunkieJunkie.com
Metal clock face:   Tim Holtz             Fleur de lis charm:   Prima             Chipboard chain:   Dusty Attic "mini chains"
Clear acrylic dotted frame,  metal word charms:   Making Memories             Pearls:   Recollections
Flowers:   Prima,  Wild Orchid Crafts,   local craft store            Pink stamen clusters:   ChocolateLetters on Etsy
Miscellaneous:   watch hands,   acrylic craft paint


Thanks so much for visiting today - I hope your week is starting with a smile!

Related Posts Plugin for WordPress, Blogger...