Showing posts with label shabby chic. Show all posts

Thursday, August 27, 2015

Pretty in Pinks...

Hi again, everyone! Today's share is a shabby sweet card in one of my favorite "soft color" combos-rose pink and taupe...


Beautiful patterned papers from Maja Design's Vintage Summer Basics collection are still some of my favorites, so much so that I save all the smaller leftover pieces from other projects because I know I'll eventually use them on cards, such as this one! 

In the center of the florals, there are three cherry blossom flowers made with LaLa Land Crafts' die...they're surrounded with premade mulberry paper lilies and sweetheart blossoms from Wild Orchid Crafts. Those bunches of beautiful dark stamens peeking out from top and bottom of the cluster are from my go-to source for stamens, ChocolateLetters on Etsy...


The lace is a piece of cream lace dyed with Distress Inks to blend with the dusty pinks in the rest of the embellishments ("Spun Sugar" mixed with a bit of "Victorian Velvet" and just the littlest bit of "Picked Raspberry")...


The little die cut palm fronds branches are made using My Favorite Things' Wild Greenery die...it's another of my newest favorites...


Supplies:
Patterned papers:   Maja Design "Vintage Summer Basics" collection
Dies:   LaLa Land Crafts "Cherry Blossom Flowers";   My Favorite Things "Wild Greenery"
Mulberry paper flowers:   Wild Orchid Crafts             Stamens:   ChocolateLetters on Etsy
Pearls:   Recollections             Liquid paints:   Lindy's Stamp Gang "Bodacious Blush" & "Toto's Tornado Black"
Miscellaneous:   cheesecloth,   twine


Thanks so much for visiting today...have a wonderful weekend!


Tuesday, July 14, 2015

Mixed Media Shabby Chic Meets LSG Color Challenge...

Hello again, friends! Blog-worthy projects are happening less than usual lately while I play with a few new (to me) mediums and practice some new (to me) techniques, but now and then I like to take time out to go back to what I know and create something from start to finish.

I love combining a bit of the shabby-chic style with mixed media, and this month, Lindy's Stamp Gang has a beautiful palette of colors in their monthly color challenge. So out came my sprays and the fun started. Here's the finished result...


And here's the color board the card is based on. The fun part is that this color palette lends itself to soft pastel colors, as well as bright sassy colors. I chose a little of both - a little softer with the background, and a little sassier with the flower colors. :)


I created the background paper by spraying 4 colors of Lindy's sprays onto a piece of mixed media paper. For this background, I used Bonjour Butter Flat FabioAloha Avocado Flat FabioQueen of Hearts Red Flat Fabio, and Blue Hawaiian Blue Starburst sprays. 

I started randomly spritzing a little of each of the colors around the page, using a small mask to cover part of the page. Then I removed the mask, and filled in the white space left with more of the same colors, but this time, dropping the color in using the wand portion of the sprayer, and spritzing with water to spread them out. Here and there I dabbed excess color off the page with a paper towel, so you can still see some of the original lines from the stencils in parts of the background.

When that was dry, I applied some molding paste through a stencil for some subtle texture...


I added a large floral cluster over some twine and lace strips run vertically down the left side of the front.  I began with the pale yellow flowers, then added the medium blue roses, and finally the bright red lilies - a little potpourri of color intensities ...


The large yellow rose in the center is made using Spellbinders' Rose Creations dies-it was a little too bright, so I toned it down with cream colored craft paint to blend with the soft yellow of the lilies...


Supplies:
Color Mediums:   Lindy's Stamp Gang sprays
Stencil:   Prima "flourish"          Dies:   My Favorite Things "Wild Greenery";   Spellbinders "Rose Creations"
Lace:   Tim Holtz idea-ology            Small flowers:   Wild Orchid Crafts
Stamens:   ChocolateLetters on Etsy            Pearls:   Recollections
Miscellaneous:   twine,  Golden molding paste


Thanks so much for visiting today...I hope your week started with a smile!

Tuesday, June 30, 2015

Bright and Sunny Shabby...

It's been sunny and hot-hot-hot here lately, so I guess that's what put me in the mood for a bright shabby chic card...and that's what I ended up making to share with you today. :)


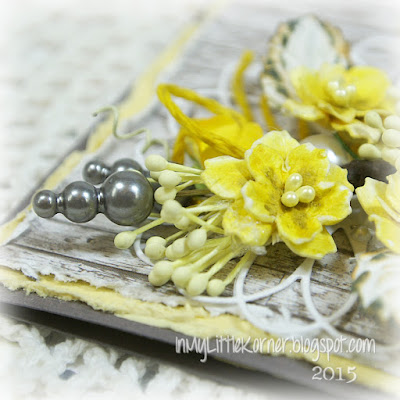
I made this flower stem a while back, using Prima leaves, a couple stamen clusters, die cut flowers using the LLLC Cherry Blossom Flowers die, and some bright yellow premade sweetheart blossoms to fill in the small spaces. Against the taupe woodgrain paper, it was a nice contrast, so it became the center of attention for this card.

A couple Maya Road grey pearl stick pins were the perfect addition to the top of the stem...


and white pearls were added after the stem was glued down to give a little luster to the niches between the flowers...


The loopy white diecut doily made a fun base for the stem, and twine dyed with Distress Ink added some colorful loopy accents to go along with the diecut...


Supplies:
Patterned paper:  Maja Design "Vintage Summer Basics" collection
Dies:   Memory Box "Whimsy Circle";   LaLa Land Crafts "Cherry Blossom Flowers"
Punch:   Martha Stewart "Vintage Doily PATP"
Stamens:   ChocolateLetters on Etsy            Sweetheart blossoms:   Wild Orchid Crafts
Leaves:   Prima            Ribbon:   local craft store             Pearls:   Recollections
Pearl stick pins:   Maya Road             Miscellaneous:   twine, cheesecloth, "Mustard Seed" Distress Ink


Thanks so much for visiting today...I hope your week started with a smile!

Monday, June 15, 2015

All Occasion Card - a Style Potpourri...

Happy Monday, everyone! Today's share is a fun mix of styles - a bit freestyle collage, shabby chic, and mixed media - all in one little card.

The freestyle collage comes in with the lighthearted layering of mixed patterned papers and elements...the shabby chic with the distressed edges and subtle, vintage color mix...and the mixed media with a couple of coloring techniques on the background and the flower cluster...


The floral cluster starts with a couple large flat flowers that have been in my stash for a loooooong time. :)  I stacked them, then added a crocheted lace piece and more paper roses. All the roses were lightly coated with a dry-brushed layer of gesso to soften the colors and blend them together in a shabby-chic way...


This center rose started out ecru in color, the same as the crocheted piece beneath it. I used Lindy's Stamp Gang C'est la Vie Cerise Magical to tint the rose to match the highlights of this Magical paint that I had used around the edges of the background patterend papers...


Tiny gold microbeads were glued all around the floral cluster...just for fun...


Supplies:
Patterned papers:   Prima "Almanac" "Nature Garden" "Botanical" and "Zephyr" collections
Color medium:   Lindy's Stamp Gang Magical - C'est la Vie Cerise
Large flowers:   Prima, Petaloo             Small roses:   Wild Orchid Crafts
Crochet doily & rose, bordered velvet ribbon:   Prima
Pearls:   Recollections             Lace:   TheFunkieJunkie.com            Stamen cluster:   local craft store
Miscellaneous:   gold micro beads,  twine,  thread,  gel medium


Thanks for coming by for a visit today - I hope your week is starting with a smile!


Thursday, May 7, 2015

All Occasion Card - From a Different Angle...

The design of today's card happened by sheer happy accident. While I was choosing papers to use, I decided to use the rest of some coral and ecru patterns I had used before.

I had cut strips of these papers for a previous project and what was left of the original 6"x 6" squares were pieces that were approximately 5" x 4" each. As I laid them out on my worksurface while making the final choice, a couple of them sat at an angle to the others, and that's when I saw the pattern I'd use...I think you'll see what I mean...


See how those paper corners were laid out? Easiest design I've ever made! LOL  I distressed and inked the edges, and laid some scalloped lace under each one, then adhered them all down to a piece of dark brown cardstock before adding just a bit of topstitching on the right side. The right side still needed "something," so I stenciled on some modeling paste in a small tile pattern. Once it was all adhered to the coral cardstock base, I added the rest of the embellishments.

The large coral flower has been in my stash forever...I think it's an older Prima flower. The edges were already accented with dark brown, but I did add a little bit of lighter brown ink over the top to add a bit more shabbiness to it before gluing it down and adding a couple leaves and an embellished pearl stick pin...


Loopy twine double bows were the finishing touch around the large flower. A reader recently emailed me to ask how I make the double or triple bows. I don't have video capabilities, but there are many videos already out there to help you with different ways to make them. I hesitate to recommend any one over another, because they all work to make great bows. 

That said, I wrap the twine/ribbon around my fingers to make mine, and I finally found a video that shows the technique I've used for as long as I can remember. Here's the link to it:  making a double bow using your fingers ...


The finishing touches were to add mini white roses, small pearls and pearl clusters along the lace edges. I didn't have any dark brown pearls in my stash, so I took some white ones and colored them using a Spectrum Noir EB7 pen until they were the deep brown I was looking for...


Supplies:
Patterned papers:   Pink Paislee "Cottage Farms"
Lace:   TheFunkieJunkie.com            Mini roses:   Wild Orchid Crafts
Pearls:   Recollections             Stencil:   The Crafters Workshop "Mini Tile Texture"
Miscellaneous:   fabric flower & leaves,   embellished stick pin,   Golden modeling paste,  
twine,   Spectrum Noir EB7 pen


Thanks for stopping in for a visit today!

Friday, April 17, 2015

Just a Little Pop of Orchid...

Happy Friday, everyone! I'm closing out this week with a soft and shabby little all-occasion card.

Now and then when I make a softly colored card, I like to add one small touch of complementary color (well, today's is technically "near complementary") as a little "surprise for the eyes."  This card started with soft greens and tans, and with the little pop of orchid, it gave me just the bit of fun contrast I was looking for...


I pulled a couple snippets of lace from my grab bag of partly used pieces, and they were just the right length to use here...little peeks sneaking out behind the flowers. I added some Viva Glass Effects Gel to look like little dew drops on the flowers and leaves...


This orchid colored rose was made up from small flat (2cm) Kaisercraft flowers, and the bunches of pearl stamens are from ChocolateLetters on Etsy...


In addition to the clear gel, there's a light coating of clear coarse glitter on the two-toned Prima leaf...


Supplies:
Patterned papers:  Prima "Princess" collection
Dies:   Spellbinders "Grand Rectangles" & "Labels 23";   Sizzix "Flowers Branches & Leaves"
Flowers:   Wild Orchid Crafts,  Kaisercraft            Stamens:   ChocolateLetters on Etsy
Pearls:   Recollections
Miscellaneous:    Laces, twine, embellished stick pin, Viva Glass Effects Gel


Thanks so much for visiting today...have a wonderful weekend!

Tuesday, March 10, 2015

Soft and Sweet...

Hi, everyone! There was no Mixed Media Monday this week on the blog, but I hope to have one again soon. How I envy those talented mixed media artists who can whip up a page in their journal in an hour or less. Unfortunately, I rarely finish ANY kind of crafty project in that amount of time...LOL. I ponder, I change, I ponder some more...I'm slow as a turtle, easily distracted from my end goal, and go off on experimental tangents as I play. It can be rather comical, actually! All those years working in the business world, so focused and goal-oriented, and now I'm the complete opposite in my creative pursuits. My current in-progress journal pages are just that...in various stages of progress...and none of those stages include "done."

But I have gotten a few cards made in the last couple weeks, including the one I'm sharing today. It's a spring-colored, softly pastel, shabby little number, with a bit of my mixed media supplies mixed in for fun...


I took my cue from the splatters designed into the patterned paper for the rest of the card embellishments, using pearls and a dotted edge stencil for the white spackle around the edges to continue the "dots" design. Lots of Tea Dye Distress Ink was used around the paper edges, and also used to dye the white twine for the loopy bows...


The chipboard heart was coated with white gesso, stamped with a text stamp, and splattered with Shabby White Frantage...


The flower cluster starts at the top right, centered with a large layered flower surrounded with lots of little roses, loopy twine bows, pearls, and diecut leaves, all sitting atop a diecut doily...


Here's a closeup of the largest flower. I mixed a bit of Frayed Burlap Distress Stickles with some clear glass glitter, and ended up with the perfect chunky, taupe-y, lightly glittery accent on the pastel ledger paper of the center flower...


The flowers, leaves, and pearls cascade all the way down to the bottom corner...


Supplies:
Patterned papers:   Prima "Princess" collection
Dies:   Cottage Cutz "Tea Time Doily";   La-La Land Crafts "Open Leaf  Flourish"
Stencil:   The Crafters Workshop "Mini Halftone Borders"
Flowers:   Prima,  Wild Orchid Crafts,  Kaisercraft            Pearls:   Recollections
Miscellaneous:   Faber-Castell Whipped Spackle,  Stampendous Frantage "shabby white,"    
Tea Dye Distress Ink,   cheesecloth


Thanks so much for stopping by for a visit...I hope your week started with a smile!


Thursday, March 5, 2015

A Little of This, A Little of That...

Hello, again! Today I'm sharing a card that combines my latest fixation with mixed media supplies and my long-time "fully-loaded shabby chic" card style.

I was playing with some of my sprays one day, and noticed that the rose, dark tan, and silver looked pretty fun sitting there together on my craft sheet. But instead of creating one of my "smoosh papers" I decided to tape off a card-sized piece of mixed media paper and spray and spritz the three colors where I wanted them...and it ended up looking just the way I had hoped it would...


The fun part is that the rose and the gray sprays both have a bit of iridescence to them, while the tan color is a flat paint...here you can see the glisten in the rose and grey that I mixed a bit in the corner...


Yet when you hold the card at a different angle, you can really see the depths of the individual colors...


Here are a few detail shots, starting at the upper left corner working around the card...


The largest pink rose in the left corner is made using Spellbinders' Rose Creations dies...it started as a white rose, and was colored with Victorian Velvet Distress Ink and a few spritzes of water...


You know how I love to nestle pearls inside flower clusters...I'm not sure I'll ever be able to break that habit :) ...


In the center is a fun loopy die cut using one of Tim Holtz' new mixed media dies. I cut it once from deep rose cardstock and a second time from a lighter rose color...offset them a little bit before attaching them to the card...then decided they needed a light dusting of white craft paint to distress them just a tad...


Supplies:
Color Mediums:  Lindy's Stamp Gang Sprays:  Alpine Ice Rose,  South Shore Sand,  Gag Me With a Spoon Gray;
Liquitex Ink! Titanium White
Stencil:   The Crafters Workshop "Mini Art Is"
Art Mediums:   Golden Modeling Paste
Dies:   Sizzix Flowers Branches & Leaves;   Sizzix/Tim Holtz Scribbles & Splats;   Spellbinders Rose Creations
Small paper roses:   Wild Orchid Crafts            Pearls:   Recollections
Miscellaneous:   lace pieces,   twine,   pink crystal stems,   white craft paint


Thanks so much for visiting today...have a great weekend! (And U.S. friends, don't forget to "spring forward" for the switch to Daylight Savings Time this weekend.)


Related Posts Plugin for WordPress, Blogger...