Thursday, January 12, 2012

Red, White, and Blue...Who Knew?

Here are the last of the cards made over the Christmas holiday break.  I was having so much fun creating in colors other than Christmas colors, and with the warmer weather we've had over the last few weeks, it's hard to remember that winter is still the current season!  I keep reaching for spring color combos lately.

This first card came together without much advance planning, and when it was done, I realized that I'd made a Valentine in red, white, and blue...who knew?  But it didn't start that way. I started with the pale blue Echo Park patterned papers, and then decided to add a red scalloped piece just as an accent.  But the red accents kept multiplying...and when I added the white and cream lace accents...well, let's just say I had to add that pretty light green Prima fabric leaf to break up the color pattern a bit! LOL


Supplies:
Patterned papers: Echo Park and Basic Grey      Edge Punch: EK Success Diamond Lace
Laces: craft store (lower edge)  and LittleRedCottage on Etsy (top edge)
Hearts: Papertrey Ink dies, Echo Park patterned papers      Fabric leaf: Prima     Sentiment Stamps: Hero Arts
Fabric flower: Frogfeathers on Etsy      Felt rose: MyFavoriteThings Mini Rolled Rose dies
Pearl: Recollections      Hand dyed Hug Snug seam binding      Handcrafted stick pins

And last but not least, two more all-occasion mini cards (3-1/2"W x 5"H) using images from Made by Janet on Etsy...I love the teacups (I've been calling these "the teacup twins").  I added just a small touch of clear glitter to the teacup handles and bases to accent them, and surrounded the images with pearls and laces.


Supplies:
Teacup images: MadebyJanet on Etsy      Patterned Papers: Pink Paislee Nantucket collection (aqua),
Sassafras Secretly Smitten collection (yellow), Echo Park Be Mine collection (music)
Lace: LittleRedCottage on Etsy (scalloped), local craft store (white small flower)
Hand dyed Hug Snug seam binding      Pearls: Prima


Hope you have a wonderful weekend...I'll be back next week with photos of a few more new creations that came out of the Korner this week!    


Monday, January 9, 2012

Happy...

Happy Monday!  Most of the young ones around here are just today returning to school...they had a longer than usual holiday break this year, and from what I'm hearing, they loved it!  I try to keep up with the school schedule here, since we live around the corner from a middle school, and just a few blocks either direction are both a grammar school and high school.  Patience is a much-needed virtue in the afternoons when each of the different schools let out for the day and traffic is crazy busy! :)

I have two more cards to share with you that I made over the holiday break. This first card started as a friendship card, but once I added the diecut heart, I realized that once again, I had another possible Valentine's Day card. I'm not totally sure where I got the "HAPPY" chipboard piece - it was in a baggie in a larger box of miscellaneous chipboard embellishments among my stash.  It might be K&Co (?)...but it started the whole design of the card, so it's an important little unknown piece!


Supplies:
Patterned Papers: Authentique Uncommon collection      Sentiment Stamp: Hero Arts
Grey Pearls: Creative Imaginations      Felt Rose: My Favorite Things Mini Rolled Rose die set
Lace: Frogfeathers on Etsy      Chipboard Heart: from stash       Handcrafted stick pin  
Spellbinders dies: Classic Petal Edgeabilities (bottom edges); Grand Label 23 (text paper)

Next up for today is a friendship or birthday card with a decidedly shabby/cottage feel.  I paired Spellbinders' Classic Ovals Large dies with My Favorite Things' Oval Dainty Doily die for the focal point medallion.


Supplies:
Patterned Papers: Kaiser Craft Miss Nelly collection      Pearls & flourishes: Martha Stewart and Prima
Dies: Spellbinders Classic Ovals Large and MyFavoriteThings Oval Dainty Doily
Sentiment Stamp: Papertrey Ink      Paper Rose: Prima     
Hand dyed Hug Snug seam binding      Scalloped Cotton Lace: Fields of Dreams on Etsy


Have a wonderful week...I'll be back soon with the last of the cards made over the holiday break...and after that, some new ones I'm starting today!


Saturday, January 7, 2012

Meanwhile, back in the Korner...

Happy 2012!  I'm back from some time off from blogging, and ready to start a new year.  We had a wonderful holiday break, and spent some time with out-of-town family members who were able to stay a few extra days for some extra fun and after-holiday shopping (well, I guess that qualifies as "fun," too!). Slowly but surely the house is getting back to "normal"...this weekend the last of the holiday decor is going back up in the attic for another year.

I worked a bit in my craft room over the holiday break, and have several new cards that I can share here with you.  (The rest are going into my "stash" to be sent out for upcoming occasions, so those will have to be shared after they arrive at their new homes. :)  )

This first card uses another adorable image from MadeByJanet on Etsy. I paired it with a sentiment stamp from Papertrey Ink for what I thought would be a fun friendship or birthday card, or maybe even an out-of-the-ordinary Valentine!


Supplies:
Patterned Papers: Sassafras Sweetly Smitten collection, MyMindsEye A Beautiful Life collection
Vintage image: Made by Janet on Etsy      Chipboard Frame: Tattered Angels
Doily Die: Memory Box (whimsy circle)      Sentiment Stamp: Papertrey Ink      Pearls: Prima
Lace: LittleRedCottage on Etsy      Hand-dyed Hug Snug Seam Binding      Silver heart: local craft store

A while back, I purchased some adorable Prima chipboard pieces, and thought I'd save them for spring cards.  Well, that plan didn't work...I couldn't resist playing with them just a little bit earlier! :)

Up first, a friendship card...


Supplies:
Patterned Papers: Prima Romantique collection, Authentique Uncommon collection,
Sassafras Sweetly Smitten collection
Frame: Tattered Angels      Chipboard Sentiment: Prima      Sentiment Stamp: Technique Tuesday/Ali Edwards
Pearls: Recollections      Hand dyed Hug Snug seam binding     
Handcrafted stick pin starting with Maya Road leaf pin      Lace: Frogfeathers on Etsy


The next card uses another Prima chipboard piece and it just begged for some shabby and feminine embellishments for a sweet friendship card.


Supplies:
Patterned Papers: Authentique Gathering collection      Pearls: Recollections
Aqua fabric flower: Frogfeathers on Etsy       Chipbpard Frame: Tattered Angels
Chipboard sentiment block & paper rose: Prima      Cotton Lace: craft store      Hug Snug seam binding        

Thanks for stopping by this weekend!  I have more new projects to share...I just need to finish the photos...I'll be back soon!


Friday, December 23, 2011

It's the Most Wonderful Time of the Year...


From my little Korner to yours, sincere wishes for a very merry Christmas filled with love and happiness!

Thursday, December 15, 2011

Christmas Canvas Fun

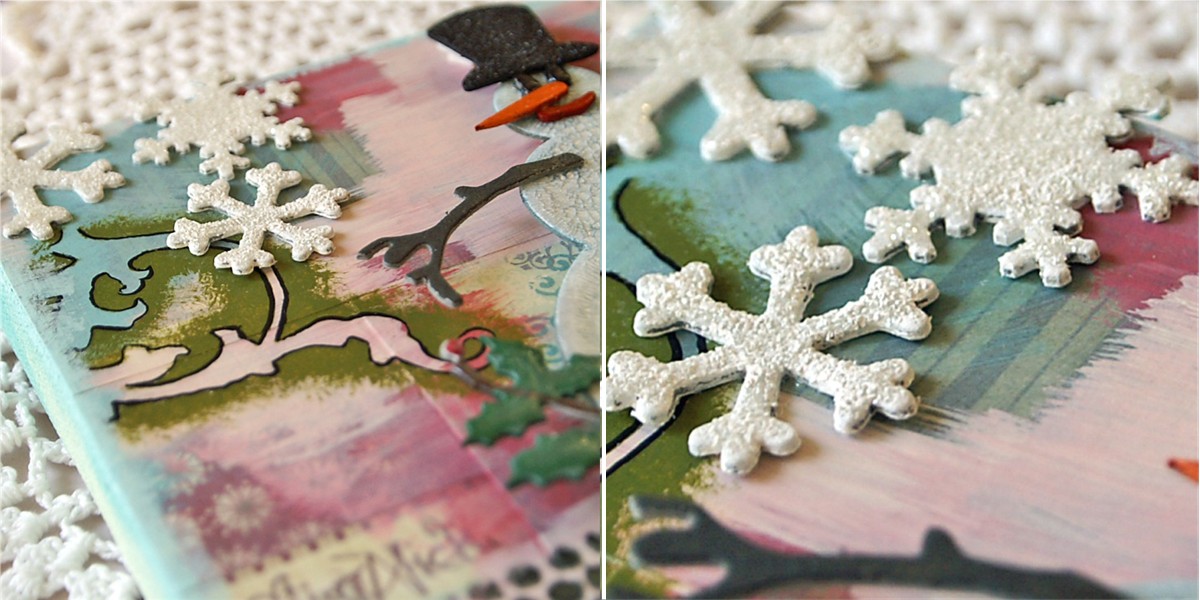
A few months ago when I cleaned my workroom and reorganized supplies, I came across two 6x6 canvases that I purchased 3(?) years ago or so. I had set them aside like I often do, and years later, they still sat in the package.  So a couple weeks ago, as a break from making cards, I pulled them out and decorated them with holiday patterned papers, stamps, acrylic paints, glass glitter, etc.   I'm no "pro" at mixed media, but it's sure fun to play with other mediums now and then!

Inspired by a couple of Tim Holtz' tags in his annual series for this year, I pulled out a remaining package of seasonal grungeboard shapes last week (the deer, holly branches, mini ornament, and the snowman), and finished embellishing the fronts.  I haven't decided whether I want to leave them as is for hanging, or attach something fun like a flat-bottomed doorknob on the bottom and a decorative element to the top and use them as tabletop decor. Just in case, I finished the backs with paper and paint, so I have the option to hang them for now, and can make them tabletop decor without having to change anything on the backs - they have a finished look.


A few of the details for the reindeer canvas:
-white German glass glitter was used here for the "snow" at the bottom of the canvas;
-the deer antlers are covered with bronze German glass glitter;
-after applying Rock Candy Distress Crackle Paint over the painted holly branch (and letting it dry and crackle), I rubbed white acrylic paint over the crackles, then wiped off the excess, to emphasize the veins and add texture to the leaves;
-the lace edge stamp is by B Line Designs.


A few details for the snowman canvas:
-I copied Tim's technique of die-cutting the "25" into the snowman, and backing it with patterned paper and adding glossy accents to the top;
-after painting the snowflakes white and covering them with coarse clear glitter, I *lightly* dabbed on white acrylic paint over the dried glitter to give it a more textured look (don't cover all the glitter...just some of it);
-black German glass glitter covers the snowman's top hat.

And now, my little break is over...must get to wrapping some gifts!  Have a wonderful weekend...and if you're headed out to shop this weekend...well, just keep smiling and don't let the craziness take away your fun!  (And I will keep repeating that to myself, too! :)  )


Monday, December 12, 2011

Almost there...

There's something enjoyable about the "hustle and bustle" of this season when you know you're not in a rush, and can sit back and enjoy it all without the stress part getting in the way! Today I had to stand in line for 40 minutes at the post office, and it was okay.  All of us in line were laughing about it, and making small talk and jokes, and the time flew by until it was my turn at the window. The Christmas roast is ordered, and the logistics of getting everyone together for the day are finally starting to take shape. There's still a bit of decorating to finish around the house, but we'll make it in time to enjoy the season to its fullest.

Are you tired of Christmas cards yet? Hope not..here are the last of the designs from the Korner for this year. :)

For this group, I used a Spellbinders snowflake die and embossed it directly to the front of a cream-colored card, added a small bit of course clear glitter accents, and changed the accent in the center for variety.


Next up, a fun reindeer card using the last grungeboard reindeer left in a set of Tim Holtz seasonal pieces from a couple years ago. The antlers are covered with bronze German glass glitter, and the patterned paper over the grungeboard is coated with Rock Candy Distress Crackle paint. Spellbinders' Labels Twenty-Two shape was embossed with a Cuttlebug Distressed Stripes embossing folder and accented with white acrylic paint around the edges. The "merry & bright" background paper is from My Minds Eye Lost & Found Christmas collection (6x6 size).


This card was made with Simple Stories 25 Days of Christmas papers, and a WRMK "Joy to the World" clear sentiment stamp. Spellbinders' Classic Postage Stamp Edgeabilities was used on the bottom edge.


On this last card, I combined Authentique Wonder collection patterned papers for the background, but pulled the "peace and joy" tag from Simple Stories 25 Days of Christmas collection and matted it onto a Spellbinders' Labels Eight die cut background for the sentiment.  The small reindeer was cut from Ranger Claudine Hellmuth adhesive canvas on lightweight chipboard using the Tim Holtz Mini Reindeer Movers & Shapers die.


Thanks for stopping by...I hope your week goes well and you have some time to stop and take in some of the fun parts of the holiday season!

Related Posts Plugin for WordPress, Blogger...