Friday, April 26, 2013

Hybrid Happy - Take Three...

And another happy Friday is upon us...the last one in April...this month has flown by so fast for me!

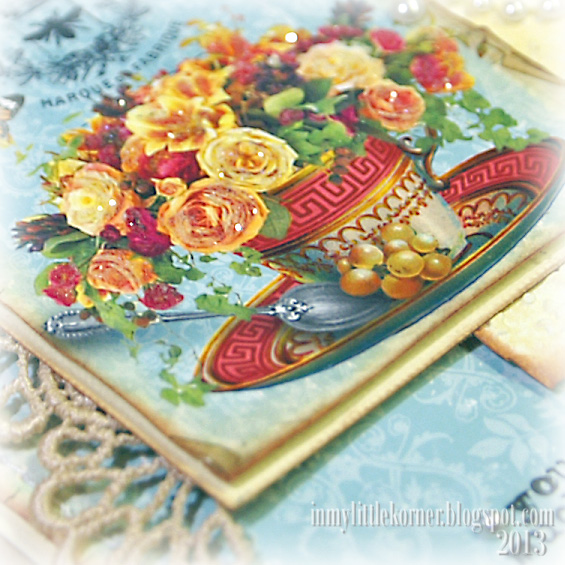
Today's card features the same digital paper used as the background for the card front and for the small digital collage that's the focal point.  Backgrounds of soft blue and yellow, with a touch of kraft around the edges, and tea-dyed lace, are contrasted by the bright colors in the teacup and bouquet of roses in it.  It uses one of my favorite sentiment stamps - it's such a wonderful sentiment for a friendship card, or as a thank you note...


There's such a light coating of clear coarse glitter scattered around the roses in the teacup that it hardly shows up in the photos - but it's there...


One single red rose centered between two pale yellow roses mimics the rose bouquet in the teacup...


And lastly, a view of the inside that also shows the dimension on the card front...

Supplies:
Patterned papers:  Designer Digitals/KPertiet Color Challenge 92009-1 (blue); 
 Playing with Brushes Torn Paper (distressed edges)
Digital Collage Elements:
Flowers and Grapes:  VintageImages.org     
French sign, teacup, spoon:  TheGraphicsFairy.com
Ticket:  AstridsArtisticEfforts.blogspot.com
Butterfly:  Dover Publications
Cuttlebug Textile Textures Embossing Folder      Lace:  TheFunkieJunkie.com       Sentiment stamp:  Technique Tuesday
Roses:   Wild Orchid Crafts       Pearls:  Recollections


Thanks for taking the time to visit today...I hope you have a great weekend!


Wednesday, April 24, 2013

Damask and Dots...

It all started when I opened the drawer of 12x12 patterned papers again (a drawer that's been a little bit ignored lately since I've been obsessively using my 6x6 pads of papers).   :)

I had decided to put some of my "older" papers to use...when I came across a wonderful soft aqua damask with corners fading to black and white polka dots.  Then I remembered I had another paper that was only black and white dots...and lo and behold, the dots were the same shades and the same size, even though they were different manufacturer's papers...and I was off and running with the design of today's card.


Small two-tone roses of white and aqua were the perfect fit here, as were two tiny pink rosebuds for just a touch of the unexpected color...


The shabby fabric rose started out white...I used a few different colors of watered down Distress Inks to get the soft aqua shade I was going for, and dyed some Hug Snug seam binding to match while I was at it...


A pearl corsage pin was embellished with a pink gem spacer, pearls in different sizes and shades, and an antique gold spacer...


Supplies:
Patterned papers:   Kaisercraft Sublime/Majesty (dot);   Glitz Hoopla Pipework (teal damask & dot)
Dies:   Spellbinders Classic Scallop Edgeabilities;   My Favorite Things Royal Leaves
Lace:   TheFunkieJunkie.com        Paper  Flowers:   Wild Orchid Crafts         Shabby rose:   Frogfeathers on Etsy
Pearls:   Recollections and Prima       Hug Snug seam binding       Handcrafted stick pin


Thanks so much for visiting today!


Sunday, April 21, 2013

TSTR - Spring Bliss...

It's the start of a new week, and  I'm tickled pink to have been invited to be a Guest Designer at The Shabby Tea Room . With the theme "Spring Bliss," you know it's going to be another fun challenge!  Debbie's our host, and our challenge is to use yellow, green, and white, and include a flower and polka dots.

Here's my card for this week's challenge...


based on this pretty photo:


Yes, I can guess what you're probably thinking. When I first saw this photo, I pulled daisies out of my flower stash to use on my card.  But then I remembered that I had some cherry blossoms in there, too...and cherry blossoms are one of the first signs of spring...so white cherry blossoms it was...just for the fun of it. :) 

As you can see, there was a lot of die-cutting done for this card.  The outside finished dimensions are 4" x 6", and the largest die on the front is backed with lightweight white chipboard to support the edges while the card is standing upright.  The inside die cut topped with the yellow polka dot paper is adhered with foam tape for just a bit of dimension.

Then the spray of cherry blossoms, leaves, pearls, and a small yellow seam binding bow were added...


and just a snippet of pretty white lace topped with a double line of white pearls...


and lastly, a peek at the inside...

Supplies:
Patterned paper:   Echo Park Dots & Stripes/Candy Shoppe collection
Dies:   Spellbinders Timeless Rectangles;  Memory Box Elegant Scrollwork;  My Favorite Things Royal Leaves
Cherry blossoms:  Wild Orchid Crafts       Lace:   TheFunkieJunkie.com       Pearls:   Recollections
Sentiment stamp:   Inkadinkado       Hug Snug seam binding


Thanks for stopping in for a visit...I hope your week is starting with a smile!


Friday, April 19, 2013

Squaring Off (From A Different Angle)...

Happy Friday, everyone!  I'm ending the week with a short post of a happy little card.

I was playing with another new die set the other day, and one of the pieces is a large "corner" die. I've seen dies similar to this used on square cards, but they were smaller dies than this one, so my new toy required a little bit more imagination on my part to make it work on the size cards I tend to make.  But I think I was successful! :)

Once I decided on the background paper, and placed the die on the diagonal, it took a bit of shuffling the pieces around to decide where I wanted to place the flower cluster and lace.  Once again, it meant I had to keep myself from going with familiar placements and just let the embellishments "go with the flow" of the design...


By running the tea-dyed lace up the diagonal line between the die cut and paper, it almost forced the cluster to the top corner...putting it there keeps the design balanced now, but also leaves me the option to add a sentiment on the lower right if I decide to do so later...


I cut one of my handcrafted pearl wire spirals in two, putting the shorter piece on the top of the cluster, and the longer piece at the bottom over the small seam binding bow...


Supplies:
Patterned paper:  Prima IOD Rue 88 Coordinates 3 (digital)
Dies:   Spellbinders Gold Elements One;   My Favorite Things Royal Leaves;   Sizzix Flowers Branches & Leaves
Punch:  EK Success Double Crochet Lace       Scalloped lace:  TheFunkieJunkie.com
Flowers:   Wild Orchid Crafts       Pearls:  Recollections       Handcrafted pearl wire spiral       Hug Snug Seam Binding


Thank you for visiting today...I hope you have a great weekend! 


Wednesday, April 17, 2013

Blessed to Call You Friend...

Today  I chose a card to feature that uses soft, calming colors...one of which, yellow, is a color signifying hope, optimism, healing energy (in feng shui), and in Japan, of courage...wished for all of those affected by Monday's tragic events in Boston.

When I find a trio of patterns I want to use together, I usually turn to a "tried and true" paper layout, and put a bit of a different spin on it, by varying sizes or shapes with different edges, as on today's card...


Only the top pieces were edge punched with a decorative scallop...but the edges of all the pieces were dry brushed with white paint for a shabby touch...


The chipboard heart frame was painted, inked, then lightly glittered...and there's just one lone pale grey-blue flower admidst all the pale yellow ones...


Supplies:
Patterned papers:   Kaisercraft Rustic Charm collection       Chipboard heart:   Maya Road        
Gold rose trim:   SuhaFuha on Etsy         Lace:   TheFunkieJunkie.com       Flowers:   Wild Orchid Crafts      
 Pearls:   Prima and Recollections       Sentiment Stamp:  Papertrey Ink        Punch:  Martha Stewart Medium Branch


Thanks so much for visiting today!


Monday, April 15, 2013

Just A(nother) Note...

Happy Monday to you!  This week is starting off with a light and fun note card...and believe it or not, no additional flowers except those in the digital collage on the card front!

Without a flower cluster to assemble, it seemed as though this card went together so quickly - but each time I played with adding more dimension to it with embellishments, it looked overdone - so I left it alone.

Once again, I used the dry brush technique around the punched edges, and some ink, paint, and distressing on the paper/cardstock elements...


I used a heavier coating of clear coarse glitter on the Eiffel Tower to give it the illusion of the tower sparkling with tiny lights...it adds a nice dimensional touch to the flatness of the digi collage...


A couple Hug Snug bows topped with a single large pearl are accented with a pearl wire spiral and a tiny sentiment tag...


And finally, a peek at the inside...all the edges of this card were dry brushed with white paint...inside and out, front and back...

Supplies:
Patterned paper:  Prima Divine collection       Edge punch:  Martha Stewart Cherish PATP   
Hug Snug seam binding       Large pearl:  Recollections       Lace:  TheFunkieJunkie.com
Leaves:  My Favorite Things Royal Leaves die       Handcrafted pearl wire spiral
Digital Collage elements:   
Eiffel Tower, Eiffel Tower postmark, French labels:  TheGraphicsFairy.com
Roses:  TheVintageMoth.blogspot.com;  VintageImages.org
Ticket:  AstridsArtisticEfforts.blogspot.com
Papers:  Designer Digitals: MTerasawa Color Challenge July 19 (aqua);  KPertiet Inspiring-4 (dot);
LynnG Crisp 2 (edge detail);  KHMize Measured Edges Grungy (rulers)


Thanks for stopping by for a visit...I hope your week is starting with a smile!

Related Posts Plugin for WordPress, Blogger...