Monday, January 7, 2013

Two By Two...

Happy Monday!  I hope I didn't mislead you with that title and put visions of Noah's ark in your head. :)  Today I'm showing cards that were made in pairs....not something I do a lot, but it was fun to do things differently this past weekend. I had been playing with some blank tags, stamping and "shabby-ing" them up around the edges...and when I was finished, I wanted to find a way to incorporate them onto cards instead of just setting them aside in the "extras" bag until later.

Then I found some fun heart doilies in my stash, and decided to make up a Valentine card.  I couldn't decide if I wanted to make it up with the pink heart doily, or the red...so I made up both, and used my newly-shabbied tags, too. I like them both, each in their own way.

The pink version...soft and shabby...


Instead of putting a layer of lace just under the floral cluster, I scrunched up a piece about 4" long (after spritizing and inking it), and hot-glued it to the front across the tag, putting the floral cluster to one side, and the pearl cluster to the other...


I cut apart one of the longer phrases of my sentiment stamps to make the shorter sentiment, inked and distressed the edges, and set it to the side of the tag, over a small piece of cheesecloth...


The red version came out bright and cheery and shabby...


Supplies:
Patterned papers:  Prima Almanac collection      Sentiment stamps:  Hero Arts; Papertrey Ink
Pearls:  Recollections      Mini Roses:  Wild Orchid Crafts      Tags:  American Tag Company
Text Stamp:  Prima      Flower Stamp:  Dawn Houser/Uptown Rubber Stamps-Floral Tapestry
Miscellaneous:  heart doilies, crocheted lace


Next up is another set of the mini cards  (3-1/2"w x 5"h)  that I love to make in pairs. Die cut frames and sentiment labels form the focal point on the fronts, and the floral clusters and bows add a definite feminine flair. 


I diecut frames and labels once from cardstock, and once from lightweight chipboard, and glue the two together with liquid glue when I'm using them on cards where the edges extend over the background a bit, or when I'm popping them up with foam tape for dimension.  It doesn't add that much more weight to the card, and helps keep the edges stable.  You can see what I mean in the pic below...


This time, the bases for the rose clusters are each formed by a single fabric flower.  These were part of a "stem" of flowers purchased at a local big-box craft store.  I took the flowers off the stems, spritzed them with Tea Dye Distressed Ink and distilled water, and put the floral clusters in the centers after gluing them down on the frames...


Supplies:
Patterned papers:  Echo Park Victoria Gardens collection      Edge Punch:  Martha Stewart Cherish PATP
Dies:  Spellbinders Floral Ovals, Classic Ovals Large, Fancy Framed Tags Two
Sentiment Stamps:  Papertrey Ink      Paper Roses:  Wild Orchid Crafts      Mini Pearls:  Recollections
Hug Snug seam binding      Miscellaneous:  cheesecloth, craft store fabric flowers


Thanks so much for visiting today.  I hope your week is starting with a smile!


Friday, January 4, 2013

Love is in the Air...

Like many of you, I'm primarily a card maker these days, and I'm always thinking about the next card-sending holiday and *trying* (note the asterisks around that word...I'm not always successful at that "trying" thing -  LOL) to get ahead of the game and have some cards ready early (i.e., not do what I did for this past Christmas season and change tactics because I started so late...oops). And that means Valentine's Day...and that means, love is in the air!

And these two cards are proof that, at least, I made a good first effort at that early start. :)

First up, a card that I felt didn't need a sentiment (but one could easily be added with a small tag near the flower if I changed my mind later on). I used lots of scalloped elements to contrast the strong rectangular shape of the card and the pieces of patterned papers...the punched scallops down the sides, the scalloped lace, the round loops in the paper doily, and the rounded edges of the open heart...


On top a base of tea-dyed cheesecloth, one loopy diecut doily topped with a large felt rolled rose, diecut leaves, golden-cream pearls, and a large open chipboard heart shabbily inked and glittered, all together form the focal point of the card...


Along with the scalloped lace down the side, I had to tuck a tiny piece of gathered lace between the flower and the heart...I thought it needed a little bit more dimension and texture between those two elements...


Supplies:
Patterned papers:   Prima Tea Thyme collection;  Prima Almanac collection;  Crate Paper On Trend collection
Punch:   EK Success Double Crochet Lace      Dies:  My Favorite Things Rolled Rose;  Memory Box Quinn Flourish
Pearls:   Recollections      Scalloped crocheted lace:   TheFunkieJunkie.com      Chipboard heart:   Maya Road
Miscellaneous:   cheesecloth, gathered cotton lace, clear coarse glitter


Next up is a fun, and very shabby, Valentine, with lots of distressed and painted edges, and more glittered elements...


The cluster at the bottoms of the two glittered chipboard hearts starts with another piece of scrunched cheesecloth, topped with a large pink button that's been "sugared" with clear coarse glitter and surrounded with a cluster of mini roses and leaves, with a few tiny pearls scattered here and there...


The sentiment stamps were placed in the two corners surrounding the cluster...one at the top, and the other in the lower corner...no way to miss the sentiment on this card!


Supplies:
Patterned papers:   Crate Paper On Trend collection      Chipboard hearts:  Maya Road
Sentiment stamps:  Technique Tuesday/Ali Edwards      Paper roses:  Wild Orchid Crafts    
 Dies:   My Favorite Things Royal Leaves
Miscellaneous:  cheesecloth, clear coarse glitter, twine, button, pearl wire spiral

Thanks so much for visiting today.  I hope the first week of 2013 was a good one for you, with the promise of more good days to come.  Have a wonderful weekend!


Wednesday, January 2, 2013

Warm Winter Wishes...

Happy New Year, everyone! The weather here lately is bright and sunny...but brrrrrr...cold. (I realize for those of you who live in snowy climates that my definition of cold is probably different than yours...LOL. For us, freezing/32 degress F means "brrrrr....COLD!" )  But to be truthful, I like the cold weather, because it's a reminder that we actually have something called winter here....and because summer seems to go on forever.

So today I have just one new card to show...and it's a result of our "brrrrr....cold" weather lately that I was inspired to make this up in grey, tan, and white with some sparkly thrown into the mix...the colors of "cold."


I gathered up some burlap ribbon to form the base of the flower, then topped it with paper leaves, mini white craft store fabric flowers, some floral wires dipped in white Flower Soft, a Hug Snug bow, and a pretty white organza flower with a pearl cluster center...


A couple punched snowflakes were covered with clear coarse glitter, a cluster of pearls was added to the center of each one, and they were popped off the page with foam tape...


Supplies:
Patterned papers:  Basic Grey Capella collection; Carta Bella Winter Fun collection
Punches:  Martha Stewart Arctic Snowflake and Eyelet Lace edge
Die:  Papertrey Ink Victorian Lace Border      Mulberry paper leaves and flower:  Prima
Pearls:  Recollections      Memo pin:  Tim Holtz      Hug Snug seam binding
Miscellaneous:  cheesecloth, burlap ribbon, fabric flowers, coarse clear glitter

Thanks for visiting today...I hope your week started with a smile!


Saturday, December 29, 2012

TSTR - Favorite Project

Well, the holiday season is winding down, and soon the pretty decorations and lights will be packed up and put away for another year.  But for now, we're getting a few more days of enjoyment from them...the tree is still lit up in the living room, and will be that way until New Year's Day.

I haven't had much time the past couple weeks to craft in the Korner, so this week's challenge at The Shabby Tea Room  is perfect for me. This week's host, Lenet, is asking us to pick out our favorite project we created for any of the Shabby Tea Room's challenges for 2012.

Although it was a little hard to choose among a few of my favorite projects, I realized that one of my most favorite was one of my latest creations...the Christmas mini album I created for the Sweet Shabby Christmas challenge in November, while I was a guest designer (and which also happened to be another challenge that Lenet hosted).


You can find my original November blog post here, and in December I posted detailed photos of all the finished inside pages here, along with a little "candy box" I made to sit alongside the album on the side table.

Thanks for visiting today.  I hope you're having a wonderful weekend!


Monday, December 24, 2012

May Your Days Be Merry...


It's Christmas eve...all the hustle and bustle is done here...and now it's time for quiet celebration.

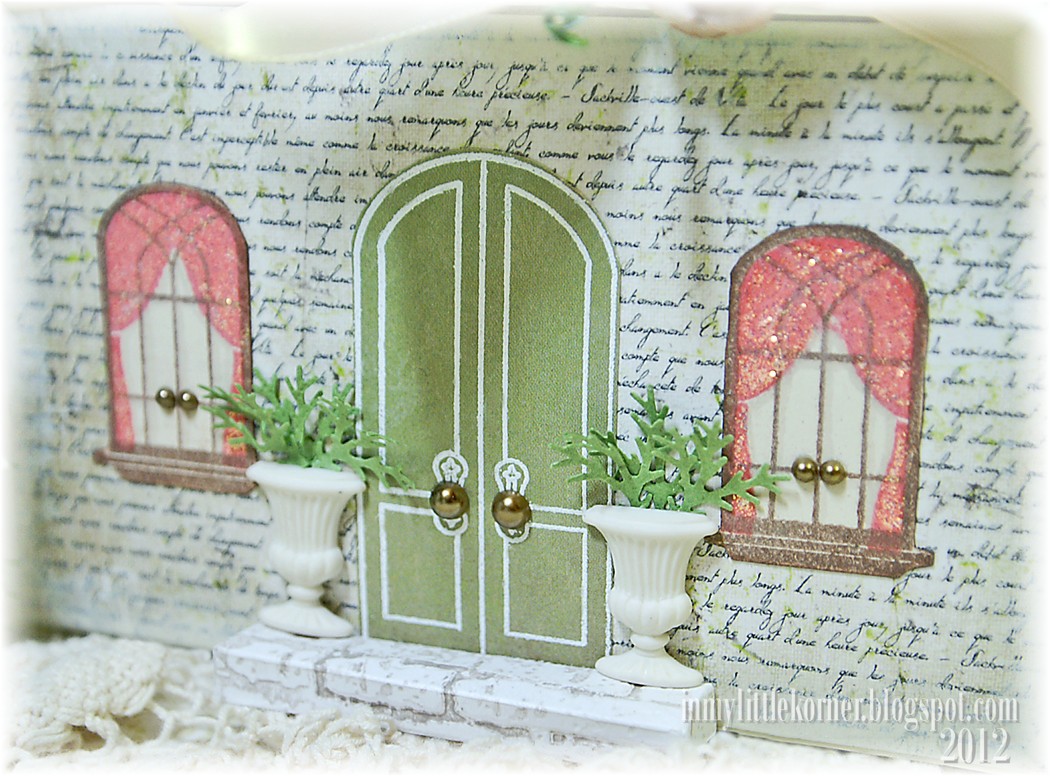
But before I go, I'd like to share with you the gift box I made for my mother's gift.  You've most likely seen these little papier mache "cottages" around the Web the past couple years, but this is the first year I've had the right sized box for the right sized gift!

This time, I used what I call the "medium" size house, and it fit the box for the gift just perfectly. It started like this...


This box measures 5-1/2"W x 4"D x 7"H (the top simply lifts off, making it easy to "unwrap" a present). Once decorated, it came out like this...


The front door and curtained windows are made with Papertrey Ink stamps.  Those little white plant urns are actually buttons that came in an assorted pack from the craft store.  The "ferns" are branch punches...and the "brick step" was constructed from a piece of cardstock that was run through the Big Shot using the Tim Holtz brick embossing folder (inked up first with Pumice Stone Distress Ink to provide the contrast detail) and glued to the front of the box/house.  


I got the idea for the "sugared" button roof from Melissa Phillips' blog last year...there are about 95 assorted white buttons covering the front and back of the roof/box top, all then covered with coarse clear glitter.  I used that particular crocheted trim around the dormer because I love the way the shadows remind me of icicle shadows.


Thanks so much for visiting.  I wish you a Merry Christmas!


Wednesday, December 19, 2012

And Last But By No Means Least...

Hello again. :)  With all that's happened since I last checked in here,  I thought it might be a good time to just show some pretty pictures and not focus on the sadness that the events in Connecticut caused so many of us to feel this past week. Trying to comprehend events such as this are hard for so many, including me.  So I'm hoping that, in my very small way, I'm giving you a break from the sadly serious for a just a few moments.

How are your holiday preparations coming along?  In my well-intentioned effort not to stress myself this season, I seem to have "relaxed" just a bit TOO much...LOL. I still have a few presents to shop for (i.e., I have to brave the mall this week), and some finishing touches on the house decorations to make. But I'll be ready come Sunday night, and relaxing on Christmas Eve...yep, I think I can!

Here are the last of the Christmas card designs I made this year. The first two use a couple Basic Grey Christmas paper collections from last season. They were a couple of my favorite collections, so I purchased them in full 12x12 size as well as a couple each of the 6x6 pads to match!


Supplies:
Patterned papers:  Basic Grey Jovial collection      Dies:  Sizzix Flowers Branches and Leaves
Edge Punch:  EK Success Diamond Lace      Pebbles glitter dots      Hug Snug seam binding
Miscellaneous:  handcrafted pearl wire, chipboard star, silver German glass glitter


Supplies:
Patterned papers:  Basic Grey Eskimo Kisses collection     Dies:  Spellbinders Layered Poinsettia
Lace:  TheFunkieJunkie.com      Pearls:  Recollections     
Hug Snug seam binding      Miscellaneous:  snowflake button


The next group of cards uses papers from this season's Prima and Carta Bella collections...first up, the shabby chic/girly card...


Supplies:
Patterned papers:  Prima Tea Thyme collection      Vintage Image:  Graphic 45 Christmas Emporium collection
Pearls:  Recollections     Hug Snug seam binding      Sentiment stamp:  Inkadinkado


This next one doesn't truly qualify for the "clean and simple" label, but it's closer than some of the previous cards...LOL 


Supplies:
Patterned papers:  Carta Bella Winter Fun collection
Rub-on sentiment:  BoBunny     Clear crystal snowflake:  Basic Grey
Sentiment Chip:  Spellbinders Lacy Doily Accents die


And for the single guys on the Christmas card list - a few less fussy, more clean-and-simple style cards...


Supplies: 
Patterned papers:  Carta Bella Winter Fun collection      Rub-on Sentiment:  BoBunny
Miscellaneous:  packing twine, snowflake buttons


Supplies:
Patterned papers:  Carta Bella Winter Fun collection      Rub-on sentiment:  Making Memories
Miscellaneous:  packing twine, buttons


Supplies:
Patterned papers:  Carta Bella Winter Fun  collection; Graphic45 Christmas Past collection (teal dot)
Edge punch:  Martha Stewart Cherish PATP     Sentiment rub-on:  unknown
Sentiment Chip:  Spellbinders Twisted Metal Tags and Accents die     Miscellaneous:  buttons

Thanks so much for visiting today!


Related Posts Plugin for WordPress, Blogger...