Monday, October 5, 2015

Mixed Media - A B C ...

Welcome back to Mixed Media Monday in the Korner.

The story behind today's piece from my large art journal: last week, a crafty friend posted a pic of one of her journal pages in progress, and I commented that her page put my unfinished circle page to shame. :)  She prompted me to post a pic of my page's progress so far - I was taking a little break from housecleaning, so I pulled out my camera and snapped a pic of my page and posted it into the thread.

Later that evening, my journal was still sitting there on my worksurface, and I couldn't sleep, so what better time than "now" to finally finish it? And that's how this page finally got done, many weeks after it was started. Without seeing my friend's post, and without her prompting after my comment, it might still be sitting there on the shelf, and still unfinished. :)

This page is one of the first in my large Dylusions art journal...


I don't have stepout photos for this page because - well honestly - I forgot to even think of it when I started playing with this. But I can give you some of the steps to the end product.

The paper in this journal is heavy mixed-media paper, and this time, I didn't put any gesso on the page first. I put a dab of different Dylusions acrylic paints around the page, and spread them with a combination of paintbrush, fingerpainting, and spreading with a damp baby wipe.

The larger black squares were made through a stencil using heavy black gesso - you can probably see that in the top right and lower left, I applied the gesso through the stencil in the usual manner to get the positive image. But for the lower right and upper left, I turned the stencil over and pressed the gessoed stencil down on the page to get the negative pattern.

I then used jar caps and black gesso to form the outlines for the circles down the page before adding the white speckled areas using Whipped Spackle through a Tim Holtz stencil.

After I had the circles laid out, I used molding paste through an alpha stencil in the lower corner and across the center.

Heavy white gesso was finger painted into the centers of the circles, so I could color them later...and that's as far as I got when I put the page away for another day...


You can see I didn't have far to go to finish this page, so it was well worth my time to get it finished and cross it off the list of the incomplete. :)

I used Gelatos to color inside the circles, blending black, purple and yellow. The little white dots were added with a white gel pen, and the smaller vertical black dots were made with black acrylic paint through a Tim Holtz stencil. 

The last bits were to add a few strips of washi tape here and there, and a trio of word stickers...and it's complete!

Here are a few closeups around the page...


Supplies:
Color Mediums:   Dylusions acrylic paints:  Crushed Grape,  Bubblegum Pink,  Lemon Zest,  Vibrant Turquoise,  Squeezed Orange
Liquitex heavy body acrylic paint - Mars Black;   Faber Castell Gelatos:  Grape, Buttercream, Black
Stencils:   Prima/Finnabair "Grungy Grid" and "Alpha";  Tim Holtz Idea-ology "Speckles" and "Dot Fade"
Word stickers:   Tim Holtz Idea-ology "Big Chat"          
Art mediums:   Faber Castell Whipped Spackle,  Art Basics black heavy gesso,  Liquitex white heavy gesso,  Golden molding paste
Miscellaneous:   washi tape,  Zig Mangaka black pen,  Uniball Signo white gel pen,  Prismacolor white pencil 


Thanks for visiting today...I hope your week is starting with a smile!


Friday, October 2, 2015

For the Holidays...

It's Friday, and time to close out the week with a couple more Christmas cards for the upcoming holidays. I did make a couple of each of these designs, so my collection is slowly building for this year...and it's a good feeling to be getting these done early!

We finally had a bit of very much needed and welcome rain this week in Northern California, so it only seems fitting to show you the "Joyful" card first! :)


The embossed background is accented with Pumice Stone Distress Ink, and as I've done before with this LaLa Land Crafts diecut, the street lamp is accented with Inka-Gold "Old Gold" metallic paint, and simply accented with branch punches, narrow ribbon, and a tiny bell...


The diecut sentiment words are accented with a gold gel pen...


Supplies:
Dies:  LaLa Land Crafts "Street Lamp";   Memory Box "Star of Wonder";   Paper Smooches "Christmas Words"
Punch:  Martha Stewart "Medium Branch"            Embossing folder:  Tim Holtz "Bricked and Woodgrain"
Pearls:  Recollections         
Miscellaneous:   ribbon, mini bell,  Pumice Stone Distress Ink,  Viva Inka-Gold "Old Gold", gold gel pen


The second of today's cards is a bit more shabby, with a bit more detail and lots of diecuts...


The little diecut poinsettia is surrounded with a holly diecut, and a twig wreath adorned with punched branches, clear red gems, and sparkly snow...


and a little pearl flourish pointing the way to another flourish die cut in the corner...


Supplies:
Patterned papers:  Graphic 45 "Christmas Past" and "Twelve Days of Christmas"
Dies:  LaLa Land Crafts "Pretty Poinsettia" and "Filigree Corner";  Memory Box "Holly Flourish";  Impression Obsession "Twig Wreath"
Punch:  Martha Stewart "Medium Branch"            Glitter dot:  Pebbles            Red gems:   Kaisercraft
Pearls:   Recollections          Miscellaneous:  white wire,  "Golden Rod" Stickles;  DecoArt Glistening Snow-tex


Thanks for stopping by for a visit...have a wonderful weekend!


Monday, September 28, 2015

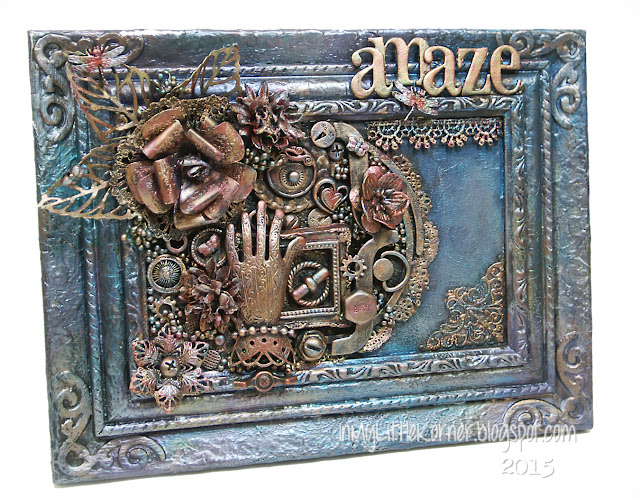
Mixed Media - Amaze...

Hello again, everyone...it's Mixed Media Monday in the Korner. :)

Today I'm sharing another project using the new Perfect Paints - specifically, the Shimmering Matte Acrylics. My first experiment with these was the "Believe" canvas that turned out bright and brilliant and very colorful. This time, I wanted to see if I could come up with a muted, vintage-looking project using the same paints, and I think I was successful...I hope you agree.

I got this different look by using a base of black gesso, and applying the paints with a dry-brush technique that put the color on with a lighter coating and let the black gesso show through in spots. The shimmer of these paints really gives this muted look a beautiful glow...


The base is a couple plastic dollar store frames that I glued together with E6000 glue - then added a scroll cardstock diecut to the corners of the very boring, plain, and very smooth outer plastic frame (these plastic frames were very shiny, so to make them easier to photograph, I did apply a thin coating of clear gesso over them prior to this picture so there would be a whole lot less reflective glare)...


And then I made an "oops!"...but then I thought it might work to my advantage because it could be a better way to show you how I did the next step. 

The plan was to apply one-coat crackle medium in spots along the smooth outer frame, and the smooth section of the inner frame, then apply heavy black gesso over everything. But I got carried away and started applying the heavy black gesso with a stippling brush and a palette knife, and then realized I'd forgotten the crackle medium...oops!

So I decided to finish the gesso coat, then apply the crackle medium, and put another, thinner coat of black gesso over the whole thing again. Turns out I was right - you can see the shiny clear crackle medium better in the photo when it's over the matte gesso...so here you go..."spot" applications of the crackle medium along the outer edges, and a continuous coating on the inner frame...


With the final coating of gesso done, you can now see how the crackle medium and a stippling application technique of the heavy gesso combines with the cardstock corner diecuts to add a great overall texture to what were smooth sections of the frames...


The next fun step was to start applying a base coat of colors. In my head, I was picturing a finished project with a border of silvery-blue and a center of rose-gold embellishments. To start, I combined red and blue paints until I had the purple shade I wanted, and started dry-brushing the color on, being careful not to cover too completely, because I wanted the black gesso to show through from the lower areas of the textures. 

Next, I applied some of the blue paint alone, and then some silver...blending the three colors around the outer edges. I didn't worry that this was looking darker than I envisioned, because I could later add some of the lighter colors used on the embellishment areas to the frame to blend it all together...


Then I started pulling out and laying out embellishments. There's a bit of everything here - a paper baking doily, an old hand scarf pin, a handmade flower backed with cotton lace (that I didn't like after I'd made it years ago, but set it aside to find a way to rework "later"), some older chipboard alpha letters from my scrapbooking days, buttons and paper flowers and silver seed beads, a metal corner scroll, a snippet of lace, an air-dry clay frame, dragonfly charms, and butterfly beads - little bits of fun to layer and stack.

Except for the seed beads, I coated them all with black gesso before gluing them down, then, after the seed beads were glued down, applied a final coating of gesso over everything to cover the beads and any wayward glue blobs...


Here are some detail shots, starting with the paper flower I made too long ago...it's text patterned paper with just a touch of clear coarse glitter on the petals and a cotton lace bottom layer. I didn't like the finished flower at the time, but never got around to taking it apart and redoing it. I pulled it out and discovered it was a pretty good fit for use up in that corner! A coating of gesso and some beautiful paints and you'd never know it was doomed for the "round file" so long ago. 

There wasn't a way to continue the clustered look of the round seed beads up in that flower corner, but I did find some stamens in my flower boxes that were almost the same size as the seed beads. So I clustered some of them up and stuck them in around the metal leaves, and after they were painted, you can't tell where the beads stop and the stamens start...


A mulberry paper cherry blossom sits among lots of metal bits and bobs, along with an air-dry clay mini frame and a chipboard bracket, also left from my scrapbooking days (and if you look closely, you'll see I couldn't resist applying pink paint to the fingernails on my old hand pin... :) )


These chipboard alphas are covered with copper, green, and red paints to simulate old metal with a couple different patinas...


And finally, a closeup of a corner that shows a bit more of the blending after applying a bit of the lighter, center colors to the outside frames...


Supplies:
Color mediums:   Perfect Paints Shimmering Matte Acrylics - Red Wagon, Peony, Tarnished Silver, Peacock Blue, Moss Green, Spring Green, Aged Copper
Art Mediums:   DecoArt One-Step Crackle;   Art Basics heavy gesso - black
Dies:   Spellbinders "Twisted Metal Tags & Accents" (corner scrolls)
            Metal leaves, metal flower, metal corner element, scalloped lace:   TheFunkieJunkie.com
Small metal findings:   Prima/Finnabair             Stamen clusters:   ChocolateLetters on Etsy
Frame clay mold:   Martha Stewart           Chipboard letters:   Heidi Swapp
Miscellaneous craft store supplies:   Plastic frames,  Wilton doily,  chipboard circle,  chipboard bracket,  hand pin,  washers,  butterfly beads,  dragonfly charms,  shaped buttons,  air dry clay,  silver seed beads,  mini pearl trim      


Thanks so much for visiting today...I hope your week is starting with a smile!


Wednesday, September 23, 2015

Watercolor Greetings...

Today I have a couple clean-and-simple watercolor greeting cards to share with you. I came across a great pricing deal on some Yarka St. Petersburg watercolors, and couldn't wait to play with them. I wanted to experiment with these new colors using both a concentrated coloring and a watery, free-flowing coloring technique, so I pulled out a couple flower stamps to play with.

Instead of using a loose coloring technique all over, I played with coloring the images more exactly, and using the loose coloring in the background. These watercolors are fabulous for this...you need so little pigment on your brush to get the concentrated color that I imagine this set will last me for years!

First up, a little number using more "autumn-like" colors...


Originally I stamped the image with light brown ink to blend the outlines, but decided I wanted more contrast because I was using a blue-grey background, so I used a scribble technique over the outline with a black pen, and highlighted more with a white gel pen...


I reversed the usual order of stacked die cuts by placing a white cut under the black to add some brightness to the sentiment over the background...


Supplies:
Stamps:   Unity Stamp Co. "Lean on Me" (flowers);   Simon Says Stamp 'Happy & Smile" (sentiment)
Dies:   Simon Says Stamp "Sending"
Watercolors:   Yarka St. Petersburg             Black pearls:   Kaisercraft
Miscellaneous:   Uniball Signo white gel pen;   Zig Mangaka black pen


Next up, a stamp with brighter florals, combining a darker background with a lighter, splattered one...just for fun...


I added more image outlining as with the first card, and highlighted the stamens with a white gel pen...


I used the clear Wink of Stella pen a little differently on this card. I loaded some of the sparkly ink onto my craft sheet, then back onto a smaller watercolor brush, and flicked it over the entire card front. It makes the card sparkle, but in a very subtle way. Here's a better closeup-all those tiny white looking dots are the silvery sparkle from the Wink of Stella pen...


And this time, I used the bright white diecut sentiment above the black shadow diecut for stronger contrast to the portion of the background that was darker...


Supplies:
Stamps:   Penny Black "Jubilant"
Dies:   Simon Says Stamp "Small Hello"
Watercolors:   Yarka St. Petersburg             Pearls:   Recollections
Miscellaneous:   Kuretake Wink of Stella-Clear pen;   Zig Mangaka black pen;   Uniball Signo white gel pen


Thanks so much for visiting today!


Friday, September 18, 2015

Getting a (late) Head Start...

A couple months ago, a sweet friend asked if I would make up some Christmas cards for her...we joked about "Christmas in July"...then real life continued to take up what used to be crafty time, and "Christmas in July" turned into "Christmas in September." But hey, we're still ahead of the game, right? And if I work on it a little here and a little there (which fits perfectly with my schedule these days), there might be a sizable collection of Christmas cards in our baskets, ready for sending at Christmas time.

Here are a couple of the first designs for this year. I usually make 1-2 of each design, with just a slight change in each so they're technically "one-of-a-kind." The first two are pretty simple in design, so they leave room for easy additions and/or changes to individualize them as I construct them.

I love white-on-white designs, so I usually include at least one each season...this was a fun one...


The ribbon snowflake die inspired me to pull out a couple of my curved border dies, and the lines blended pretty nicely. I used some foam tape under each of the curved border pieces so there's a bit of dimension to the card without adding a lot of bulk...


Then I double-cut the snowflake portion of the die, and adhered the second over the first with a foam dot under the center...

Supplies:
Dies:   Poppystamps "Snowflake Ribbon";   Simon Says Stamp "Merry Christmas";   Spellbinders "Curved Borders One"
Scalloped Lace:   TheFunkieJunkie.com             Pearls:   Recollections


The second card is basically another white-on-white with green accents. :)  The green patterned paper is die cut in the center with a scalloped oval, and popped up over the white base with foam tape to create a well in the center.  The pine branch diecuts are adhered to the white base, then the poinsettia and berries dies are adhered to the green patterned piece at the top of the well...


I love to attach single gems to the centers of flowers, but sometimes there isn't enough flower petal surface area to attach them securely. So I resort to my old trick of holding them down with Stickles glue...sort of a two-for-one solution...I get the glitter around the gem, and lots of glue to hold it in place...


The temps are still near 100 degrees around here, but I was in the mood for some snow. :)  I added a bit of glitter and Stickles to the berry and pine branch dies, then put the finishing touch of Snow-Tex over both...


Supplies:
Patterned paper:   Graphic 45 "Twelve Days of Christmas-Patterns & Solids"
Dies:   Spellbinders "Beaded Ovals";   Memory Box "Holly Winterberries";   Poppystamps "Fancy Celebrate";   
Impression Obsession "Pine Branch";   La-La Land Crafts "Pretty Poinsettia"
Gems:   Creative Imaginations             
Miscellaneous:   DecoArt Glistening Snow-Tex,  Martha Stewart Clear Coarse Glitter,  "Star Dust" Stickles


Thanks so much for visiting today...have a wonderful weekend!


Monday, September 14, 2015

Mixed Media - DREAM canvas...

Happy Monday, everyone! Today's share for Mixed Media Monday is an 8x8 canvas that I made just for fun. I played with a few of my newest colors of Golden heavy body acrylic paints for the background, then layered some stenciling, and finally lots of findings with a twist...


Instead of layering all the findings and fun pieces flat across the center of the canvas, I turned two 3x3 mini canvases upside down, adhered them to the center of the 8x8, and layered the pieces inside and out of the mini canvases...it adds lots of fun dimension...


Here are a few stepouts showing how it came about. The first step was to gesso the backs of the mini canvases with black gesso, and pencil in their final position on the larger canvas. Then I randomly added some of my favorite acrylics for the background, and splattered with white gesso...


Then I added some molding paste through a stencil...only in two corners, since the other two would most likely be covered with embellishments...


Then it was time for fun. The first step was to glue the two mini canvases to the larger one - I used fabric glue for that, since it was canvas-to-canvas. Once it was good and dry, I started adding...and adding...and adding...chipboard die cuts, wood cut shapes, lots of layers of metal findings...the works!

I coated most of the pieces with black gesso before I glued them to the canvas, so I'd only have to do light touchups after they were all secured. I didn't want to risk having some of the black gesso cover areas of the background where I wanted color to show. Once I photographed that step, I thought the middle looked like a big black blob (and who wants to look at that? - haha). So I painted some of the pieces with one of the colors I planned to use, and added the seed beads for contrast, so you can see a bit more where it's going...


Once I had the embellishments secured, and painted that first small area, I thought the stenciled background areas looked a bit too bright. I was using Inka Gold metallic paints on the embellishments throughout the center, and I wanted that area to be the brightest part of the canvas. So I got out a black Stabilo pencil and shaded the stenciled areas to tone them down just a little, and add more dimension to the unembellished corners...


Here are some more detail shots. Once I had glued all the embellishments down, I touched up some of the areas with more black gesso, then started applying several different colors of Inka Gold metallic paints.

I love how some of my very-old metallic-colored buttons are so perfect for this type of project. Many years ago, you could find bags of these silver and gold buttons in the craft stores. There would be mixes of wonderful shapes - butterflies, hearts, stars, keys, zipper pulls - all sorts of goodies all in one bag, for about $5. Years later, I'm finally starting to get to the end of the supply from these button bags, and sad that they're not available anymore. You can see in this first pic one of the butterfly buttons, and on the left, the rope-edged pull-type button beneath the wooden scroll...


paper and metal flowers, hearts, buttons, findings...lots of goodies brushed with metallic colors...


This pretty round medallion was in my stash, so I topped it with a silver button, then put a Finnabair finding right in the center of the beautifully-edged button...


The "dream" key in this next photo was the inspiration for the title of the canvas and the small phrase stickers that were added around the finished canvas...


Supplies:
Color Mediums:   Golden heavy body acrylic paints:  Teal, Primary Yellow, Ultramarine Violet, Quin Nickel Azo Gold, Quin Magenta
Viva Decor Inka Gold metallic paints:   Aquamarine, Green Yellow, Steel Blue, Orange, Magenta, Violet
Stencil:   Prima "Circular Lattice"             Stamp:   Prima/Finnabair "Messy"
Dies:   Sizzix "Flowers Branches & Leaves             
Word stickers, pen nib, arrow:   Tim Holtz Idea-ology            
Metal flowers, large metal butterfly, "dream" key, floral medallions:   TheFunkieJunkie.com
Paper flowers:   Wild Orchid Crafts             Small metal findings:   Prima/Finnabair
Wood scrolls, buttons, hearts, stars, butterflies, seed beads:   local craft stores
Miscellaneous mixed media supplies:   Stabilo All pencil (black),  drywall tape,  black & white gessos,  Golden molding paste 


Thanks so much for visiting today...I hope your week is starting with a smile!


Related Posts Plugin for WordPress, Blogger...