Friday, February 27, 2015

Sending You Joy...

TGIF, all! I thought a bit of a switch-up in colorways was in order...it seems that I'm favoring a lot of aqua and purple these days. :)

I'm ending the week by sharing a bright, sunshiny, clean and simple watercolor card with you today...


The sentiment is a mix of stamping and die-cutting...


A couple more detail shots...


Supplies:
Stamps:   Hero Arts "Things We Love" (flowers);   Simon Says Stamp "Sending & Wishing" ("you joy")
"Sending" Die:   Simon Says Stamp            Twine:   The Twinery
Miscellaneous:   Sakura Koi watercolors,   Uniball Signo white pen,   Pitt Artist black pen,   clear sequins,  orange gems


Thanks for popping in for a visit today...have a wonderful weekend!


Wednesday, February 25, 2015

LLLC - Sketch Challenge...

Good day to you all! This week at La-La Land Crafts, the design team is working with a sketch challenge.

My term as a member of this wonderful design team is coming to an end with this post, but rest assured you'll still see lots of wonderful LLLC products on my cards in the future. This has been such a fun 6 months working with a most wonderful group of talented and fun and funny teammates!

But now, on to the fun stuff. :) This card...


is based on this sketch...


It all started with that small watercolored piece beneath the flowers and lacy strips. I was playing with some new heavily-textured watercolor paper, and liked the play-piece so much I decided to find a way to use it on a card...so happy that the sketch lends itself to using it now, and that I had a beautiful piece of patterned paper that was a perfect match for a background for it!

I cut a few strips using the Small Lacy Border Die, added narrow satin ribbon across the top of each, and placed the top two strips behind the watercolor piece, and the bottom one across the top of the piece...


Cherry Blossom Flowers and leaves from the Open Leaf Flourish Die form the floral cluster, accented with twine bows and small pearl clusters...


I couldn't find a cardstock in the color I pictured in my mind, so I die cut a Filigree Corner from white cardstock, and shaded it with a couple Distress Inks to make it just the right color...


Supplies:
LLLC Dies:  Small Lacy Border,  Cherry Blossom Flowers,  Open Leaf  Flourish,  Filigree Corner
Patterned paper:  Lili of the Valley "Baskets & Bunnies" paper pad
Pearls:   Recollections            Pearl stamens:   Wild Orchid Crafts
Miscellaneous supplies:   natural twine,   Sakura Koi watercolors,   Shizen watercolor paper,   Picked Raspberry & Seedless Preserves Distress Inks


Thanks so much for visiting today. I hope you'll take a few moments and head over to the La-La Land Crafts Inspiration Blog to check out what my teammates have made up with this week's sketch inspiration!


Monday, February 23, 2015

Art Journal - Make a Wish...

Happy Mixed Media Monday, everyone! :)

I have another art journal spread to share with you today...


This layout began with a couple of what I call my "smoosh papers." When I purchase new watercolors, or sprays, or powders, I add them to my handmade color charts for those materials. Instead of using a palette, I put small amounts of the colors on my craft mat. Since I hate wasting color supplies, I found a way to use up the leftovers on my sheet by adding more water and "smooshing" pieces of mixed media and/or watercolor papers onto the mat filled with liquid colors.

I have lots of pieces still left to use on cards, canvases, and more journal pages, so you can expect to see these on upcoming projects...


I cut a couple of the "smoosh papers" down to 5" x 8-1/2" to fit, adhered them with liquid adhesive to the pages of my journal, and outlined them with a black Pitt pen and white Sakura Gelly Roll pen...


The next step was to adhere a piece of Tim Holtz Melange tissue paper along the two outside edges using gel medium. Then I used a bubble stencil to add Studio 490 crackle texture paste (this is one crackle medium that will crackle just as effectively with a heat gun as with letting it air dry). Once the crackle medium was dry, I applied a coat of clear gesso over the pages (to prevent the base colors from changing as I added further color mediums).


Next, I used more Lindy's Stamp Gang sprays to deepen and accent some of the color areas - even though I couldn't remember what I originally used to color the pages, I could find sprays that were close, if not the same.

The next step was to stamp and emboss the sentiment and dandelions using embossing ink and white embossing powder...


Why is it when you want your embossing to come out clean and precise, it won't, but when you want a shabby, distressed look, it turns out perfectly precise? LOL  So I went to work with my black Stabilo All pencil, shading around the dandelions and stamped words, smearing the penciling with my finger to make the embossed areas a bit more shabby and distressed. Then I shaded with the pencil around the crackled bubbles, and decided that now the butterflies didn't stand out enough, so I outlined them with a white Uni Posca pen...


I thought the two upper inside corners looked too "flat," so I die cut a couple spiderweb corners from white cardstock, and sprayed them with a couple sprays to blend in with their background colors. And finally, I added small lace pieces, tears of washi tape, and black and silver sequins for fun accents and different textures...


Supplies:
Color Mediums:   Lindy's Stamp Gang Sprays - Hydrangea Blue,  Golden Doubloons,  Alpine Ice Rose,
C'est La Vie Cerise,  Bodacious Blush,  Tibetan Poppy Teal
            Stamps:   Unity Stamp Co. "Wish With Your Heart";   Hampton Art "Cling Dandelions"
Stencil:  Prima "Bubbles"            Dies:   La-La-Land Crafts 'Spiderweb Corner"
Printed Tissue Paper:   Tim Holtz "Melange"     
Art Mediums:   Golden matte gel medium,  Liquitex clear gesso,  Studio 490 crackle texture paste
Miscellaneous:   white ultra-fine embossing powder,  Stabilo All pencil,  Sakura Gelly Roll pen, Uni Posca paint pen,  lace, washi tapes, sequins


Thanks so much for visiting today...I hope your week is starting with a smile!


Wednesday, February 18, 2015

LLLC - Ready for Spring...

Happy Wednesday to you all! This week the La-La Land Crafts team is working with the inspiration challenge "Ready for Spring."

Today's card is one that I created for display at the CHA trade show last month, and I knew it would fit perfectly for what was an upcoming challenge at the time - so if you visited the La-La Land Crafts booth at the show, and this card looks familiar, that might be why. :)

I used the pretty Maja Designs patterned paper as my inspiration for the colorway of the card...orchid purple, green, and taupe.  At the top, I used the new Masquerade Mask Die and tucked half of it behind the patterned paper background to look like a flourish over the top of the card. In the upper left and lower right corners, more delicate accents with the use of the Filigree Corner Die...


The Cherry Blossom Flowers are made from watercolor paper that was first stamped with a text stamp, then colored with Distress Ink (Victorian Velvet).  They sit on top of a couple pieces of the Berry Flourish...


And taking center stage, the new Chandelier Die, cut in orchid with a grey shadow layer, and accented with lots of white pearls...


Supplies:
LLLC Dies:  Masquerade Mask,  Filigree Corner,  Cherry Blossom Flowers,  Berry Flourish,  Chandelier
Patterned paper:   Maja Designs "Vintage Autumn Basics" collection
Pearls:  Recollections


Thanks for stopping by for a visit today. I hope you'll take some time and visit the La-La Land Crafts Inspiration blog to admire the projects my teammates have made for this week's challenge.


Monday, February 16, 2015

Art Journal - No Bird Soars Too High...

Good Monday morning, all...it seems Mondays are turning into Mixed-Media-Mondays lately! :)

Today I have another mini art journal spread that went in a different direction than originally intended. As one of my sweet blog friends, Lizzyc, recently commented, art is truly "alive." It sometimes has a mind of its own, and is totally subjective, and so often it's just plain fun to go with the flow!

Here's the latest page spread in my small Dylusions art journal...


This layout is filled with texture. If you've been with me here for a while, you know that now and then I pull out my scraps bag filled with unused die cuts, lace snippets, and other assorted pieces that were set to go on a project, but got put aside. It's a fun challenge when I pull out that baggie, spread out the contents, and pick some elements to use.

Here's a pic of the some of the pieces that were chosen from the baggie for this layout...


There are pieces of gathered lace that were ungathered, punched borders, die cut frames and pieces of frames, strips of torn text paper, chipboard ruler pieces, and resist-canvas birds and some kind of flying insect (that I choose not to bother knowing specifically what it is because I'm not fond of flying insects - which is why I probably didn't use it the first time! LOL).

I started by gluing pieces in a mostly horizontal pattern to the pre-gessoed pages in my journal...


I also added some pieces of netting from a bag that once held something...can't remember...but I knew I could use that netting one day. (I'd already colored the two birds before I remembered I hadn't snapped a stepout photo yet...oops.)

It was only after I adhered the canvas birds and insect that I realized that since they were resist canvas, I needed to color them first so the contrasting pattern covered with the resist medium would show up. If I simply gessoed over them again before coloring them, the resist pattern would be lost. So I colored the birds and insect (carefully with a small watercolor brush), and when dry, coated them with gel medium in the centers, so most of the new coloring would be unaffected when I sprayed and spritzed and splattered colors onto the pages.  

And here's another fun fact...the day after I had finished this step and set the book aside until the next night, I was scrolling through my feed on Facebook and came across an online friend whose work I absolutely love-she's been an inspiration to me to get out my journals and play again. Marta had posted a couple pages from her journal that were at the same point in construction...and looked amazingly like my two pages above...snippets of diecuts and laces and little ephemera pieces, in almost an identical layout. And yet, our two completed pages turned out so differently you'd almost not recognize how close in design they began.  Click here to go directly to Marta's post showing how her page turned out (if you scroll down to the 3rd and 4th photos you'll see the base page before coloring).  Fun, right?

The next step was to apply a second coat of gesso over all the layers of papers, netting, lace, etc., brushing it on around the three canvas pieces. Now all the different original colors and surfaces will color more uniformly, and the centers of the three resist canvas pieces will retain their newly-applied colors because of the topcoat of gel medium. 


As soon as I started spraying colors, this page took on a mind of its own. All those background pieces simply became textures that nestled around the spray puddles and formed contrast areas...so I just went with it...no process, no reasoning, just an "I wonder what will happen when I do this" attitude... letting the colors combine and drip and settle in.

Once the colors were on, I started adding some fun extras...a couple rusted hearts from my stash...and a couple spiral clips that started out as bright gold but became "rusted" with the help of gesso and a few different sprays...


I found the quote in my trusty "quote notebook" and printed it onto cardstock before cutting it into strips and gluing onto the canvas. Blue mica flakes added a sparkly touch beneath some of those strips of paper and lace that formed the heavily-textured background...


Supplies:
Color Mediums:   Lindy's Stamp Gang sprays - Sweet Violet Purple Teal,  Caribbean Blue,  Tilt-a-Wheel Teal,  Tea Pot Purple,  
Aloha Avocado,  Rusty Lantern Lime,  Bayou Boogie Gold
Liquitex Ink! - Titanium White & Carbon Black          Archival Ink-Coffee
Stamps:   Stampin' Up! "Gorgeous Grunge"
Rust Hearts:   TheFunkieJunkie.com          Twine:   The Twinery          Resist Canvas Shapes:   Prima
Mica Flakes:   Stampendous Frantage "Oceanic"          
Art Mediums:   Golden matte gel medium,   Liquitex white gesso


Thanks for popping in for a visit today...I hope your week is starting with a smile!


Wednesday, February 11, 2015

LLLC - Love Everything About You...

Happy La-La Land Crafts Wednesday, everyone. This week, the team's inspiration challenge is "Valentine"...just a few days away!


I wanted all the embellishments to stand out from the background, so I went with very subtle base patterned papers. It's a bit hard to see in the photo, but in the upper right corner and on the far right of the sentiment banner, I've added some heart-shaped texturing with modeling paste and a stencil.

The large diecut heart over on the left side is the inside of the Heart Doily Die, and I cut a second piece in black to serve as a shadow.  The "Love" word from the Hanging Hearts & Love Word Set was cut three times in black cardstock, and stacked together to give a bit of thickness. The inside of the heart piece is stacked 6 layers deep to make it higher than the black outline...


The textured diecut  Wrought Iron Fence behind the Hanging Hearts is the fence I made in the Tutorial Thursday post here on the La-La Land Crafts Inspiration blog last month.  The hanging hearts were cut once from coral cardstock, once from patterned papers to use on the heart shapes, and once from black cardstock for a shadow layer. There's a bit of Diamond Stickles decorating the little bows at the top, behind the cream colored pearls...


I needed some bitty flowers to accent the sides of the fence, so I turned to one of my older hydrangea punches to assemble some little purple flowers to decorate the corners of the fence, and accented the centers with Liquid Pearls...


Supplies:
LLLC Dies:  Hanging Hearts & Love Word Set,  Wrought Iron Fence,  Heart Doily
Patterned papers:  My Minds Eye "Heirloom" collection'   Prima "Vintage Vanity" collection (large heart)
Sentiment stamp:   Simon Says Stamp "Handwritten Borders"
Punch:   Martha Stewart 3-in-1 Hydrangea          Pearls:   Recollections         
Stencil:   The Crafters Workshop  "Mini Confetti"
Miscellaneous:   twine,  Bisque Liquid Pearls. Golden modeling paste


Thank you for visiting today.  I hope you'll take a few moments to pop over to the La-La Land Crafts Inspiration Blog to enjoy the projects my teammates have made up for this week's inspiration challenge!

Monday, February 9, 2015

Art Journal - Wild and Precious Life...

Good Monday morning to you all! Lately I've been making an effort to finish art journal pages I started right after Christmas, and in the past couple weeks, I've been able to check that goal off my to-do list. Today I've got a nice, long, picture-heavy post for you to make up for my spotty posting schedule lately. :)

This page spread uses a fun quote stamp from Unity Stamp Company...as soon as I saw this stamp, I knew I'd use it on a journal page.

The other fun thing about this layout is that it started out in one direction, but then did a 180-degree switch in the opposite direction - the end design looks nothing like the way it started.

Here's the finished product...it's made in my small (5" x 8") Dylusions mixed media journal...


All finished in pretty pastels...but guess how it started out?...


I had seen a picture on The Crafters Workshop blog by an artist who had used her Caran d'Ache Neocolor II wax pastels to form rectangles on the page in all different colors...then wet them, and pressed the opposite page against the wet colored page to make a 2-page spread.

I had already applied white gesso to two pages after gluing down text from an old book, in torn, random pieces. So I decided to use these two prepared pages, and copy the coloring idea with my Neocolor II's, but instead of rectangles, I used circles. 

Then I wondered what would happen if I bordered the circles with black Neocolor...would it totally mess up once I wet it and pressed the pages together? Nothing ventured, nothing gained...and since the page was covered with gesso, I had some open working time if it was a total mess...so I gave it a try...


Not bad, right? I did do a bit of "touchup" with my round watercolor brush to define some of the circles a bit more (the ones that got completely distorted in the press)...but other than that, I found that you can outline in a dark color at the same time you wet the insides of the colored circles and press to a second page as long as you press straight down, and don't move or shift the pages while you're "smooshing" them.

The next step was to add some modeling paste through a harlequin stencil...


And then I stood back and looked...and maybe now is a good time to let you in on how I originally envisioned the use of the circle idea. I planned to use the large quote stamp as the main focal point on the spread, and thought I could fill in some of the open circles with smaller quote stamps, words, etc. that would complement the quote.

But as much as I loved the brightness of this page, I wasn't going to get the quote stamp to show up the way I had it in my head...these colors were too strong and there was too much activity going on.

OK...not a bad experiment, and one to definitely keep in mind for a later abstract page or two. But to move on with the current design idea, I decided to apply a light coating of white gesso over this whole layout to see what would happen next...


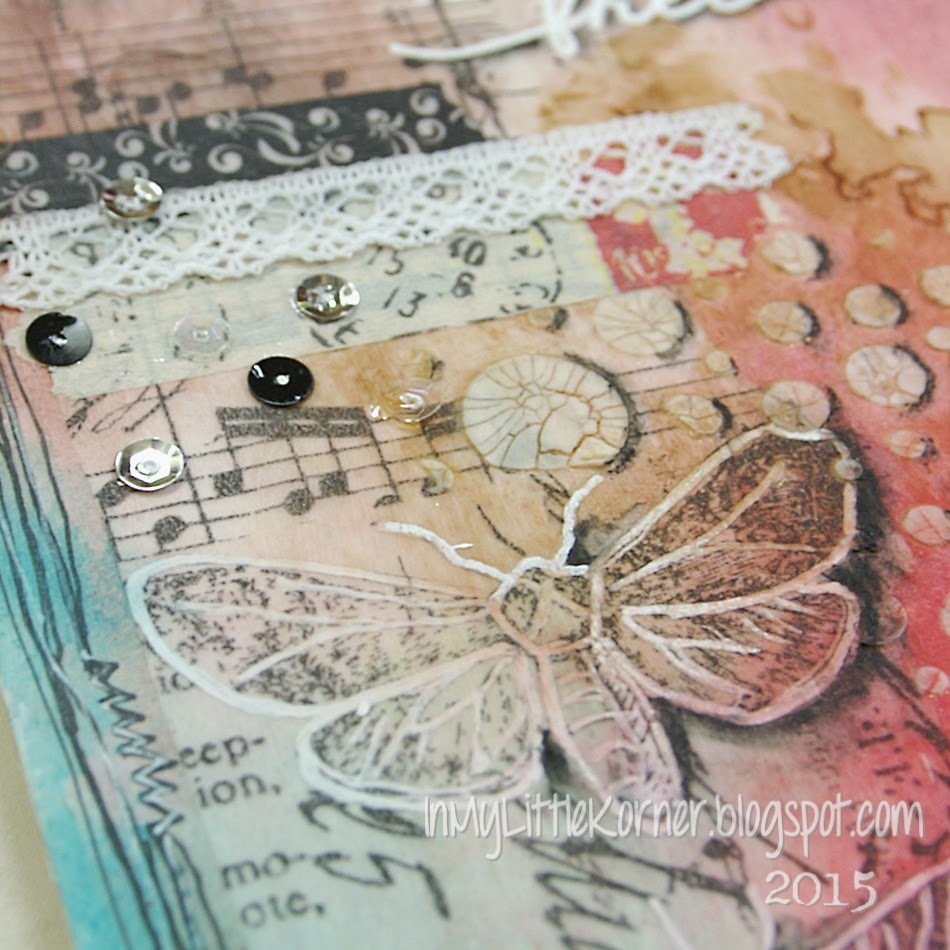
And now we're cookin'!  You can still see the shapes and colors, but they're much more subdued. So I stamped the quote, colored the letters with watercolor pencils and highlighted and shadowed the letters with black and white pens and a W3 Copic.  

Next, I used gel medium to attach some drywall tape, pieces of lace, and some buttons; another light coating of white gesso over the laces and buttons was added,...


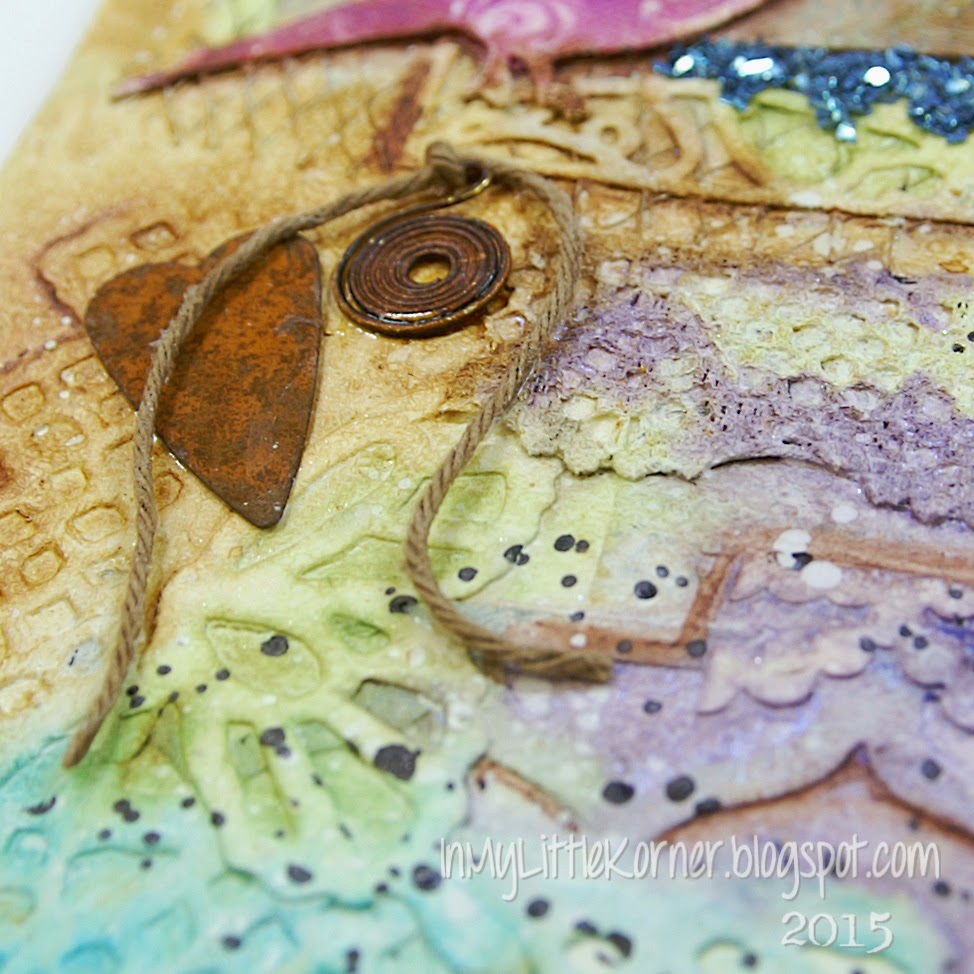
And now for some more coloring fun! I added some Lindy's Stamp Gang sprays over the laces and buttons, and the areas immediately around them. I colored some chipboard hearts and a chipboard flourish that I pulled out of my stash, and used gel medium and foam tape to adhere them to the lower left corner. 

A couple more Unity Stamp quotes were added at the bottom below the laces. Faux stitching was added with the help of a stamp, crystal seed beads were added for accent, and a black Stabilo All pencil was used to shade the side edges of the harlequin shapes.

And that's how it evolved from this:

 to this...


Here are a few detail photos from around the pages...


Supplies:
Color Mediums:   Lindy's Stamp Gang Sprays: Golden Doubloons, Sandra Dee Sepia, Summer Lovin' Sun, Tea Pot Purple, Pop Rock Purple, Raspberry Lemonade, Pink Ladies Pink, C'est La Vie Cerise, Greased Lightnin' Green
Caran d'Ache Neocolor II wax pastels;    Caran d'Ache Supracolor watercolor pencils
Stencil:   The Crafters Workshop Mini Harlequin
Stamps:   Unity Stamp Co. "Wild & Precious Life" and "Empowered Words";     
Technique Tuesday "Hanging by a Thread"
Art mediums:   Liquitex white gesso;  Golden modeling paste;  Golden matte gel medium
Miscellaneous mediums:   Sakura white Gelly Roll pen;   Black Stabilo All pencil;   Copic W3;   
Pitt Artist Pen (black, M)
Miscellaneous craft supplies:   buttons,  chipboard pieces,  drywall tape,  lace pieces,  seed beads


Thanks so much for stopping by today...I hope your week is starting with a smile!


Related Posts Plugin for WordPress, Blogger...