Thursday, May 28, 2015

Hot Summer Pink...

Hello again! The other day as I was putting away unused supplies and bits and pieces, I found an A2 sized piece that I had cut a round aperture into, and run through my brick wall embossing folder, then set aside when I changed my mind on the direction of the project I was working on. Of course, in the midst of my mini cleanup, I had an idea what I could do with the piece, so instead of continuing to straighten things up, I got to work making a mess again! :)

The round aperture I had cut turned out to be the right size for me to use one of my LaLa Land Crafts stitched circle dies to create a frame...and then the ideas kept coming, so I kept working...and this is the end product...


I used the same green ink that I used inside the aperture to color the edges of the white leaves and berries. It was a happy find to see that the lilies were the perfect color to go with the small hot pink roses...


The little punched butterflies were accented with pink Stickles and tiny pearls. I still get use from many of my older punches - it's one of the reasons I still hold on to many of my basic tools...you never know when they'll be perfect for a current project, and they're faster to use than setting up my electronic cutter for a last minute accent...


I pencil-traced the aperture onto the base of the card, and inside it I added some stamped leaves and pink stems that would coordinate with the flowers I planned to place on the top layer around the outside of the framed circle. Then I used foam tape to attach the top embossed layer to the card base...


And lastly, a couple closeups of the embellishments at the bottom of the card...


Supplies:
Embossing Folder:   Sizzix/Tim Holtz "Bricked and Woodgrain Set"
Dies:   LaLaLand Crafts "Stitched Circles" and "Berry Flourish"
Stamp:   Simon Says Stamp "Summer Garden"             Punch:   Martha Stewart "3-in-1 Butterfly"
Flowers:   Wild Orchid Crafts (roses);   local craft store (lilies)
Pearls:   Recollections            Pearl stem:   local craft store
Miscellaneous:   "Pink" Stickles,  white twine


Thanks so much for stopping by for a visit today!


Monday, May 25, 2015

Happy Memorial Day...

Happy Memorial Day Monday, everyone! To those who read my little crafty blog and have loved ones who were lost while in service to our country, I thank you for their service and selflessness, and sympathize with your loss and your sacrifices.

I'm starting this week off sharing a very frilly and softly-shabby all-occasion card, filled with flowers and fun embellishments...


It all started with the background paper...a very soft, buttery yellow and pale gray wood pattern.  It's accented with white lacy touches and pale yellow roses, offset with the deeper turquoise and purple roses for a burst of color among the pales.  

The small frame in the center is made with white air-dry clay that's painted with Old Silver and Hematite Viva Inka Gold paints to give it an aged, metallic look...


A few roses are nestled down inside the frame on top of some scrunched cheesecloth...the rest accent a couple corners of the frame...


Here's another closeup of the frame detail. I first applied the Hematite (dark grey-blue) paint to the clay frame, and after letting it dry for just a couple minutes, finger-painted on the Old Silver (which is the buttery, pale yellow shade that was a perfect match for this card). After the Silver was applied, I rubbed the edges until some of the Hematite peeked through, making it look old and worn...


Supplies:
Patterned paper:   My Minds Eye "Bramble Rose"
Dies:   Cottage Cutz "Tea Time Doily";   My Favorite Things "Royal Leaves"
Stamp:   Unity Stamp Co. "chickenwire"             Clay mold (frame):  Martha Stewart
Flowers:   Wild Orchid Crafts (purple, yellow roses);    LayoutsFromTheHeart on Etsy (dk. teal roses)
Pearls:   Recollections            Lace:   TheFunkieJunkie.com            Glass Glitter:   Stampendouc "Oceanic"
Miscellaneous:   cheesecloth,  white twine,  white air dry clay,  Viva Inka Gold paints - "Old Silver" and "Hematite"


Thank you for visiting today...I hope your week is starting with a smile!


Thursday, May 21, 2015

Just Happy...

Summer temperatures have me in the mood for lighter, softer colors mixed with bright white.

For today's card, I played again with what I call "altered edges." I used a die designed, I think, for straight edges, but I put them on a diagonal slant to add some fun layering to the front of the card...


At the top, a flower cluster of cream and white lilies, and aqua and white mini roses, sitting atop a loopy diecut doily, accented with lots of loopy twine bows and pearls...


Over on the side, another smaller version, with just a few aqua flowers...


And a sentiment that will work for a variety of occasions, as the need arises...

Supplies:
Dies:   Spellbinders A2 Scalloped Borders Two;   LaLa Land Crafts Filigree Corner;   Memory Box Quinn Flourish;   Sizzix Flowers Branches & Leaves
Lace:   TheFunkieJunkie.com            Flowers:   Wild Orchid Crafts            Pearls:   Recollections
Sentiment stamp:   Simon Says Stamp "Handwritten Greetings"
Miscellaneous:   white twine 


Thanks for visiting today!


Monday, May 18, 2015

Mixed Media - With Brave Wings Color Challenge...

Hello, again! I know I've been gone more than a week, but I've got a fun Mixed Media Monday canvas to share today with LOTS of photos, so I hope that makes up a bit for my unscheduled absence. :)

At the start of the month I made note of this month's color challenge over at Lindy's Stamp Gang. But then I got distracted by life, and this became a project completed in small bits of time, with many starts and stops, and I lost track of the fact I was following a color board inspiration! Thankfully, when I finished, I realized I still had the ingredients of the color challenge board front and center.

Here's the finished 12 x 12 canvas...there's lot of glittery bling on this one, so I tilted the camera down a bit to capture more of the details and less of the reflection...


And here's the LSG color board with this month's challenge colors - I picked the minty-aqua, fuchsia pink, and golden tan as the three colors I would play with:


You might be able to see by the edges that I started with a piece of vellum with torn edges as the base of everything - gluing the vellum unevenly gave me the horizontal texture lines that I wanted to build into the background - you know I'm a big fan of texture! So it started like this...


A little hint: to "iron" down the vellum creases to make them flat, I turned the canvas over and used my brayer on the back side...


The next step was to apply a coat of white gesso over the vellum and canvas - now you can really see the horizontal creasing...


Then I added crackle paste through a Prima Netting stencil, and more in the upper right corner using the Tim Holtz Speckles stencil (as always, you can click on any of these photo to see it larger and, in this case, see the crackle detailing better)...


And finally to the step where it all comes together - COLOR! :)  The background colors are Lindy's Stamp Gang Magicals - Autumn Maple CrimsonMerci Beaucoup Mint, Bonjour Butter darkened with Cafe au Lait and for shading and darkening, Sandra Dee Sepia ...


Once I placed all my larger elements on the canvas and had an idea how the layout was going to look, I stamped a criss-cross stamp with brown ink randomly around the open areas...


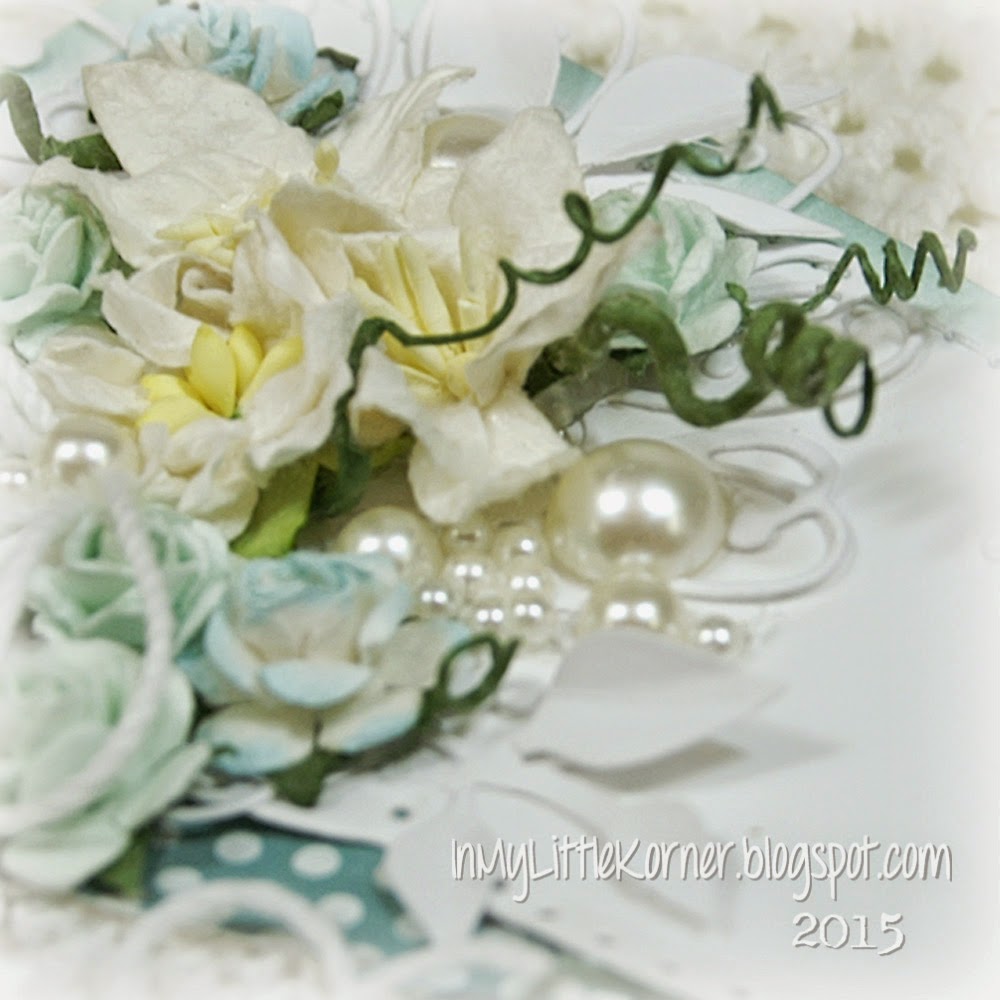
Then it was time to start gluing down elements and bling to get to the final finished product. Here are some closeup shots around the canvas, starting with the beautiful fabric and bead Prima butterfly in the upper left corner...


I painted the brick chipboard piece with both the Red Hot Poker Orange and the Autumn Maple Crimson colors so it had a beautiful soft iridescent glow beneath all the beads and flowers and buttons and pearls...


The metal lock piece was gessoed and painted and stained to look old and rustic, so it would blend with the painted chipboard chain...


Under the mulberry rose and metal leaf is a double-layer diecut heart from one of the newer Tim Holtz mixed media dies...


To make the chipboard words stand out from the rest of the embellishments, I first coated the piece with black gesso, then painted it with Aqua Stickles. When that dried, I accented some of the letters with a white Uni Posca paint pen. The final coat was with some of the Merci Beaucoup Mint Magical, to blend it all together and tone down the glitter just a bit...


Love this "hope" charm! I didn't have a chipboard piece that worked beneath the circles...a flourish just didn't look right, but I felt it needed something beneath the embellishments and beads. So I handcut a few strips of chipboard and painted them with the Red Hot Poker Orange Magical. I wanted to mimic the look of the thinner pieces of the circle above it, and the strips were the perfect balance for the embellishments beneath the circles...


And last but not least, the little group of goodies in the lower right corner...painted wooden angel wings, a painted wooden birdcage, a painted urn button, another word stone, and lots of bling and flowers with another little snippet of lace...


Supplies:
Color mediums:   Lindy's Stamp Gang Magicals - Cafe au Lait + Bonjour Butter,  Autumn Maple Crimson, Merci Beaucoup Mint, Sandra Dee Sepia
Art mediums:   Liquitex white gesso;  Darice Studio 71 black gesso;  Golden crackle paste;  Aqua Stickles;  Coffee Archival Ink,  Viva Inka Gold metallic paints (rose quartz, hematite, and violet)
Chipboard:  Dusty Attic "Mini Chains";   ScrapFX Wordlets ("with brave wings...");   Blue Fern Studios "Shabby Brick Bits" and "Graduated Circles"
Wood Accents:   Kaisercraft "Wooden Flourishes/Wings";   local craft store (birdcage with bird)
Stencils:   Prima "netting";   Tim Holtz "speckles"            Dies:   Tim Holtz "Scribbles & Splat" (heart)
"Hope" charm, metal door lock, fabric butterfly:   Prima            Metal leaves & corner scrolls:   TheFunkieJunkie.com
Stamps:   Unity Stamp Co. "she remained true" and "distressed criss-cross"
Pearls:   Recollections                     Flowers:   Wild Orchid Crafts          
Background vellum:  Tim Holtz "Wallflower" collection
Miscellaneous:   word stones,  seed beads, urn button, spiral clip, cheesecloth, lace pieces


Thanks very much for stopping by for a visit...I hope your week is starting with a smile!

Thursday, May 7, 2015

All Occasion Card - From a Different Angle...

The design of today's card happened by sheer happy accident. While I was choosing papers to use, I decided to use the rest of some coral and ecru patterns I had used before.

I had cut strips of these papers for a previous project and what was left of the original 6"x 6" squares were pieces that were approximately 5" x 4" each. As I laid them out on my worksurface while making the final choice, a couple of them sat at an angle to the others, and that's when I saw the pattern I'd use...I think you'll see what I mean...


See how those paper corners were laid out? Easiest design I've ever made! LOL  I distressed and inked the edges, and laid some scalloped lace under each one, then adhered them all down to a piece of dark brown cardstock before adding just a bit of topstitching on the right side. The right side still needed "something," so I stenciled on some modeling paste in a small tile pattern. Once it was all adhered to the coral cardstock base, I added the rest of the embellishments.

The large coral flower has been in my stash forever...I think it's an older Prima flower. The edges were already accented with dark brown, but I did add a little bit of lighter brown ink over the top to add a bit more shabbiness to it before gluing it down and adding a couple leaves and an embellished pearl stick pin...


Loopy twine double bows were the finishing touch around the large flower. A reader recently emailed me to ask how I make the double or triple bows. I don't have video capabilities, but there are many videos already out there to help you with different ways to make them. I hesitate to recommend any one over another, because they all work to make great bows. 

That said, I wrap the twine/ribbon around my fingers to make mine, and I finally found a video that shows the technique I've used for as long as I can remember. Here's the link to it:  making a double bow using your fingers ...


The finishing touches were to add mini white roses, small pearls and pearl clusters along the lace edges. I didn't have any dark brown pearls in my stash, so I took some white ones and colored them using a Spectrum Noir EB7 pen until they were the deep brown I was looking for...


Supplies:
Patterned papers:   Pink Paislee "Cottage Farms"
Lace:   TheFunkieJunkie.com            Mini roses:   Wild Orchid Crafts
Pearls:   Recollections             Stencil:   The Crafters Workshop "Mini Tile Texture"
Miscellaneous:   fabric flower & leaves,   embellished stick pin,   Golden modeling paste,  
twine,   Spectrum Noir EB7 pen


Thanks for stopping in for a visit today!

Monday, May 4, 2015

Mixed Media - Believe Canvas...

For this week's Mixed Media Monday I'm sharing a 4" x 12" canvas for my craft room that took me a while to get from start to finish. I knew what colors I would be using, and I had a big collection of "findings"  and bits and pieces that I was going to use to embellish the piece, but it just wasn't coming together at first.

Here's the finished canvas...


Here are a couple side views of the beginning of the process. I started with a few techniques I'd used on some of my art journal pages...tissue paper (I used aqua tissue paper, because I knew that would be one of the background colors) crumpled and glued to the canvas front and sides with gel medium, followed up with torn pieces of printed tissue paper glued on, and finally several different stencils used to add modeling paste to the front and sides (I think that doily stencil is going to be my new favorite). I started placing laces and doo-dads here and there to get a feel for where it would end up, but it wasn't working out...so I put all the embellishment pieces in a big baggie and set it aside with the canvas for another day...


And then I saw this canvas by Gabrielle Pollacco, and I copied many of her ideas...the chipboard chain across the top, the use of the wide lace, doubling up on the flourishes (I had started with the deep flourish at the top but was having trouble getting the bottom of the canvas to feel balanced until I looked at Gabrielle's canvas again), and the brown accents around the edges. 

They became the finishing touches to the embellishment layout I had started with, but put to the side when I couldn't arrange the combination to my liking.


Here are some detail photos of the embellishments and paint layers. I used both a teal and violet background paint - when the violet mixed with the teal, it made the deeper purple tone that you see. Once I had glued the embellishments to the canvas and gessoed them, along with a coating over the entire canvas area, I covered all the embellishments and the background with those two colors. You can see the unmixed violet on the side in this photo, before it mixed with the teal to make the purple on the front...


The next step was to dry brush a subtle metallic accent over all the pieces using Lumiere Halo Violet Gold paint...it gave a beautiful warm glow to all the purples. The final color was a turquoise craft paint...again dry brushed over some of the pieces to give the look of aged metal. To get just the right warm brown edge color I was looking for, I mixed a couple different LSG Magicals together - equal parts Sandra Dee Sepia and Cowabunga Copper - and the result was a beautiful brown with just a touch of irridescence...


The quote is a mixture of word stickers, outlined with Prismacolor pencils to accent and shade the individual words...


And finally, a couple closeups of the bottom of the canvas...


Supplies:
Color Mediums:   Lindy's Stamp Gang Magicals - Tibetan Poppy Teal,  Sweet Violet Purple Teal,  
Cowabunga Copper,  Sandra Dee Sepia
Lumiere "Halo Violet Gold" paint;   turquoise acrylic craft paint,   Prismacolor pencils
Stencils:   Prima "Flourish";   The Crafters Workshop "Mini Deco Doily" "Art Is" and "Mini Specimens"
Embellishments:   Maya Road chipboard flourishes and flowers;   Blue Fern Studios "Turkish Bits";   Dusty Attic "zippers" and "mini chains";   
Tim Holtz grungeboard letters, numbers, and hearts
Metal floral corners:   TheFunkieJunkie.com             Mini roses:   Wild Orchid Crafts
Word Stickers:   Paper House Fabric Stickers;   Tim Holtz "Chit Chat Stickers"
Gems:   Creative Imaginations and Kaisercraft          Miscellaneous findings:   buttons, photo turns, spiral clips


Thanks for visiting today...I hope your week is starting with a smile!


Related Posts Plugin for WordPress, Blogger...