Thursday, February 27, 2014

Something Different...

Hi again!  Today I'm sharing a card that's quite different from my usual style. When I first saw this new zipper die from My Favorite Things, I was very intrigued. It appeared to be one of the most realistic zipper dies I've seen so far.

Then I saw some of the sweatshirt cards made by a few members of their design team, and instantly my memories went back to the early 80's when I had a fun lightweight sweatshirt-style jacket that was made of a lined cotton lace fabric, with a small lacy ruffle down the zipper's edges, and bitty roses in among the lacy trim. How fun would it be to make a card reminiscent of my old summer jacket?!

So, that's just what I did...all the while thanking myself for not being able to part with my last sheet of this old Karen Foster lace paper...heehee...(i.e., "hoarding" does pay off some times!)...


I had some chipboard letters in my stash, but of course, not the right color...they were made of manila colored glossy ledger paper, and didn't stand out against the lacy paper background...so I colored them with some Spectrum Noir pens...


I made a double thickness of the zipper tab, glued both layers together, then adhered it to the zipper with a thin foam dot, just to add a little more dimension and give the little charm a bit more "swing room"...


Supplies:
Patterned paper:   Karen Foster  Design/Antique Lace
Zipper Die:   My Favorite Things          Chipboard letters:   Heidi Swapp           Pearls:   Recollections
Lace:   TheFunkieJunkie.com          Roses:   Wild Orchid Crafts


Thanks for stopping in for a visit today...have a wonderful weekend!
        

Monday, February 24, 2014

LOTV - All the Best

Happy Monday, everyone! Since today is release day for LOTV, I thought I'd share one more card made with the new Timeless Victorian paper collection, one of the beautiful new products available beginning at midday today (UK time, so that's early morning U.S. time, no matter what U.S. time zone you live in).

I love this sentiment from Set 25, Handwritten Phrases because it's appropriate for so many occasions - friendship, farewell, hello, get well, good luck - and probably more that I can't think of at the moment. And seriously, how could I resist the beautiful shades of lavender and lilac and aqua in these papers?...


Sometimes I like to put sentiments in unexpected places or orientations...this time, it's up the left side next to a lacy trim die cut from one of the papers in the collection...


I used a series of heart shaped dies to cut a framed opening, and put another, smaller heart frame inside the larger one...


A small floral cluster in the lower right corner balances all the interest at the left side of the card and forms a visual triangle with the sentiment and the lilac bow. A single lily is surrounded with little lilac and aqua roses and an embellished leaf stick pin...


Supplies:
Patterned papers:   LOTV *new* Timeless Victorian collection
Sentiment stamp:   LOTV Set 25, Handwritten Phrases
Dies:   Xyron ShapeZ/Heart;   Papertrey Ink Heart Print;   Tim Holtz Vintage Lace
Punch:   Martha Stewart Rose Leaf          Flowers:   Wild Orchid Crafts
Leaf  stick pin:   Maya Road (embellished)          Pearls:   Recollections          Hug Snug seam binding


If you took part in last week's blog hop, remember to visit the Ideas to Inspire blog to see if you're a winner of one of three fab prizes.  The newest products will be available at the shop today. I suspect the site might be a bit on the busy side with this release if everyone heads over there at the "opening gun," but never fear, this release is worth the short wait! :)

Thanks for stopping in for a visit...I hope your week is starting with a smile!


Thursday, February 20, 2014

LOTV Blog Hop - Good Friends...

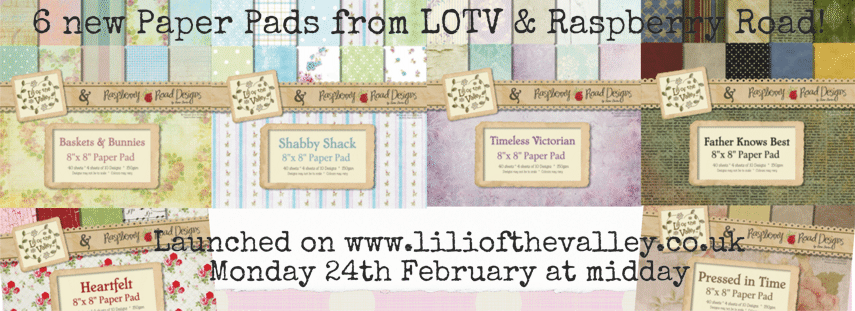
Hello, everyone! It's time for another Lili of the Valley design team blog hop today, with inspiration for using the latest products that will be available to purchase on the website from midday (UK time) Monday, February 24th.

This release is featuring 6 *beautiful* new paper pads, 5 new art pads, and another new set of the popular sentiment tags representing all your family members...


I think you'll find lots of beautiful ideas along the hop - just travel from one blog to another, following the links below, and leave a comment on each blog post.

As always, there are some hidden prizes on the hop...but we on the team don't know whose blogs are the "lucky" ones! The winners will be drawn at random from all the comments left on the "lucky" blogs.  This time, there's a full set of the 6 new paper pads to give away - 2 lucky winners will each receive 3 of the new paper pads. A third prize of a set of the new family sentiment tag stamps is also on the prize list for a third lucky winner. So be sure to visit and leave a comment on each blog hop post to get your name in the drawing for one of three great prizes!

Here's the link list of all the blogs participating in this hop...

Kathy (you're here!)

Today's card features the new "Pressed in Time" collection.  I stamped two of the corner images from Set 21, Grunge Corners and embossed them with peridot green embossing powder. After stamping the sentiment from Set 62, Quotables/Friendship, I highlighted the edges of the key words using a white Uni Ball Signo pen to make it stand out a bit more...


The little butterflies are punched from coral pink vellum,with just a touch of Diamond Stickles on the wings...


I didn't have any dark coral roses in my stash, so out came some acrylic paint and the small paint brush, and after some dry-brushing with the dark coral paint, you'd never know these roses didn't start out this color...


One of my favorite newer tools is the Martha Stewart Beaded Ruffle Edge punch. Here, I cut just the scalloped edging off the punched paper, inked it for accent, and after "scrunching" it just a little to shabby it up, glued the ends of the ruffles under the torn paper edges...


Supplies:
Patterned papers:   LOTV *new* Pressed in Time collection
Stamps:   LOTV Set 21, Grunge Corners;    Set 62,  Quotables/Friendship
Punches:   Martha Stewart Beaded Ruffle Edge, Rose Leaf, and Royal Butterfly
Flowers:   Wild Orchid Crafts          Stamen cluster:   ChocolateLetters on Etsy          Pearls:   Recollections
Adirondack Dimensional Pearls - Mushroom                Ranger Stickles - Diamond
Miscellaneous:   white and natural hemp cording,  vellum scraps


Your next stop on the hop is Mary's blog for some wonderful inspiration. If you get lost at any time along the way, you can refer to the list above, or head back to Ideas to Inspire to pick up the links there.

Finally, don't forget to stop by the Ideas to Inspire blog on Monday morning to find out who the lucky winners are before the new products are available on the LOTV site.

Thanks so much for visiting today...enjoy the blog hop, and good luck to you all!


Tuesday, February 18, 2014

Just a Shabby Little Number...

Hi, all! I didn't disappear into the void - just got my days all mixed up (not sure what that's a sign of...but I'm sure glad I keep my hair blonde and can pull that out as an "excuse" when I do something silly...LOL).

Today's card is just a shabby little number, with no sentiment to make it specific...an all-occasion card in dusty rose pink and blue. The papers were the inspiration. They're from Maja Designs' Vintage Autumn Basics collection - I used the 6x6 pad (you can find it here ). The small tags were one side of one of the patterned papers. I had fun mixing the shabby look of the distressed edges and the jute twine with the "dressed up" look of the flowers and pearls...


Once I "shabbied" the edges of the papers and tags with inks and an edge distresser, I curled the ends of the tags up just ever so slightly - they're only adhered to the lacy-edged paper by the very ends...


I love this crocheted lace trim - I've gotten a lot of use out of it since I first purchased it. This time I added just a single line of pearls through the center to bring some of the elegance over to the "shabby side" of the card...


The pink and blue flower came assembled the way it is here, but the blue flowers were individual little blooms that I grouped together and added pearl stamens to the center of...


Supplies:
Patterned papers:   Maja Designs Vintage Autumn Basics collection (6x6)
Punch:   Martha Stewart Doily Lace Edge
Dies:   Tim Holtz Vintage Lace;   Sizzix Flowers Branches & Leaves
Crocheted lace:   LittleRedCottage on Etsy          Flowers:   Prima          Pearls:   Recollections
Pearl stamens:   ChocolateLetters on Etsy          Miscellaneous:   jute twine


Thanks for visiting today! 


Tuesday, February 11, 2014

LOTV New Paper Peek - Happy for You...

Good morning, all! Lili of the Valley has *six* new paper pads about to release on the 24th of this month, and they're all real beauties! If you caught our own Dawny P on Create and Craft yesterday, and you acted quickly, you were able to order some of these before the shop release, since they're exclusive to C&C until then. There are still a few available at C&C, but many of them sold out quickly. :)  Don't fret, however...there will be plenty restocked to the shop by February 24! I can't pick a favorite...they're all really so pretty.


Today I'm sharing a card that features the "Baskets & Bunnies" collection. Don't let the name mislead you...there are no basket or bunny papers here...just gorgeous spring colors and patterns that are truly a joy to work with. In fact, I used six (yes, you read that right...6!) different papers from this collection on today's card - these papers really deserve to get all the attention...


I used sentiment words from LOTV's Stamp F, Words for Tags and split them between a tag (from Set 14, A5 Tags) and the inside of the small air-dry clay frame next to the flower cluster. It's very subtle, but in the upper left corner, framing the "happy" tag, is a stamped corner from the newly released Set 68, Corners set - it's stamped and heat embossed with white ink and powder...


The floral cluster is centered with a pink and yellow gardenia that's surrounded with cream lilies, and small cream aster daisies, with lots of pearls and pearl trim...


Supplies:
Patterned papers:  LOTV *new* Baskets & Bunnies collection
Stamps:   LOTV Set 68/Corners;   Set 14/A5 Tags;   Stamp F/Words for Tags
Dies:   Spellbinders Foliage Two           Flowers:   Wild Orchid Crafts          Pearl trim:   local craft store
Frame:   Martha Stewart air dry clay and clay mold          Crocheted lace:   TheFunkieJunkie.com
Pearls:   Recollections          Tim Holtz Memo Pin          Hug Snug seam binding


Thanks so much for visiting today...I hope your week started with a smile!


Friday, February 7, 2014

"Squirrel!" - And Other Pretty Things...

Happy Friday, everyone! Here in California, we're celebrating the return of rain...glorious rain that we hope will fall steadily for a few more days to help alleviate the serious drought conditions. So YAY for rain! :)

Last week I told you about finding bits and bobs of supplies left over from previous projects that were found while I was cleaning out my craft room (like the dog in the movie "Up" who is easily distracted mid-sentence by a "squirrel!" I'm easily distracted while cleaning when I find fun things I'd forgotten about.) Today's share is that card.

Two of the pieces I found were the full, and half-piece, die cut shapes from coral toned patterned papers. I decided to cut a larger piece of the same shape to form the base of the card. Then I found the two hearts...one diecut and covered with plain white textured cardstock (that I ran through the Big Shot using a border embossing folder so just the center of the heart was embossed with a pattern, and the lines at the edge of the border folder formed a smooth area to the side of the pattern), and the chipboard heart frame that I had already painted, inked, and glittered. Added to the lace snippet, the piece of white burlap, and the little white butterfly punched from a paper with glitter swirls, I had the perfect start for a pretty spring-toned card in coral, white, and green...


I wanted the bows to look "airy" so I combined some white and natural twine with a piece of white hemp cord to form the triple bow at the intersection of the two hearts, then added a cluster of white pearls in the center...


The roses and leaves on the card were dotted with clear gel to simulate dew drops...


A small rose was added inside the heart frame to balance the roses at the top of the card...


And lastly, a flourish of pearls was added to mimic the fluttery butterfly's path of flight and fancy...


Supplies:
Patterned papers:   Prima Almanac collection (coral damask);   Bo Bunny Coral Dot 
Dies:   Spellbinders Grand Labels Four;   Sizzix Flowers Branches & Leaves
Punch:   Martha Stewart Royal Butterfly            Flowers:   Wild Orchid Crafts
Lace, white burlap:   TheFunkieJunkie.com            Pearls:   Recollections
Miscellaneous:   white hemp cording, twine, clear coarse glitter, Viva Decor Glass Effects Gel


Thanks for stopping by today...have a wonderful weekend!


Monday, February 3, 2014

(P)ink and (T)aupe with a (T)ouch of (P)urple...

Hello, all...and happy February (already!). I'm 2/3 of the way to the end of this latest sort-and-donate project in my craft room...it's a good feeling! So far, I'm resisting the urge to go through the donation stack "just in case I'll need it some time in the future" (and if you know me, you'll understand what will power that's taking...LOL).

One drawer I was recently working my way through was a large lateral file drawer filled with miscellaneous craft items that I put there over the last few years, solely for lack of a better place to store them. I commented yesterday that it was like a "craft memory drawer." Inside were instruction books and materials for various crafts I tried over the years, old sewing patterns going back as far as the 80's (that made me giggle as I remembered my old work wardrobe by looking at the patterns), and a couple mysterious embroidery tools that I don't even remember purchasing (but they have receipts from early 80's, so maybe that's why I don't remember buying them-that was a long time ago...heehee)!

But it will be nice if I can keep things as organized as I'm getting, so it will be much easier to temporarily move them out of the room when it's time to lay down the new floors...yay! And certainly much easier to pick and choose which items to keep close at hand so I can still craft a bit while my room is unusable.

Today's card is one I put together a couple weeks ago before this "cleaning" made such a mess in here. It's heavily inspired by Klaudia and her use of twine to form an airy wreath. Of course, when I went to write this post, I couldn't find the exact card that inspired this wreath, but that might benefit you, because you'll get to see more of her beautiful work if you go looking for it, too! :)  I intentionally left any sentiment off the front, making this an "all occasion/any occasion" card...


The twine wreath sits atop a die cut twig wreath, just to give it a little more contrast against the background papers - I put some clear white glue on my fingertips and ran the twine along them while shaping it into a circle slightly smaller than the die cut wreath...


...then added a couple matching twine bows among the top rose trio...


Beneath the bottom trio of roses, I added a snippet of crocheted lace to add just a touch of brightness against the muted shades of pink and taupe...


Supplies:
Patterned papers:  Maja Designs Vintage Summer Basics collection
Dies:   Impression Obsession Twig Wreath;   My Favorite Things Royal Leaves;   Sizzix Flowers Branches & Leaves
Lace:  TheFunkieJunkie.com          Pearls:   Recollections
Flowers:   LayoutsFromTheHeart on Etsy (pink roses);   Wild Orchid Crafts (purple roses)
Miscellaneous:   pink and natural jute twine


You may have noted a new hotlink along the right side of my blog...LOTV is starting a new feature on the Ideas to Inspire blog...daily candy...and it's already started!  You can check out all the fun details HERE .

Thanks for stopping by for a visit today...I hope your week is starting with a smile!


Related Posts Plugin for WordPress, Blogger...