Thursday, January 31, 2013

Hybrid Happy...

I've gotten my new printer, and it's so much fun to be able to print digi elements again!  (I ended up not getting another big photo printer after all, but found a great deal on a Canon Pixma MG6220, and so far, I'm loving the photo quality and versatility of this all-in-one printer.) Luckily I had some elements printed up before my older printer died completely, but I really wanted to print out some of my newer papers and collages, and didn't realize how much I depended on that printer until it wasn't working up to par anymore.

Now we're in the process here of getting all my programs and files moved over to a newer and faster computer.  So there's less time for crafting while I verify that all my files are backed up, and all the softwares work after installation.  It's a time consuming process, and I'm so glad my better half is a computer geek and loves doing this kind of thing, because it's not my favorite activity by a long shot.  I'm one of those people who enjoys using and learning software tasks on the computer, but is hopelessly lost when trying to figure out how it all works on the hardware side.

In the meantime, here's a little "Thinking of You" card that uses a beautiful background paper from ByDigitalPaper on Etsy...this one is in Janet's Shabby Chic Paper set...


I inked up the chipboard frame with Spun Sugar and Brushed Corduroy Distress Inks, coated it with clear coarse glitter, and attached it directly to the center area of the paper that had no printed flowers.  The sentiment is stamped on the inked diecut and adhered with foam tape to the center of the larger frame. (It's been a long time since I attempted to do shadow stamping. I literally held my breath as I stamped that sentiment a second time, hoping I had placed it offset as I thought I had....LOL)  I cut the leafy branch piece in half, and put part of it off the left side...


A couple Hug Snug bows with a spray of pearls in the center, a small pearl flourish, and the other half of the leafy branch beneath the pearl flourish...and that's all this card needed to be finished...


Supplies:
Patterned paper: ByDigitalPaper on Etsy/Shabby Chic Paper      Chipboard frame:  Tattered Angels
Dies:  Sizzix Flowers Branches & Leaves;  Spellbinders Labels 20
Pearls:  Recollections      Sentiment stamp:  Inkadinkado      Hug Snug seam binding


Thanks so much for stopping by for a visit...I hope your week is going well!


Monday, January 28, 2013

A Photo-Heavy Monday...

Sometimes, while cruising around the Web and social media sites, you find someone whose work inspires you in one way or another.  This happens often to me, and most recently from a wonderful card maker "across the pond" who, although she doesn't have a blog yet, shows her wonderful creations on Facebook. Her name is Debbie Stevens, aka Paper-Pastimes, and you can find her Facebook page here if you'd like to join/follow her page to keep up with her creations.  ETA: Debbie also now has a blog...you can find it  here.

Debbie inspired me to use more of my dies on my cards, and especially to do so while using a monochromatic color scheme.  You can see by most of my cards that I'm a big fan of patterned papers, so I love the challenge of creating a card without any patterned papers at all, using only cardstock to create a variety of patterns and dimension.

Today I'm sharing three cards that I made recently, all inspired by Debbie's work. First up, an all-occasion card (the card is actually a light cream color, but it looks much whiter in straight-on photos). On this card, I used several layers, each attached to the card with foam tape. The floral image is adhered to the light brown layer at the bottom of the stack. The next layer up is the dot-embossed cream cardstock with the oval cut out to display the floral image. Next is the Floral Oval die, with the center oval cut out larger than the oval displaying the image. The final layer is the Tiffany Frame die, set slightly inside the oval cut into the center of the larger Floral Oval die.


I pulled the pink color from the rose in the image for the scrunched seam binding bows, and topped them with a single lavender mini rose, some punched branches, and a smattering of small white pearls and clear crystals...


Before adhering it to the card, I coated the Tiffany Frame die with clear glitter for just a touch of texture and sparkle. and added a couple pearls to the top and bottom details...


Supplies:
Dies:  Spellbinders Floral Ovals, Classic Ovals Large and Small; Memory Box Tiffany Frame
Cuttlebug Polka Dots embossing folder      Floral image:  The Graphics Fairy
Paper rose:  Wild Orchid Crafts      Martha Stewart Medium Branch punch
Hug Snug seam binding      Pearls & crystals:  Recollections


The next card is a birthday card for someone I know doesn't follow my blog, so won't see it before I send it out. :)  This time I set the layered sentiment chips inside the cutouts made in the center of the card.  Here's what I'm talking about...


The dry-embossed cream layer has a round cutout to show the solid cream layer at the bottom. It's topped with a round frame with a center circle cutout slightly larger than the one in the lower layer.  Inside that cutout are two sentiment chips of varied size, each adhered to the card with foam tape for dimension...


The floral and bow cluster arcs around the bottom of the round frame...


Supplies:
Dies:  Spellbinders Parisian Motifs, Standard Circles Large and Small; My Favorite Things Royal Leaves; Memory Box Elegant Scrollwork
Sizzix Diamond Embossing Folder      EK Success Scalloped Circle Punch
Sentiment stamp:  Papertrey Ink      Paper flowers:  Wild Orchid Crafts      Crocheted flower: local craft store
Pearls:  Recollections      Hug Snug seam binding
Miscellaneous:  cheesecloth, white acrylic paint


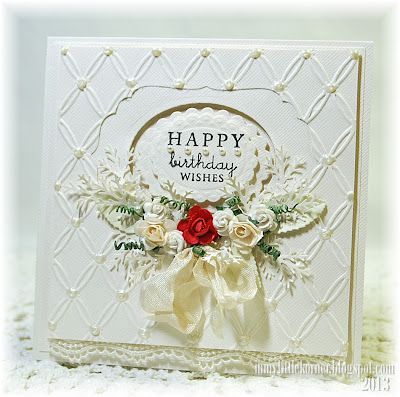
And last, but not least, the first card I made inspired by Debbie's work and had set aside until I completed the other two.  Turns out the timing was perfect, because I found out I had missed the birthday of a special friend, and was especially glad I could send her something she wouldn't have already seen here. LOL    On this white card, the dry-embossed layer is adhered directly to the solid layer beneath it - then both together are adhered to the card with foam tape.  The sentiment chips are "popped up" with foam tape, also.  The bottom of the card is decorated with a fancy-edged lace...


A single red rose in the floral cluster of cream and white roses, and the green wires on each of the mini flowers, are the only parts of the card that aren't white or cream, so they really  stand out against all the other monochromatic textures...


Supplies:
Dies:  Spellbinders Labels Four, Classic Ovals Large, Scalloped Ovals Small, Beaded Ovals;  
My Favorite Things Royal Leaves
Couture Creations Tied Together embossing folder      Martha Stewart Medium Branch punch
Paper roses:  Wild Orchid Crafts      Mini pearls:  Recollections
Lace:  TheFunkieJunkie.com      Viva Decor Pearl Pen-Cream      Hug Snug seam binding


Thanks so much for visiting today...I hope your week is starting with a smile!


Friday, January 25, 2013

Going Back In Time...

Happy Friday!  Am I the only one thinking that January is buzzing by so fast it's hard to keep up? January usually drags a bit for me after the hectic pace of the Christmas and New Year holidays...but not this year!

I haven't had a lot of time to participate in current sketch challenges lately, but that doesn't mean I don't use sketches anymore...as with the card on last Friday's post.  Today's card uses another older sketch...a  Mojo Monday  sketch from a little more than a year ago (better late than never, hmmm? ).

Shades of deep pink and bright red are accented with green, white, and complementary purple...total shabby fun on this upbeat card...


Here's the sketch it's based on...I followed this sketch almost to the letter...


A couple handmade pearl wires are looped though the flower cluster ...I'm so glad I held on to those spools of colored wire from years ago when I used it on my scrapbook pages ...


On the other side, a twisted piece of pink wire from the larger flower, and a pearl flourish to offset the pearl loops on the opposite side...


Supplies:
Patterned papers:  Echo Park This & That Graceful      Flowers:  Wild Orchid Crafts & local craft store
Dies:  My Favorite Things Decorative Doily Duo and Royal Leaves;  Spellbinders Standard Circles Large 
and  Fancy Framed Tags Two
Pearls:  Recollections      Sentiment stamp:  Papertrey Ink      Hug Snug seam binding
Miscellaneous:  cheesecloth, handcrafted pearl wires


Thank you for visiting today...have a wonderful weekend!


Wednesday, January 23, 2013

The Same...but Different...

Generally, I like to make each card a one-of-a-kind design...even on the "twin sets" I make, I try to change up something in the design so they're not completely identical. And now and then I like to take some elements of a previous project and use them in a different way to see if I can get a different look.  I did that with the digital collage used on the front of today's card.  I posted a card here last July, and the collage was the center of a brighter and more "formal" card.  Today it's definitely "shabbied" up with distressed and painted edges and surrounded with deeper tones...


It's a smaller floral cluster than my usual, sitting atop a cardstock flourish and accented with a seam binding bow and handcrafted stick pin of silver with white pearls and one simulated black pearl...


Supplies:
Digital collage elements:  Paris label, vintage frame, pink rose, Eiffel Tower, teacup: The Graphics Fairy;  
floral clusters:  vintageimages.org (flowers45 and flowers334)
Patterned papers:  Crate Paper Random collection;  Prima Tea Thyme collection
Sentiment stamp:  Papertrey Ink      Lace:  TheFunkieJunkie.com      Die:  Memory Box Elegant Scrollwork
Mini roses:  Wild Orchid Crafts      Mini pearls:  Recollections      Hug Snug Seam Binding 
Miscellaneous:  handcrafted stick pin, clear coarse glitter, white craft paint


Thanks so much for stopping by today...I hope your week is going well!     


Monday, January 21, 2013

It's All There in Black and White...

Happy Monday! I hope you all had a fun weekend, and if you're one of the lucky ones to have this as a 3-day weekend, you've got one more day of fun left! :)

Today I have a twin set of mini note cards to share...that both feature a black and white damask patterned paper as the main focal point.  I cut the 6x6 paper so the damask pattern could be centered on each note card, surrounded with a die cut chipboard frame, then complemented with black and white stripes and a dash of contrasting color.


Bright rose pink is the contrasting color for the first twin in the pair. I love this sentiment because of its versatility. It's fitting for so many reasons...get well, sympathy, friendship, and more...


Just a light touch of clear glitter accents the damask design...


And for the second, a subtle golden tan color alongside the black and white...a little more elegance for saying "Thank You"...


And lastly, a peek at the inside details...

Supplies:
Patterned papers:   Crate Paper Portrait collection      Edge Punch:   Martha Stewart Flower Bed
Crocheted laces:  local craft store      Black pearls:  Kaisercraft      Pearl circles:  Basic Grey
Sentiment stamps:  Paper Sweeties "You Are Amazing" set      Hug Snug seam binding


Thanks so much for visiting today...I hope your week is starting with a smile!


Friday, January 18, 2013

Bright and Sassy...

I'm ending the week with a bright and sassy card.  It's still pretty cold here at night (below freezing) but lately the sun's been shining brightly during the day, and that makes me turn to brighter colors.

This was also a fun card to make because a little experiment turned out the way I'd hoped...yay!

Here's the finished card, that was based on The Deconstructed Sketch #72 , from October, 2012...


You might have to click on the card photo to enlarge it to see what I'm talking about, but see that scrunched lace beneath the bright red bow?  It didn't start that color.  Look as I  might through my sometimes embarrassingly large stash of laces, I didn't have a yellow or yellow-green lace, and even though the card base is white, white lace just didn't work for me.  But I did find this lace:


Obviously, not what I was hoping to find.  But after I realized this was cotton lace, I pulled out a plastic bowl, added some warm water and some bleach, cut a piece of this green lace, plopped it into the bowl of bleach water, crossed my fingers, and left it there in the laundry room sink for about 15 minutes.  When I returned...success!  The green lace had bleached down to the perfect yellow-green shade to complement the colors in the papers I wanted to use.  Gotta love it when that happens!

Then all I did was gather it through the center (the lace is 2" wide), and hot glue it down. 


I added the black cardstock flourish, scrunched seam binding bow, and a few pearls and crystals to the center, along with a tiny sentiment tag...and now I had a bright and cheery finished card!

Supplies:
Patterned papers:   Echo Park For The Record collection      Digital image:   CherryPinkPrints on Etsy
Die:   Memory Box Elegant Scrollwork      Pearls & crystals:   Recollections
Lace:   local craft store      Hug Snug seam binding


Thanks so much for stopping by today...have a wonderful weekend!


Tuesday, January 15, 2013

Tea (Thyme) for Two...

A crafter's dilemma:  when you find a set of papers you really like, you have to resist the urge to use them on everything you make and ending up with projects that all start to look the same.  My most recent favorite is Prima's Tea Thyme collection. But instead of resisting, I went with it, and did my best to coordinate one of my favorite papers from the Tea Thyme collection with different colors to add some variety.  To be honest, because I let myself go with the flow during the design process, the two most recent cards still look a lot alike. LOL

The first one is made up in pink and dark cream, with green as the accent color...


Tea-dyed wide crocheted lace sends your eye down to the large floral cluster in the corner, made up of tea-dyed white craft-store flowers and a pretty green Prima flower in the center of it all...all surrounded with lots of mini dark cream pearls.  The diecut cardstock flourish is dusted with clear glitter, but it's a little difficult to see that detail in the photos...


Supplies:
Patterned Papers:   Prima Tea Thyme collection (floral);  Crate Paper On Trend collection (background)
Dies:   Memory Box Elegant Scrollwork;  My Favorite Things Royal Leaves
Punch:   Martha Stewart Medium Branch      Lace:  TheFunkieJunkie.com      Green fabric flower:  Prima
Pearls:  Recollections      Miscellaneous:   white fabric flowers


For the second card, I used blue as the accent color.  In these photos, the blue looks more intense than it does to the naked eye. (I think that might be the effect of the Ott light creating contrast against the white backdrop.)  In real life, it's a dusty, subdued blue.  The differences between this and the pink card?  A smaller square card, a smaller floral cluster, more rounded lines with the corners and scalloped lace and paper edge...and, ummmmm.....ok...they're basically the same card made on different days...LOL.


In keeping with the theme of more rounded edges, I used a Spellbinders die shape as the sentiment block, and stamped the sentiment using a coordinating rose colored ink...


The floral cluster sits atop a tea-dyed craft store flower, using mini roses and branch punches to make the cluster.  I used cheesecloth again beneath the floral base, but this time I pulled some of the pieces of the cheesecloth up between the flower petals to add even more shabby dimension...


Supplies:
Patterned papers:   Prima Tea Thyme collection (floral);  Echo Park Note To Self collection (blue and music patterns)
Punches:   EK Success Diamond Lace;  Martha Stewart Medium Branch
Scalloped lace:   TheFunkieJunkie.com      Paper roses:  Wild Orchid Crafts      Pearls:  Recollection
Sentiment block:   Spellbinders Labels 20 die      Sentiment stamp:   Pebbles
Miscellaneous:   cheesecloth,  fabric flower (tea-dyed)

Thanks for visiting today...I hope your week started with a smile!


Sunday, January 13, 2013

Old-Fashioned Fun...

I have a short-and-sweet post today with one more card to show you from last week (but yesterday was a very productive day in the Korner, too...I'll have several new projects to share with you next week!).

When I made up this card, I was in the mood for something old-fashioned and almost Victorian in style.  So I pulled papers in muted but strong shades of aqua and purple, added lots of pearls and faux-pearl accents, and used dark ink and cream paint to give an aged and distressed effect around the edges.


I punched the vintage rose image into a small oval shape, then layered a couple more oval die cuts beneath it...adding some lilac faux-pearl trim with a Viva Decor Pearl Pen...


After tea-dying the scalloped lace, I cut it into a couple different pieces to layer beneath the vintage image, adding some Kaisercraft mini pearls to the flower centers along the top of the lace...


Supplies:
Patterned papers:   Crate Paper On Trend collection;  Prima Almanac collection
Dies:   Spellbinders Floral Ovals, Classic Ovals Large, Ironwork Accents border;  My Favorite Things Royal Leaves
Vintage rose image:  Dover Publications      Lace:   TheFunkieJunkie.com      Paper rose:   Wild Orchid Crafts
Lilac mini pearls:   Kaisercraft      Viva Decor Pearl Pen-lilac


Thanks so much for visiting today!  I hope your weekend is turning into a fun one...it's a football weekend in this house, so lots of at-home things are happening while the games are on. :)


Thursday, January 10, 2013

Soft Coral and Floral...Winter Style

It's often a challenge to take my favorite soft colors for cards, and work them into more seasonal uses.  I love pinks and corals, but like to craft in the theme of the current season...it's one of the reasons I have a difficult time getting "in the mood" for Christmas cards when the temps outside are still in the 80 degree range. :)  But this experiment seemed to work out in my favor...I mixed gray and pinks together, and got what I was aiming for...soft pinks and corals, winter style.

I had been watching a home-decorating show on tv where they made a wall arrangement of empty square picture frames...and it got me thinking to do the same on a card.  I've used oval open frames often on my cards, but I can't recall ever using a square one...until now...


It was fun putting the floral spray together inside the frame...all layered atop some more scrunched tea-dyed cheesecloth (it's fast becoming a new "staple" in my card making supply list!).  A light dusting of clear glitter on the embossed border around the open square adds just a touch of glimmer to the kraft-backed coral cardstock that was lightly sanded to distress and let some of the kraft show through.


A pearl stick pin with gray and white pearls contrasts with the tiny dark cream seed pearls scattered on the leafy branch die cuts...


Supplies:
Patterned papers:  Prima Almanac collection; Prima Tea Thyme collection
Dies:   Spellbinders Classic Squares Small, Fleur de Lis Squares;  Sizzix Flowers Branches & Leaves;  
My Favorite Things Royal Leaves
Edge Punch:   Martha Stewart Eyelet Lace      Paper roses:  Wild Orchid Crafts
Pearls:  Recollections      Hug Snug seam binding    
Miscellaneous:  cheesecloth, crocheted lace, handcrafted stick pin, coarse clear glitter

Crafting is still a bit sporadic these days, and that means the blog posts are, too. Hopefully things will be back on a more normal "schedule" soon!   Thanks so much for stopping by today!


Related Posts Plugin for WordPress, Blogger...