Monday, March 19, 2012

Just a Note...

It was a fun week in the Korner last week...rainy days must be one of my creative cues! 

I gave myself a little challenge during the week, and that was to make up two cards using only papers left over from other previous projects (except for the card base itself), something I haven't done in a long time.

When I finish a project, any leftover piece that's 3"x5" or larger goes into a 2-1/2 gallon Ziploc bag...I have 4 of those bags leaning against the Iris cart next to my work area.  One is for cardstocks in neutral colors, one for cardstocks in ROYGBIV colors, one for patterned papers ( patterned paper leftovers from 6x6 pads go back into that pad, not into the large bag...I used only leftover pieces from any of my 6x6 pads for this), and one for chipboard scraps.

I write the vendor and collection name onto the backs of the patterned paper leftovers so I can credit them later, or even use them to match up when I'm looking for coordinating papers.  You'd be surprised how many times I dip into those bags in the process of making cards on a regular basis to match or mat papers I've chosen to use.

I started out keeping my "scraps" in a smaller basket, separated by dividers marking them by color.  But I found that when I cut into a 12x12 piece of cardstock, for example, and didn't use the whole piece, I didn't want to put the remainder back with the full size papers, yet it was too large a piece to fit into the file box without cutting it down further.  So I migrated to the large bags that I could close securely to accomodate the larger pieces, too...and it's worked out well.

OK, enough chatter...here are my "from the bags" cards...hope you like them, too.


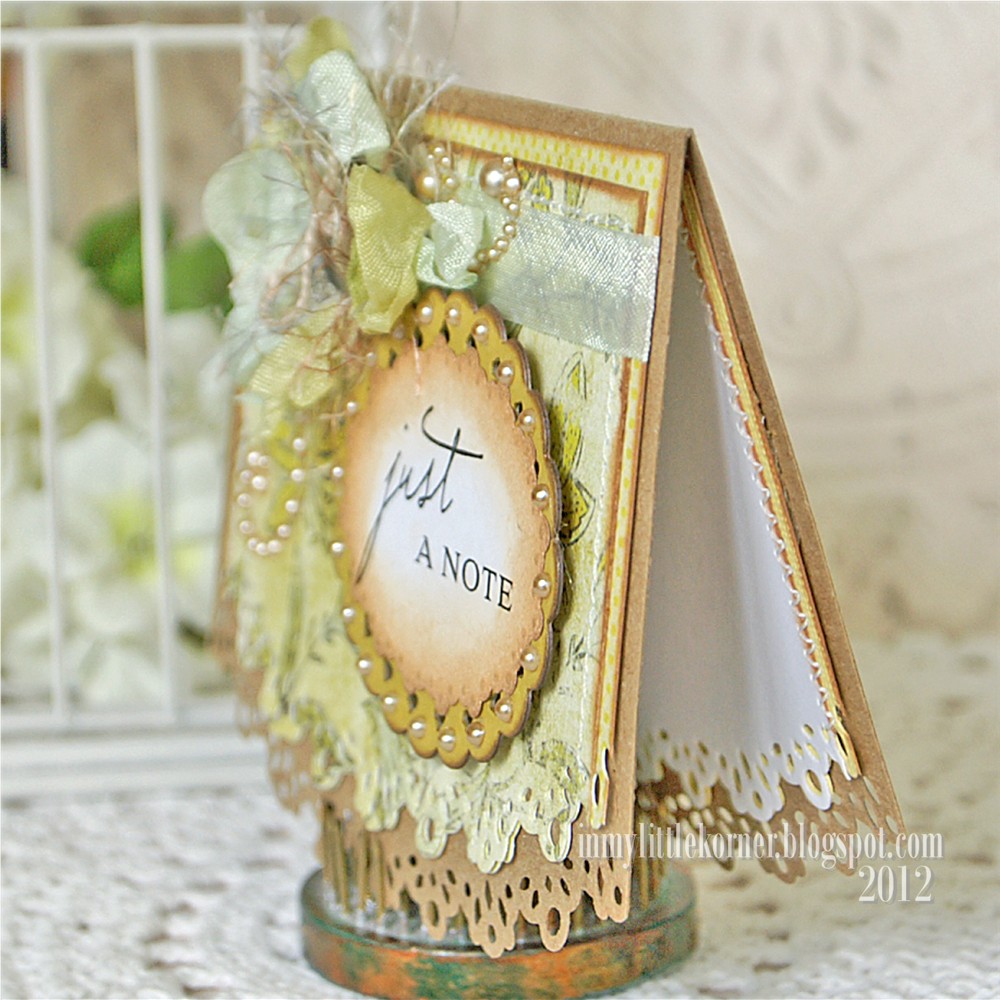
Here's what I do on the insides of cards with an edge like this...

Supplies:
Patterned Paper: Pink Paislee Queen Bee collection      Edge Die: Papertrey Ink Edgers 2
Journal spot: Martha Stewart label      Journal Spot background: Spellbinders Beaded Ovals die
Pearls: Recollections      Sentiment stamp: Papertrey Ink      Hug Snug seam binding 

Next up, a very feminine friendship card...


Supplies:
Patterned papers: BoBunny Ella Toile ("b" side); Prima IOD Coquette/Jolis (floral); MyMindsEye Stella Rose/Hazel collection (green pattern); Echo Park Victoria Gardens collection (pink damask)
Ephemera piece: Pink Paislee Buttefly Gardens Ephemera pack      Fabric flower: Frogfeathers on Etsy
Fabric & paper leaves: Prima      Spellbinders Labels 8 die      Pearls: KaiserCraft and Prima
Doily: Wilton      Handcrafted stick pins      Pearl & crystal strip: Recollections      Flower laces: local craft stores
Scalloped lace: LittleRedCottage on Etsy      Sentiment stamp: Hero Arts      Vintage button from stash  

Happy Monday...thank you for stopping by!   


Sunday, March 18, 2012

Spring...

Spring starts this week...they say.  After a beautifully mild winter with strange temperature swings, we're finally getting our "winter rains."  5 days so far, and still counting.  So while it's been a great productive week in the Korner, it's hard to get good photos to share with you, when we're under dark clouds. 

If you could have seen me this morning trying to photo at least a few cards, you would have laughed.  It was dark, then the sun (yay!) would peek through, so I'd run to the setup in the family room near the wall of windows to snap a few photos of cards.  Many times, in the 15 seconds it took me to get to the family room, it was dark again...and I mean dark. There are some mean clouds up there today, and I'm betting my family and friends in the Sierra foothills are getting the brunt of those mean clouds.

But there's a fun "Spring is Near" challenge at The Shabby Tea Room, and my card was finished last Wednesday, and it's down to the last hour, and I'm going to get this card posted come rain or shine! :)

The challenge was based on this photo - to use at least three colors, and dry embossing:

and here's the card I made for it:

Supplies:
Patterned paper: Echo Park Victoria Gardens collection     Pearls: Recollections     Doily: Wilton     Paper Roses: Prima
Dies: Spellbinders Grand Scalloped Rectangles and Classic Squares Small, Cuttlebug Floral Edge Embossing Folder
Clipart: Flower Girl: Vintage Images;  Cologne Label: The Graphics Fairy;  Butterfly: Dover Publications


I chose to use lavender, pink, green, and cream from the palette in the challenge photo...


and dry embossed the three flower stems using a Cuttlebug embossing folder, then accented them with a light brushing of Antique Linen Distress Ink, and a dusting of coarse clear glitter inside the petals:


I'm still trying to get some photos of more of the cards I made this week, so I'll be back tomorrow morning with some new little pretties to share with you.  Thanks for stopping by!


Wednesday, March 14, 2012

Never say "never"...

A couple posts ago, I showed two all-occasion cards that I had made a while back, and forgotten to post. They'd both gone on to their intended destinations already...that's how long ago they were first made.

I had a request from a friend to remake those two cards, only with "happy anniversary" sentiments, and two additional anniversary cards.  I like all my cards to be one-of-a-kind, and often, don't have the supplies to duplicate cards exactly, unless I know ahead of time that I'll be making them in sets or pairs (as with the Easter cards posted recently).  But this was a special request, and remembering to "never say 'never,'"with a little bit of digging through my stash, I was able dig up supplies to come close to what I'd already made. The clipart can be reprinted, of course...and often the flowers can be made to closely resemble others.  The papers are slightly different, but if you don't look too closely, the "second generation" of the two cards looks very much the same as the originals, but just different enough not to be exactly the same.


Supplies:
Patterned papers: MyMindsEye Stella Rose/Hazel (aqua tone-on-tone); Basic Grey Hello Luscious (aqua print);
Graphic45 Once Upon a Springtime/Spellbound (coral)
Felt doily: My Favorite Things Decorative Doily Duo die       Paper flower: Prima      Pearls: Recollections
Laces and tulle: local craft stores      Clipart: The Vintage Workshop blog  
Sentiment stamps: Papertrey Ink ("happy""wishes"); Hero Arts ("anniversary")

On this next card, the doily's a little pinker, and the background paper's a bit greener, and the flower uses different laces and trims...it's kind of fun how those slight changes can change the overall appearance, even using the exact same placement/layout as the original:


Supplies:
Patterned paper: Pink Paislee Butterfly Garden/Nature Sanctuary      Butterfly punch: Martha Stewart
Clipart: The Feathered Nest        Paper doily: Wilton      Pearls: Prima and Recollections
Pearl brad: Gartner Studios      Laces: local craft stores      Hug Snug seam binding
Sentiment stamps: Hero Arts ("happy""anniversary"); Papertrey Ink ("wishes")

Because the request included two additional anniversary cards, I sent along pics of two cards that I had already completed except for the sentiment, just in case one or both were acceptable.  And they both were!

The original heart clipart (from The Graphics Fairy) used on this card has a Christmas sentiment on it, so I did some editing in Photoshop Elements to remove that...


Supplies:
Patterned papers: Prima Flights of Fancy/Tiptoe (pink dot); Fancy Pants Aged Florals/Beloved
Heart clipart:  The Graphics Fairy       Paper doily: Wilton      Hug Snug seam binding
Scalloped lace:  LittleRedCottage on Etsy      Pearls: Recollections      Tulle: local craft store
Scalloped edge dies: Spellbinders Classic Scallop Edgeabilities and insert      
Sentiment mini block: Spellbinders Blossom & Tags Accents die     
Handcrafted stick pin (made with Maya Road heart pin base)
    
I've always liked the floral pattern on the paper used for the next card, and it was fun to use my homemade mists to try to match and blend the paper colors onto the Prima Resistant Canvas corner flourish - I wanted some texture up in the corner, but didn't want to take away from the colors of the paper.


Supplies:
Patterned papers: Glitz Designs Laced with Grace Floral; Cosmo Cricket Haunted/Ominous (scalloped border)
Pearl flourish, resistant canvas corner flourish, paper leaves: Prima
Chipboard frame: Tattered Angels      Pearl cluster & mini pearls: Recollections
Lace flower applique: Jolee's Boutique      Scalloped edge die: Spellbinders Classic Scallop Edgeabilities
Sentiment stamps: Papertrey Ink      Crocheted edge trim:  LittleRedCottage on Etsy     Handcrafted stick pin

Thanks for stopping in for a visit.  We're in for some very rainy days the rest of the week...sounds like the perfect time to "hole up" in the Korner and make some more cards.  See you soon!

Saturday, March 10, 2012

Pinning...

I bet your first thought went to the popular website after seeing that title...but no, not that kind of pinning. I'm talking stick pins, or trinket pins. 


I like to use them on my cards, and I like to have a variety of styles and colors ready to go when I need them.  Like most of my handmade embellishments, I don't like to stop and make them while I'm on a roll making a card. Instead, I make up many of my embellishments in advance (or in the case of flowers, I make up the pieces/layers and assemble them to match the project later). And, I like to be able to see them quickly and easily. So a small, traditional "tomato" pin cushion isn't the best storage solution for my needs - it's not quite a large enough  surface area to be able to see all the different colors/styles of the handmade pins. I need a stationary base that can stand on its own, and is larger than most pre-made cushions.

I have purchased a couple small and beautiful pin cushions from Etsy sellers, but they're hanging pin cushions, and to be honest, they're just so darn pretty I don't want to cover them with more pins!  I have them hanging in my craft room as decoration - like I said...they're just so darn pretty.

There are so many creative ways to make pin cushions, and I remember one day I spent several hours just admiring all the creative ways people had come up with to store their pins. I started searching locally for the one item that would strike my fancy to use for my base.  I cruised craft stores, local thrift stores, local dollar stores, and a couple passes through the local antique store for something unique and fun.  Still I haven't found the "perfect" item, but I needed to do something for storage soon. So I went back to one of the local craft stores for a "distressed" ceramic sugar bowl that I remembered would give me the right amount of free, visible space for the pins, and I was set to start.  The best part?  It was now 50% off...yay for my procrastination!

I pulled out some trinkets from an old (1990's???) bulky, gem-filled key chain that was sitting in my "stash box", some lace and Prima flowers, Hug Snug bows, a little bit of white acrylic paint, a scrap piece of upholstery fabric, polyester and cotton batting, glue gun and 3-4 glue sticks, and set to work.

You can find many links all over the net for detailed pin cushion how-to's. I didn't use one set of instructions in particular, just went by what felt like it would work at the moment.  So rather than bore you with step-by-step instructions that so many others before me have done so well, I'll just go over some tips that I found while making this one up.

The diameter of the cushion itself  is 4-1/2", and the bowl stands about 4"H...the cushion adds another 1-1/4" above the top of the bowl edges at its highest point.


So here are my hints, based on my experience with this bowl:

- Have LOTS of glue sticks ready to go. And if you can, use a mid-temp or high-temp glue gun for heavier fabrics and battings.  Mine is a mid-temp gun, but I still found I had to use a LOT of glue to make sure the cushion stayed secured to the bottom of the bowl.  I went through four 4"long glue sticks (1/2" diameter).

- I remembered seeing several sites mention that using cotton batting instead of polyester would give you a firmer cushion.  When I shopped locally, the cotton batting I found was in sheets or rolls, not loose in a bag as polyester batting usually comes.  I went with a 50/50 (half cotton/half poly) sheet (because the price was 1/2 of the pure cotton batting...LOL).  However, I found that when I scrunched pieces of the cotton batting up into a semi-round shape, it was TOO firm for the pins to go into. This could be because the pin bases I use are corsage pins, and perhaps they're not as finely sharpened as tailoring/sewing pins, but it was too firm for my use.

So, I tightly packed up a ball of the polyester batting to a size slightly smaller than I wanted to fit inside the bowl, then laid 2 layers of the cotton batting over the ball of polyester batting.  Then I put my fabric over that...and it works perfectly.  It's firm enough for the pins to stand upright, and the pins easily slide into the cushion.

- I found there was no difference whether I decorated the sides of the bowl first or made and glued the cushion first -perhaps only because of the type of bowl I used.  (Except, of course, I had to glue/secure the pin cushion into the bowl before gluing on the white and gold braid around the edge.)

- Because the bowl was heavy and stable enough to stand on its own with added weight on top, I didn't need to glue any glass marbles or weights in the bottom of the bowl before gluing in the cushion.  If I'd used a lighter weight bowl or even something as light as a vintage baby shoe, I would have glued in weights under the cushion.


Now it's time to get back to making cards...thank you for stopping by!


Sunday, March 4, 2012

Almost, But Not Quite, Forgotten...

Sometimes when I make cards, I can't post them online right away, for a variety of reasons (gifts, etc.). Then sometimes I'll post projects to my online gallery at 2Peas, and forget to cross post it to my blog, and vice-versa.  These two cards got caught in that "black hole" of my forgetfulness.  :)

The doily on this card is cut from wool felt, and lightly coated with clear coarse glitter around the edges...


Supplies:
Patterned papers: MyMindsEye Stella Rose/Hazel collection      Paper leaves: Recollections
Felt doily: MFT Decorative Doily Duo die      Laces & tulle: local craft stores      Pearls: Prima
Clipart:  The Vintage Workshop blog      Sentiment stamp: Papertrey Ink      Hug Snug seam binding

I've used this rose clipart on other cards, but on this one, I let it stand purely on its own on a clear background, and used the pearl flourish to imitate the butterfly's "flight path"...


Supplies:
Patterned paper: Prima Romantique collection      Doily: Wilton      Pearls: Prima
Butterfly punch: Martha Stewart       Rose clipart: The Feathered Nest      Pearl brad: K&Co.
Hug Snug seam binding      Looped ribbon: local craft store

I hope you're enjoying your weekend so far...thank you for stopping in!


Wednesday, February 29, 2012

A Photo-Heavy Happy Leap Day!

A friend asked if I would make some Easter cards using some of the clipart I'd gathered up lately...two of each image. Now how could I say "no?"  Flowers, and springtime colors...no need to ask twice!

I did customize the mini collages at her request to remove the text/labels, so you may see some of these same images appear later on but in different configurations. :)  And even though I was making two cards with each image, I felt I had to make some slight changes to each one, so the recipients would know they were special enough for a one-of-a-kind greeting.

On all of the cards, the folds are at the top.

First up - the corals. On the first card, I reduced the size of the clipart to fit inside the Tattered Angels chipboard frame.:


On the landscape version, I kept the clipart at ATC size (2-1/2" x 3-1/2") and placed the chipboard frame at one end just to highlight the flowers and birds nest.

One thing I should note-when I have an A2 card with elements that might go over the edge of the card itself (as with the doily on this card), I use A6 envelopes (4-3/4" x 6-11/16") to mail the card to accomodate the oversized embellishment(s), rather than the usual A2 sized envelopes.


Supplies:
Patterned papers: Graphic45 Once Upon a Springtime/Spellbound (coral floral);
BasicGrey Wander collection (aqua solid)
Clipart: Robin's eggs nest: The Graphics Fairy ; Tulips: Dover Publications;
Chipboard frames: Tattered Angels      German glass glitter: GlitterandKitsch on Etsy
Border punches: Martha Stewart Swirling Lace (bottom edges); Fiskars Threading Water (aqua strips)
Laces: local craft stores      Doily: Wilton      Hug Snug seam binding
Pearl & crystal flourishes: Prima      Pearl cluster: Recollections

Next up is the teal and violet set...I love the strong colors in this set...


On this set, the only changes I made to the landscape version were to change the size of the image, and accent with a pink bow instead of green:


Supplies:
Patterned papers: DCWV Latte Stack (solid lavender); Graphic45 Botanicabella/Secret Garden (green print);
Pink Paislee Vintage Vogue collection (light pink print)
Clipart: Small violet bunch: Dover Publications; Vase, Flowers, & Easter eggs: The Graphics Fairy
Paper doily: MFT Decorative Doily Duo     Edge punch: Martha Stewart Double Arches
Scalloped lace: LittleRedCottage on Etsy      Crocheted lace for "flower": local craft store
Pearls and flourishes: Prima      Hug Snug seam binding

And last but certainly not least, the pink set...lots of doily edging on this first card:


There was less room for layers of doily-edged papers on the landscape orientation card, but it still works. And the flower and bow accents are changed to green instead of pink...


Supplies:
Patterned papers: Echo Park Victoria Gardens collection (pink damask); BasicGrey Curio collection (green lace print);
BasicGrey Out Of Print collection (bright pink solid)
Clipart: Floral basket, egg & flowers: Bumble Buttons; Butterfly: Dover Publications
Laces: local craft stores      Edge punch: Martha Stewart Eyelet Lace      Pearls& flourishes: Prima
Fabric flowers: Frogfeathers on Etsy      Hug Snug seam binding

There isn't too much going on in the Korner so far this week...I've been a little under the weather.  But I hope to be back this weekend with some new projects to share.

Happy Leap Day, thanks for stopping by, and have a wonderful week!

Related Posts Plugin for WordPress, Blogger...