Showing posts with label LLLC. Show all posts

Friday, October 2, 2015

For the Holidays...

It's Friday, and time to close out the week with a couple more Christmas cards for the upcoming holidays. I did make a couple of each of these designs, so my collection is slowly building for this year...and it's a good feeling to be getting these done early!

We finally had a bit of very much needed and welcome rain this week in Northern California, so it only seems fitting to show you the "Joyful" card first! :)


The embossed background is accented with Pumice Stone Distress Ink, and as I've done before with this LaLa Land Crafts diecut, the street lamp is accented with Inka-Gold "Old Gold" metallic paint, and simply accented with branch punches, narrow ribbon, and a tiny bell...


The diecut sentiment words are accented with a gold gel pen...


Supplies:
Dies:  LaLa Land Crafts "Street Lamp";   Memory Box "Star of Wonder";   Paper Smooches "Christmas Words"
Punch:  Martha Stewart "Medium Branch"            Embossing folder:  Tim Holtz "Bricked and Woodgrain"
Pearls:  Recollections         
Miscellaneous:   ribbon, mini bell,  Pumice Stone Distress Ink,  Viva Inka-Gold "Old Gold", gold gel pen


The second of today's cards is a bit more shabby, with a bit more detail and lots of diecuts...


The little diecut poinsettia is surrounded with a holly diecut, and a twig wreath adorned with punched branches, clear red gems, and sparkly snow...


and a little pearl flourish pointing the way to another flourish die cut in the corner...


Supplies:
Patterned papers:  Graphic 45 "Christmas Past" and "Twelve Days of Christmas"
Dies:  LaLa Land Crafts "Pretty Poinsettia" and "Filigree Corner";  Memory Box "Holly Flourish";  Impression Obsession "Twig Wreath"
Punch:  Martha Stewart "Medium Branch"            Glitter dot:  Pebbles            Red gems:   Kaisercraft
Pearls:   Recollections          Miscellaneous:  white wire,  "Golden Rod" Stickles;  DecoArt Glistening Snow-tex


Thanks for stopping by for a visit...have a wonderful weekend!


Thursday, August 27, 2015

Pretty in Pinks...

Hi again, everyone! Today's share is a shabby sweet card in one of my favorite "soft color" combos-rose pink and taupe...


Beautiful patterned papers from Maja Design's Vintage Summer Basics collection are still some of my favorites, so much so that I save all the smaller leftover pieces from other projects because I know I'll eventually use them on cards, such as this one! 

In the center of the florals, there are three cherry blossom flowers made with LaLa Land Crafts' die...they're surrounded with premade mulberry paper lilies and sweetheart blossoms from Wild Orchid Crafts. Those bunches of beautiful dark stamens peeking out from top and bottom of the cluster are from my go-to source for stamens, ChocolateLetters on Etsy...


The lace is a piece of cream lace dyed with Distress Inks to blend with the dusty pinks in the rest of the embellishments ("Spun Sugar" mixed with a bit of "Victorian Velvet" and just the littlest bit of "Picked Raspberry")...


The little die cut palm fronds branches are made using My Favorite Things' Wild Greenery die...it's another of my newest favorites...


Supplies:
Patterned papers:   Maja Design "Vintage Summer Basics" collection
Dies:   LaLa Land Crafts "Cherry Blossom Flowers";   My Favorite Things "Wild Greenery"
Mulberry paper flowers:   Wild Orchid Crafts             Stamens:   ChocolateLetters on Etsy
Pearls:   Recollections             Liquid paints:   Lindy's Stamp Gang "Bodacious Blush" & "Toto's Tornado Black"
Miscellaneous:   cheesecloth,   twine


Thanks so much for visiting today...have a wonderful weekend!


Tuesday, June 30, 2015

Bright and Sunny Shabby...

It's been sunny and hot-hot-hot here lately, so I guess that's what put me in the mood for a bright shabby chic card...and that's what I ended up making to share with you today. :)


I made this flower stem a while back, using Prima leaves, a couple stamen clusters, die cut flowers using the LLLC Cherry Blossom Flowers die, and some bright yellow premade sweetheart blossoms to fill in the small spaces. Against the taupe woodgrain paper, it was a nice contrast, so it became the center of attention for this card.

A couple Maya Road grey pearl stick pins were the perfect addition to the top of the stem...


and white pearls were added after the stem was glued down to give a little luster to the niches between the flowers...


The loopy white diecut doily made a fun base for the stem, and twine dyed with Distress Ink added some colorful loopy accents to go along with the diecut...


Supplies:
Patterned paper:  Maja Design "Vintage Summer Basics" collection
Dies:   Memory Box "Whimsy Circle";   LaLa Land Crafts "Cherry Blossom Flowers"
Punch:   Martha Stewart "Vintage Doily PATP"
Stamens:   ChocolateLetters on Etsy            Sweetheart blossoms:   Wild Orchid Crafts
Leaves:   Prima            Ribbon:   local craft store             Pearls:   Recollections
Pearl stick pins:   Maya Road             Miscellaneous:   twine, cheesecloth, "Mustard Seed" Distress Ink


Thanks so much for visiting today...I hope your week started with a smile!

Monday, June 8, 2015

Mixed Media - Double the Fun...

It's Mixed Media Monday on the blog, and I've got two projects to share with you today, so I hope you have a few minutes to sit back and enjoy the picture show. :)

First up, an all-occasion card made with one of my "smoosh papers" - a piece of mixed media paper literally "smooshed" onto a craft sheet covered with leftover colors from another project. In this case, it's Lindy's Stamp Gang sprays.

The piece was the perfect size for an A2 card, and I liked the way the colors distributed so much that I wanted a lot of it still showing after embellishing. I added only a bit of modeling paste through a Prima stencil in a random pattern, and a bright floral cluster. Instead of using leaves in the flower cluster, I pulled out an old fern punch for a fun change of pace...


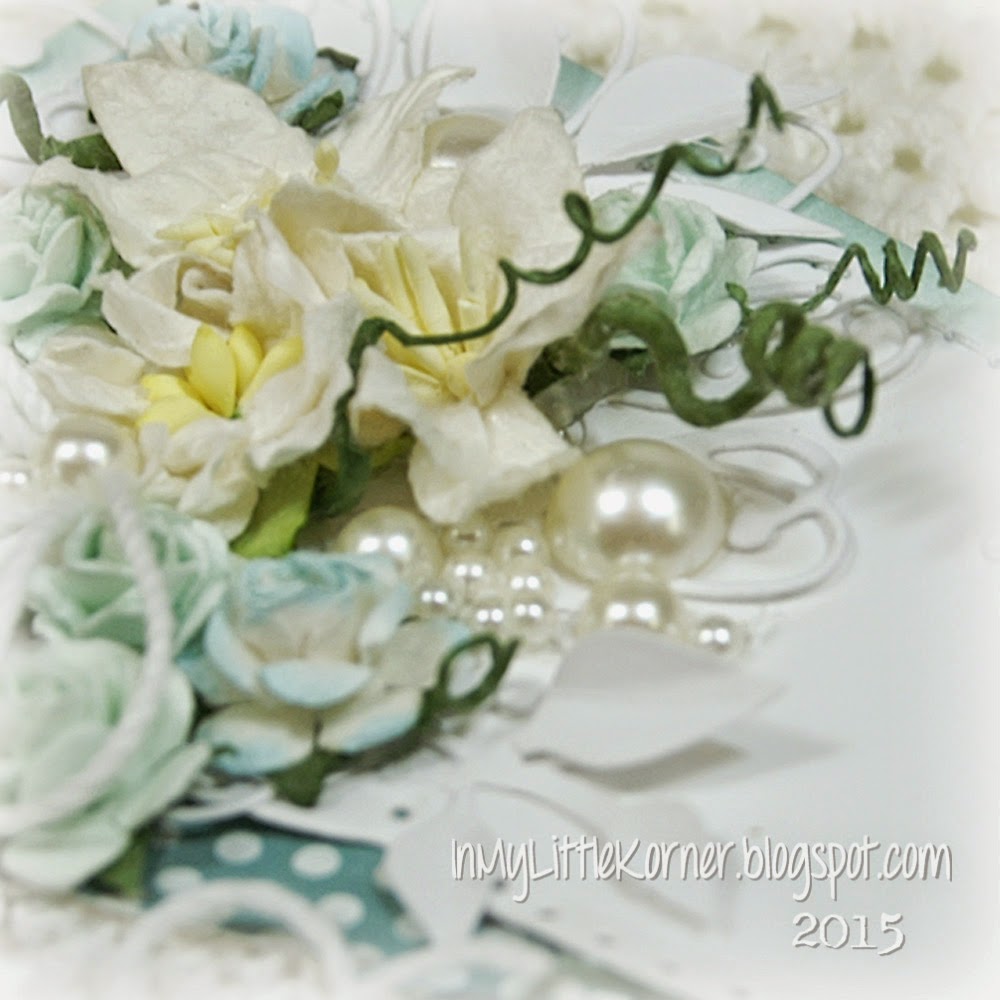
Here are some closeups of the floral cluster...


The only rose in the cluster is the large one in the center...all the rest are pretty little sweetheart blossoms...


Supplies:
Color Mediums:   Lindy's Stamp Gang Sprays  - Pop Rock Purple,  Tea Pot Purple,  Hydrangea Blue
Stencil:   Prima "Circular Lattice"            Dies:   Memory Box "Quinn Flourish"
Punch:   Punch Bunch "Large Fern"             Flowers:   Wild Orchid Crafts             
Stamen cluster:   ChocolateLetters on Etsy             Pearls:   Recollections


Last Monday when I shared the butterfly through the brick wall journal page, I mentioned this art journal page layout. It was purely a "work of wonder" as in "I wonder if this will work!" 

It's an experimental blending of different types of mediums (more than an artful design). To my pleasant surprise, since I had never combined some of them before, they all worked together beautifully. (There was one experiment that didn't work out exactly as planned, though, which you might spot right away.)

I wanted to play with using die cuts for texture instead of art mediums and stencils...and I wanted to try to blend wax based color background mediums (Gelatos and Neocolor II watercolor crayons) with water-based spray colors (Lindy's Stamp Gang Flat Fabio spray) and various pens (Ranger Fudeball, Uni Posca, Uniball Signo)...


Here are some progress stepout photos, starting with the die cuts gessoed after gluing onto the pages (a bit hard to see since everything is white)...


You'll notice there are some white splatters on the finished page. Instead of splashing white ink onto the finished pages, I wanted to see if liquid frisket would stand up to all the different product layers, and then come off smoothly when it was finished...and it did! The orange dots are the liquid frisket...


The next step was base color. I used Gelatos inside the circle diecuts on each page (I applied them in a circular design then used a wet watercolor brush to spread them through the circle), and the rest of the background is Neocolor II pencils applied much the same way - scribbled on, then spread with a larger wet watercolor brush.

There was a method to my madness with the butterflies. I added two colors inside the white diecuts on the background, and as you can see in the finished page, when I applied a second black diecut with raised wings over them, I ended up with dimensional butterflies with the colors under the black outline diecut - a fun technique...  


Here are a few closeups showing the finished butterflies and a few other details. You'll see in the closeups how perfectly the liquid frisket came off after the pages were dried. :)

In this first one, you can see that I outlined the bottom butterflies in white for more accent. The hand drawn scallops around the edge were done with a black Fudeball pen, with white accents inside the scallops drawn with a UniBall Signo in white...


I drew inside and outside the circle diecuts with a black Fudeball, and accented inside the circles with a white Uni Posca paint pen...


In this photo, you can see to the left and below the butterfly where I used a Lindy's Stamp Gang Flat Fabio spray (South Shore Sand) to shade and add some dimension to the scribble diecut texture and around some of the diecuts. I wasn't sure how, or if, it would adhere over the Neocolor II's, but it surely did. Even though the Neocolor II's are labeled as "wax pastels," they behave much like any other watercolor once they're dry...


Here's a closeup of one of the circle diecuts, colored with Gelatos and accented with black and white pens...


I also added some of the Lindy's Stamp Gang spray around the circle diecuts for shading, and randomly inside the honeycomb diecuts in the corners. (And yes, I glued the sequins on "upside down" because I liked the way the stamped creases on the back side mimicked the honeycomb pattern of the diecut. :) )...


Have you spotted the one step that didn't work exactly as I had hoped, but was worked around to a degree? Yep, it's the flowers on the lower left. I was curious how stenciled flowers would apply on top of textured diecuts. First I pulled out my black heavy gesso, then realized that wasn't much of a challenge, because of it's thicker consistency. So I went for broke and pulled out my bottle of regular black gesso...and boy was I in for some fun.

I was very careful...and I mean "very"...to make sure my stencil was flat on the top of the page, but I took a deep breath, and instead of using a sponge applicator (which is what I'd normally do with regular consistency gesso) I pulled out a small palette knife. And you probably know what happened next...seepage to the nth degree! LOL

But it wasn't so bad that I couldn't take the edge of the knife and pull out the edges of the flowers to look like large, spiky, blooms. And one advantage to the "seepage" is that the design doesn't just rest on top of the diecuts, but seeps down to the base of the page, making it a more continuous image (and at least now I know what will happen to the design with this technique...LOL)...

Supplies:
Dies:   Tim Holtz "Mixed Media" and "Scribbles & Splats";   LaLa Land Crafts "Fancy Butterfly";   Simon Says Stamp "Bubble Parade"
Color Mediums:   Faber Castell Gelatos;   Caran d'Ache Neocolor II wax pastels;   Lindy's Stamp Gang Flat Fabio "South Shore Sand";   Ranger Fudeball black pen;
Uni Posca white paint pen;   Uniball Signo white gel pen
Art Mediums:   Golden white gesso,  Golden gel medium,   Darice Studio 71 black gesso,   Grumbacher "Miskit" liquid frisket
Word stickers:   Tim Holtz "Small Talk"             Stencil:   Tim Holtz "Wildflower"             Miscellaneous:  sequins, small colored gems


Thanks for stopping by for a visit...I hope your week is starting with a smile!

Thursday, May 28, 2015

Hot Summer Pink...

Hello again! The other day as I was putting away unused supplies and bits and pieces, I found an A2 sized piece that I had cut a round aperture into, and run through my brick wall embossing folder, then set aside when I changed my mind on the direction of the project I was working on. Of course, in the midst of my mini cleanup, I had an idea what I could do with the piece, so instead of continuing to straighten things up, I got to work making a mess again! :)

The round aperture I had cut turned out to be the right size for me to use one of my LaLa Land Crafts stitched circle dies to create a frame...and then the ideas kept coming, so I kept working...and this is the end product...


I used the same green ink that I used inside the aperture to color the edges of the white leaves and berries. It was a happy find to see that the lilies were the perfect color to go with the small hot pink roses...


The little punched butterflies were accented with pink Stickles and tiny pearls. I still get use from many of my older punches - it's one of the reasons I still hold on to many of my basic tools...you never know when they'll be perfect for a current project, and they're faster to use than setting up my electronic cutter for a last minute accent...


I pencil-traced the aperture onto the base of the card, and inside it I added some stamped leaves and pink stems that would coordinate with the flowers I planned to place on the top layer around the outside of the framed circle. Then I used foam tape to attach the top embossed layer to the card base...


And lastly, a couple closeups of the embellishments at the bottom of the card...


Supplies:
Embossing Folder:   Sizzix/Tim Holtz "Bricked and Woodgrain Set"
Dies:   LaLaLand Crafts "Stitched Circles" and "Berry Flourish"
Stamp:   Simon Says Stamp "Summer Garden"             Punch:   Martha Stewart "3-in-1 Butterfly"
Flowers:   Wild Orchid Crafts (roses);   local craft store (lilies)
Pearls:   Recollections            Pearl stem:   local craft store
Miscellaneous:   "Pink" Stickles,  white twine


Thanks so much for stopping by for a visit today!


Thursday, May 21, 2015

Just Happy...

Summer temperatures have me in the mood for lighter, softer colors mixed with bright white.

For today's card, I played again with what I call "altered edges." I used a die designed, I think, for straight edges, but I put them on a diagonal slant to add some fun layering to the front of the card...


At the top, a flower cluster of cream and white lilies, and aqua and white mini roses, sitting atop a loopy diecut doily, accented with lots of loopy twine bows and pearls...


Over on the side, another smaller version, with just a few aqua flowers...


And a sentiment that will work for a variety of occasions, as the need arises...

Supplies:
Dies:   Spellbinders A2 Scalloped Borders Two;   LaLa Land Crafts Filigree Corner;   Memory Box Quinn Flourish;   Sizzix Flowers Branches & Leaves
Lace:   TheFunkieJunkie.com            Flowers:   Wild Orchid Crafts            Pearls:   Recollections
Sentiment stamp:   Simon Says Stamp "Handwritten Greetings"
Miscellaneous:   white twine 


Thanks for visiting today!


Thursday, March 19, 2015

Wishing...

It's been a while since I've made a card heavy with die cuts, and I was ready to play with a few dies that I haven't used in a bit, along with a new one, and a couple often used favorites. And since my mother's birthday is coming up very soon, what better time to make one with lots of flowers and pearls and girly embellishments? :)

So here's Mom's card this year...layers of cream diecut cardstock with lots of pretty pink flowers and loopy satin ribbon bows...


There are several layers of cardstock stacked to make the diecut scalloped bottom border, but let's start with a closeup of that yummy Prima flower that's the centerpiece...I need to find another set of this one...it has all the fun layers and gems that I love so much...


I added some handcrafted cherry blossoms and some mulberry roses alongside it...


Here you can see the layers...three in all. The card base has a diecut scallop along the bottom edge, the second layer has a different scallop edge and an open scrollwork edging above it, and the top layer has a scalloped bottom edge and the distressed punchinella die cut along the top right...foam tape holds all the layers down and gives it a bit of dimension...


And I couldn't resist adding a lone cherry blossom to the top corner...


Supplies:
Dies:   Spellbinders "A2 Scalloped Borders 2";   Sizzix Tim Holtz "Mixed Media";   Sizzix "Flowers Branches & Leaves";   Simon Says Stamp "Wishing";   La-La Land Crafts "Cherry Blossom Flowers" and "Stitched Elements"
Stamp:   Simon Says Stamp "Sending & Wishing"
Flowers:   Prima (large pink);   Wild Orchid Crafts (small roses)             Stamens:   ChocolateLetters on Etsy
Pearls:   Recollections               Miscellaneous:   satin ribbon


Thanks for visiting today...have a wonderful weekend!

Related Posts Plugin for WordPress, Blogger...