Showing posts with label decor. Show all posts

Wednesday, November 28, 2012

Finishing What I Started...

I hope all my American friends had a wonderful Thanksgiving holiday!  We had a fun and busy one, with family visiting from out of state, and a couple get-togethers with friends over the weekend.  And now we're full swing into Christmas around here (although the tree isn't quite finished yet).

Earlier this month, I showed this partially finished mini album that was made up for a challenge at The Shabby Tea Room.


But before I show you the now-completed inside pages, here's a little star box I made to sit next to the album on the table.  It's made using craft-store supplies - a round papier mache box, a wooden spool, a wooden circle, and a grapevine wreath, covered in papers and laces to blend with the album front.  I left the box lid removeable, so I can put some wrapped candies inside for those "sweet attacks" that happen so often during the holidays...


Before doing anything else, I painted the box and wooden pieces with white craft paint as a base. Some older Basic Grey papers were decoupaged to the box (inside and out are finished), and the wooden spool.  I lightly glittered the grapevine wreath, and wrapped a strand of white pearls around it to mimic the wreath on the album front.  To secure the wreath to the (painted) wooden circle, I used lots of hot glue...to camouflage the dull glue, I used Glossy Accents and large coarse clear glitter over the dried hot glue. Now it looks like a glittery moss beneath the wreath.


Of course, you know I had to glue lots of lace around the box edges, and the spool...LOL. Little pink pearls in the center of the scalloped lace flowers add an accent to the blue and white theme, and the scrunched seam binding bow and pink poinsettia on the top add a bit more.


The star is made of two medium-weight chipboard stars glued together...then covered with silver German glass glitter on the front, back, and side edges to camouflage the seam from the layers of chipboard. (It will be fun to watch this glitter tarnish over the years.)  Again, I had to use a good amount of hot glue to keep that star standing firm on the top of the box, so I covered the glue with coarse glitter.

And now, here are the finished inside pages for the "Believe" decorative mini album.  I'm glad I took the time now to finish this...I have this bad habit of putting things away to finish "later" and "later" never comes...LOL

Because of the lumpiness of my embellishments, I did have to remove one of the 8 chipboard pages that come with the album...so I have a total of 14 pages.  I won't clutter up the photos with descriptions of all the supplies used, so if you have a question or two about anything in particular, please leave me a comment or drop me an email and I'll fill you in on the details!

Page 1...

 Pages 2-3...


Pages 4-5...


 Pages 6-7...


Pages 8-9...


Pages 10-11...


Pages 12-13...


And the last page, 14...


Thanks so much for stopping by for a visit today...I hope you're having a great week so far!


Thursday, December 15, 2011

Christmas Canvas Fun

A few months ago when I cleaned my workroom and reorganized supplies, I came across two 6x6 canvases that I purchased 3(?) years ago or so. I had set them aside like I often do, and years later, they still sat in the package.  So a couple weeks ago, as a break from making cards, I pulled them out and decorated them with holiday patterned papers, stamps, acrylic paints, glass glitter, etc.   I'm no "pro" at mixed media, but it's sure fun to play with other mediums now and then!

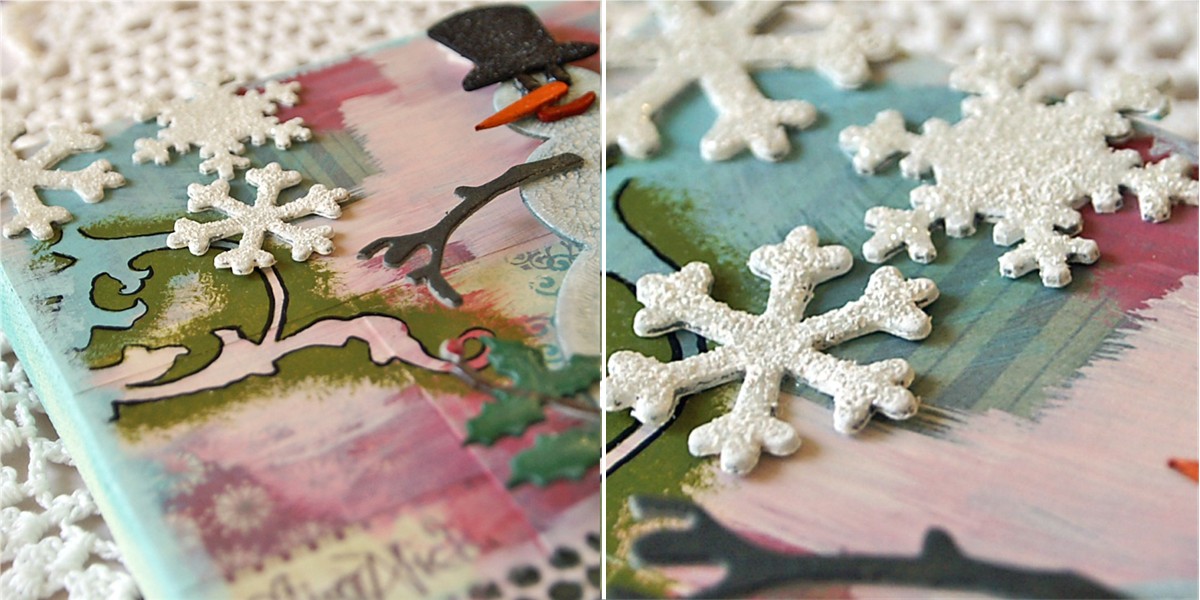
Inspired by a couple of Tim Holtz' tags in his annual series for this year, I pulled out a remaining package of seasonal grungeboard shapes last week (the deer, holly branches, mini ornament, and the snowman), and finished embellishing the fronts.  I haven't decided whether I want to leave them as is for hanging, or attach something fun like a flat-bottomed doorknob on the bottom and a decorative element to the top and use them as tabletop decor. Just in case, I finished the backs with paper and paint, so I have the option to hang them for now, and can make them tabletop decor without having to change anything on the backs - they have a finished look.


A few of the details for the reindeer canvas:
-white German glass glitter was used here for the "snow" at the bottom of the canvas;
-the deer antlers are covered with bronze German glass glitter;
-after applying Rock Candy Distress Crackle Paint over the painted holly branch (and letting it dry and crackle), I rubbed white acrylic paint over the crackles, then wiped off the excess, to emphasize the veins and add texture to the leaves;
-the lace edge stamp is by B Line Designs.


A few details for the snowman canvas:
-I copied Tim's technique of die-cutting the "25" into the snowman, and backing it with patterned paper and adding glossy accents to the top;
-after painting the snowflakes white and covering them with coarse clear glitter, I *lightly* dabbed on white acrylic paint over the dried glitter to give it a more textured look (don't cover all the glitter...just some of it);
-black German glass glitter covers the snowman's top hat.

And now, my little break is over...must get to wrapping some gifts!  Have a wonderful weekend...and if you're headed out to shop this weekend...well, just keep smiling and don't let the craziness take away your fun!  (And I will keep repeating that to myself, too! :)  )


Monday, December 5, 2011

And a Partridge in a Pear Tree...

OK, well, maybe not really a partridge, but that song did go through my head while I was making these. :)

I'm taking a little break from sharing cards to show you a fun set of 8 silver and cream ornaments I made for our Christmas tree using this Sizzix Bigz die & embossing folder.  I didn't take step-out photos as I went along (I admit it-I was doing it assembly-line style, and didn't think about taking photos until I was well into the process), but I think I can describe clearly what I did and used if you want to make some yourself.

The ornaments on our big tree are an eclectic mix of elegant large ornaments and large, but less formal, handmade ornaments. I like the ornaments on this tree to have enough sparkle on them that they reflect the mini white lights, so that's why there's glitter galore on these. If your style is more country-chic, they certainly would look wonderful without all the glitter.


To start, I die cut 8 birds from Grafix medium weight chipboard (heavier than cereal box thickness; i.e, just strong enough that it takes a bit of effort to bend). Then I die cut 16 of the same birds (I decorate both the front and back so the ornaments can swing around on the tree and still look finished) from cardstock. I used Coredinations cream cardstock with a kraft center for mine. 

After embossing the 16 cardstock pieces with the embossing folder that comes with the die, I used a foam paint brush and matte gel medium to glue the cardstock to both sides of the chipboard by covering the entire surface with the gel medium, matching and pressing the pieces together, and then rolling with a brayer to remove any air bubbles and get a nice, flat surface.  (Any strong liquid glue or decoupage medium will work as well.)

Next I applied silver German glass glitter using Glossy Accents and following the pattern of the embossing on the cardstock, and around the outside edges.  I love using the German glass glitter, because as it ages, it tarnishes to a beautiful patina.  As time goes by, the silver on these ornaments will turn a rich, darker silver, but still have lots of sparkle.  (I purchase my German glass glitter from Glitter and Kitsch on Etsy.)

(*Note: If you decide not to do the next step that coats the remaining open surface with Glossy Accents, I would recommend putting a coat of gel medium or decoupage medium over the cardstock. It will protect the surface of the cardstock and add many more useful years to your ornaments.)

After applying the silver glass glitter, I applied a thin coat of Glossy Accents over the entire surface of the bird not already covered with silver glitter, and sprinkled on Martha Stewart clear tinsel glitter.  This is a fine glitter that gives a more subtle sparkly appearance than other glitters.  Here's a photo from a different angle:


After all the glitters were dry, I added the amber gems for the eyes, and the clear crystal gems on the body. (I used Ranger "white pearl" Liquid Pearls for the white pearl accents.)

The white wool felt rolled rose was made using the larger of the two rose dies in this die set. Before gluing the flower down with my glue gun, I hot-glued two goose coquille feathers (purchased from Moonlight Feathers on Etsy) to the tail of the bird, then glued the rolled roses over the ends of the feathers. By gluing feathers and roses to both sides, it makes the tail feathers look nice and full without covering all the glittering already added!

The We R Memory Keepers Crop-a-dile works perfectly to punch a hole to add a jumpring to the top of the bird's back for your hanging cord or ornament hanger.

I'll be back soon with some new cards to share.  Thanks for stopping by...Happy Monday!


Related Posts Plugin for WordPress, Blogger...