Showing posts with label Penny Black Stamps. Show all posts

Wednesday, September 23, 2015

Watercolor Greetings...

Today I have a couple clean-and-simple watercolor greeting cards to share with you. I came across a great pricing deal on some Yarka St. Petersburg watercolors, and couldn't wait to play with them. I wanted to experiment with these new colors using both a concentrated coloring and a watery, free-flowing coloring technique, so I pulled out a couple flower stamps to play with.

Instead of using a loose coloring technique all over, I played with coloring the images more exactly, and using the loose coloring in the background. These watercolors are fabulous for this...you need so little pigment on your brush to get the concentrated color that I imagine this set will last me for years!

First up, a little number using more "autumn-like" colors...


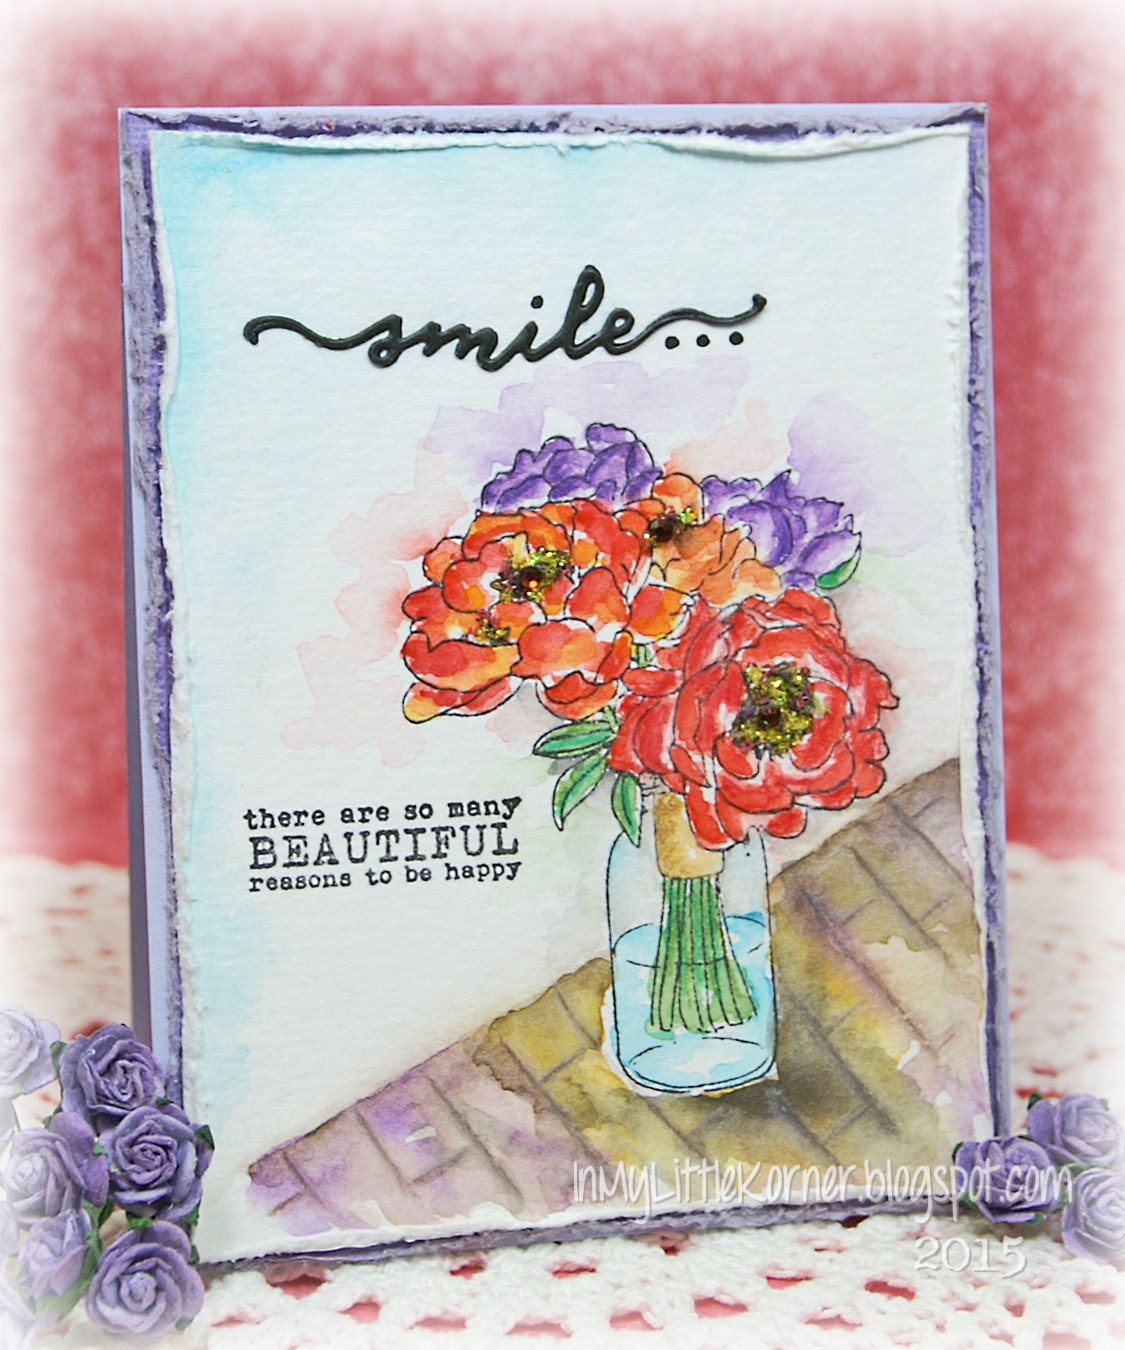
Originally I stamped the image with light brown ink to blend the outlines, but decided I wanted more contrast because I was using a blue-grey background, so I used a scribble technique over the outline with a black pen, and highlighted more with a white gel pen...


I reversed the usual order of stacked die cuts by placing a white cut under the black to add some brightness to the sentiment over the background...


Supplies:
Stamps:   Unity Stamp Co. "Lean on Me" (flowers);   Simon Says Stamp 'Happy & Smile" (sentiment)
Dies:   Simon Says Stamp "Sending"
Watercolors:   Yarka St. Petersburg             Black pearls:   Kaisercraft
Miscellaneous:   Uniball Signo white gel pen;   Zig Mangaka black pen


Next up, a stamp with brighter florals, combining a darker background with a lighter, splattered one...just for fun...


I added more image outlining as with the first card, and highlighted the stamens with a white gel pen...


I used the clear Wink of Stella pen a little differently on this card. I loaded some of the sparkly ink onto my craft sheet, then back onto a smaller watercolor brush, and flicked it over the entire card front. It makes the card sparkle, but in a very subtle way. Here's a better closeup-all those tiny white looking dots are the silvery sparkle from the Wink of Stella pen...


And this time, I used the bright white diecut sentiment above the black shadow diecut for stronger contrast to the portion of the background that was darker...


Supplies:
Stamps:   Penny Black "Jubilant"
Dies:   Simon Says Stamp "Small Hello"
Watercolors:   Yarka St. Petersburg             Pearls:   Recollections
Miscellaneous:   Kuretake Wink of Stella-Clear pen;   Zig Mangaka black pen;   Uniball Signo white gel pen


Thanks so much for visiting today!


Tuesday, July 7, 2015

Watercolor Potpourri...

Hello, again! My crafty mojo is apparently on a small vacation lately, and when that happens, I start to reorganize my work space, and play with making clean and simple watercolor cards (which is a lot more fun, and truthfully, more productive, than the reorganizing chore... ha).

So today I have a small collection of watercolor cards to share with you. A couple pieces were practice pieces that turned out perfect for a card front. I'm thinking I should tell myself that they're all "practice pieces" from now on. I seem to relax more when I view them that way, and when I relax more, they have a tendency to turn out just the way I want them to! You'd think I'd be wise to my own Jedi-mind-tricks at this age, but I admit it...I effectively psyche myself out a lot, even as an adult who should know better. :)

So on to the picture show. This first pair is made using a Unity stamp. For one, I drew a brick wall in the background, and after I painted the second one with no background, I liked it, too. So, both became all occasion cards with the same sentiment...


Supplies:
Stamps:   Unity Stamp Co. "Erica Girl" and "enjoy this day"
Color Mediums:   Grumbacher Transparent Watercolors;   Faber-Castell Polychromos pencils
Miscellaneous:   white twine,  small colored gems,  "yellow" Stickles


This next card is a 4"x 6" note card that I painted after seeing a red poppy card painted with a similar treatment. Unfortunately, I didn't note the name of the creator of the card that gave me the idea, I just wrote "shade with brown" next to the words "large poppy stamp" in my little idea notepad. (I sometimes do this rather than pinning the inspiration piece so I don't copy it too closely.) So if you see this and it reminds you of a similar card, please let me know and I'll edit this paragraph to credit my inspiration artist!

It was a little difficult to photograph this purple to look the same as it does IRL, but hopefully you can see the raspberry highlights and deep purple shadows...


On this card, I double cut the "hello" die in black and white, heat embossed the "just saying" stamp with white powder onto black cardstock for contrast, then spot-glued them both to the twine bows using liquid glue...


Supplies:
Stamps:   Penny Black "divine" (poppy);    Altenew "Super Script" ("just saying")
Dies:   Simon Says Stamp "small hello"
Color mediums:   Sakura Koi watercolors;   Faber-Castell Polychromos pencils
Miscellaneous:   twine,  clear sequins,  white embossing powder


This final pair of images were my small "practice pieces." I was playing around with coloring and shadows on penciled-in tables beneath the flower pots. I liked how they turned out, so I cut the pieces from my practice pad, and turned them into note cards...


Supplies:
Patterned papers:   Prima "Nature Garden" collection (purple);   Glitz Design "French Kiss" collection (brown);   My Minds Eye Lost & Found "Heirloom" collection (dot)
Stamps:   Penny Black "A Bunch" (jar);   Hero Arts "Things We Love" (single flower);   Simon Says Stamp "Friendship Messages" (hello);   
Altenew "Super Script" (just saying)
Color medium:   Sakura Koi watercolors          Lace:   TheFunkieJunkie.com            Pearls:   Recollections


And last but not least...


Supplies:
Patterned papers:   Glitz Design "Vintage Blue" collection (gold and blue);   Pink Paislee "Cottage Farms" collection (taupe print)
Stamps:   Penny Black "Flower Gallery" (irises);   Penny Black "A Bunch" (jar);   Simon Says Stamp "Friendship Messages" (sentiment)
Color Medium:   Sakura Koi watercolors          Lace:   TheFunkieJunkie.com          Pearls:   Kaisercraft and Recollections


Thanks so much for visiting today...I hope your week started with a smile!


Thursday, June 4, 2015

Smile...

It's another watercolor day here on the blog, and in contrast to Monday's technique and photo-heavy post, today's is clean and simple, like the card I'm sharing.

I had a couple different Unity Stamp Co. stamps that I wanted to combine and once they were finished, I realized I had the perfect Penny Black die to complement the sentiment...


I played with the flower centers by adding a tiny touch of Heather Flower Soft, then finishing the center accents with Yellow Stickles and a colored gem...


Supplies:
Stamps:   Unity Stamp Co. "As We Go Along" and "Summertime Bouquet"
Dies:   Penny Black "Heartfelt" ("smile")
Color Mediums:   Grumbacher transparent watercolors;   Faber Castell Polychromos pencils;  "yellow" Stickles
Miscellaneous:   "Heather" Flower Soft,  small colored gems


Thank you for visiting today...have a wonderful weekend!


Thursday, April 30, 2015

A Mini Pair...and a Spare...

Hello, again! With all the "fully loaded" cards I've made lately, I felt it was time to get back to some clean and simple (or my version of it, anyway) cards. I wanted a reasonably "flat" note card to send off, and decided to pull out one of my newer stamps and my watercolors and have a go.

When it was done, I realized the design would be fun on a "mini pair" - the 3-1/2" x 5" size note cards, so I made a pair of those, too!

It all started with this A2 size card...


I added several layers of color to these flowers, and although I wanted the layers to show imperfectly, they did turn out a bit more "splotchy" than I had hoped - because I didn't wait long enough for the layers to dry between applications...ah, well...lesson learned...I still like them!...


I couldn't resist adding a bit of sparkle with Crystal Stickles...


I was determined to find a way to add the gold spiral clip to the center of the twine bows. I ended up simply gluing it using Tombow Mono Aqua clear glue - it's solid as a rock...


Supplies:
Stamps:  Penny Black "demure";   Simon Says Stamp "Friendship Messages"
Color Medium:   Sakura Koi watercolors
Miscellaneous:   colored crystals, "Crystal" Stickles,  twine,  spiral clip


And here's the mini pair inspired by the A2 card. I started first by using the same stamp, but off the side a bit on the smaller size...


Once again, I used some of the Crystal Stickles for fun...


And I was a bit more patient this time and let the layers of watercolor dry before adding more  :) ...


Supplies:
Stamps:   Penny Black "demure";   Simon Says Stamp "Friendship Messages"
Color Medium:   Sakura Koi watercolors
Miscellaneous:   colored crystals,  "Crystal" Stickles


And for the second in the pair, a different poppy stamp...


And a much simpler background of just a light shadow effect...


Supplies:
Stamps:   Penny Black "divine";   Simon Says Stamp "Friendship Messages"
Color Medium:   Sakura koi watercolors
Miscellaneous:   colored crystals


Thank you for stopping by for a visit today!


Monday, April 27, 2015

Art Journal - Poppies...

Welcome to another Mixed Media Monday here in the Korner!

This layout began as a "catch-all" page in my small Dylusions art journal. I was playing with a few different stencils and color mediums, but as I went along, I got more ideas, and somehow found a way to blend them all together...


I began by adding my background colors first, using Lindy's Stamp Gang sprays, a speckle stencil and modeling paste, and stamping around the outside edges.

The butterflies and corner elements were made with modeling paste through the "Mini Specimens" stencil by The Crafters Workshop. I shadowed and traced the butterflies with Crystal Stickles and added some tiny pearls through the centers...


I used the Penny Black "Sun Catcher" stencil to gesso onto the pages, and copied the details from the matching "Poppy Time" stamp to hand draw in the details, then colored with watercolor pencils and acrylic craft paints. I decided I wanted some dimension to the poppies, so I stamped the matching stamp onto mixed media paper, colored it in, then cut out the center pieces of the stamped flowers and attached them to the center of the poppies on the pages using foam tape...


The final step was adding some of my favorite Unity Stamp quotes here and there...


Supplies:
Color Mediums:   Lindys Stamp Gang - Alpine Ice Rose,  Aloha Avocado,  Cowabunga Copper,  Hydrangea Blue
Stencils:   The Crafters Workshop "Mini Specimens";   Tim Holtz "Speckles";  Penny Black "Sun Catcher"
Stamps:   Penny Black "Poppy Time";   Unity Stamp Co. "empowered words";   
Fiskars/Teresa Collins "Music";   Stampin' Up! "Gorgeous Grunge"
Art Mediums:   Golden white gesso and modeling paste;   Plaid Folk Art acrylic paints
Miscellaneous:   Stabilo All Pencils (black and brown),  "Crystal" Stickles,  Black Archival ink, 
 Faber Castell Pitt Artist Pens (black),  Kaisercraft mini pearls


Thanks for coming by for a visit...I hope your week is starting with a smile!

Monday, April 13, 2015

Art Journal - Touch the Sky...

Hello again! Every now and then I take a small break from posting projects here while I focus on other non-crafty things, and take up learning some new (to me) techniques. This last little break was one of those times, but I plan to get back on a crafty roll and start sharing on a regular basis again...and that begins with today's Mixed Media Monday post. :)

This is another 2-page spread in my small Dylusions journal. It's filled with textures and rich colors...


It started with a coating of modeling paste through Prima's Stone Wall stencil. After the paste had dried, lots of Lindy's Stamp Gang sprays were applied, mulit-layered and lifted until there were darker shades around the edges fading to near-white in the center.

The large script stencil was inked with Watering Can (gray) Archival ink; the stamped lace edge and center stitching were stamped with Black Archival ink...


Modeling paste was mixed with brown German glass glitter, then applied through the Tim Holtz burlap stencil...a little bit more of the glass glitter was sprinkled over the top of the paste before it dried completely.


Unity Stamp "dream Big" was stamped in three places, again with Watering Can Archival ink, and then it was time to add the hearts, balloons, and text strips.

I placed the hearts on the page with removable tape and traced around them lightly with a pencil. (I wanted to shade around the hearts, and wanted to make it easier to get right up to the edges - and this was the easy way... :) )  I shaded with a black Stabilo All pencil around the tracing lines, then permanently adhered the hearts to the pages.  The "rust" hearts are chipboard, with the rusting effect achieved by using The Dusty Attic's Rusting Powder, then wiping it off with my fingers once dry, so I had the rusty shades, but not the texture. A little bit more modeling paste was added to the red hearts just for fun...


Supplies:
Color Mediums:   Lindy's Stamp Gang Sprays - Caribbean Blue,  Tilt a Wheel Teal,  T-Bird Turquoise,  
Gag Me With A Spoon Grey,  Cattail Copper Brown
Art Mediums:   Golden white gesso and modeling paste
Stamps:  Indigo Blu "Limor Webber Rugged Edge";   B Line "Lace Duo;   Unity Stamp Co. "Dream Big"
Dies:   Penny Black "uplifting"
Stencils:  Prima "Stonewall 3";  The Crafters Workshop "Mini Tile Texture"; 
 Donna Downey "Scribble Script";  Tim Holta "Burlap"
Miscellaneous:   The Dusty Attic Rusting Powder,  brown German glass glitter,  Black Stabilo All pencil;  Black and Watering Can Archival Inks


Thanks for visiting today, and I hope your week is starting with a smile!


Related Posts Plugin for WordPress, Blogger...