Showing posts with label monochromatic. Show all posts

Wednesday, December 10, 2014

LLLC - Christmas is Coming...

Happy Wednesday, everyone! Things are slowing down a bit here on the blog. but have no worries...it's only temporary. :)

Today, our La-La Land Crafts Wednesday team is working with this week's challenge theme of "White on White With a Pop of Red."  This was such a fun challenge, especially for the upcoming holidays.

This card is filled with LLLC dies, starting with the oval cutout, using the Stitched Elements set. Inside the oval, I added some dimension with strips cut using the Scallop Bracket Die Set ...


The flowers are made to resemble tiny poinsettias - but this time, I combined the Lotus Die and the Cherry Blossom Flowers sets to make up my own little flower, accenting the edges with white gesso, and adding white stamen clusters to the centers...


Cuts from the Berry Flourish die accent above and below the flower cluster, with little white pearl "berries" and small pearl flourishes accenting the leafy dies...


Inside the die cut oval, a little "lacy" touch using the Spiderweb Corner die...it's not just for Halloween anymore!...


And last but not least, the Filigree Corner Die is the perfect accent for the two right hand corners, with more little pearl accents in their centers...


Supplies:
LLLC Dies:   Stitched Elements,   Scallop Bracket,   Spiderweb Corner,   Filigree Corner,   Berry Flourish,  
Cherry Blossom Flower,   Lotus Die
Sentiment stamp:    Lili of the Valley Set 35, Christmas Handwritten Phrases
Pearls:   Recollections            Stamens:   Wild Orchid Crafts          Miscellaneous:   white twine, gesso


I hope you'll have a moment or two to visit the La-La Land Crafts Inspiration Blog to see the beautiful projects my teammates have come up for this fun challenge.

Thanks for visiting today...I hope you're having a wonderful week so far!


Thursday, June 5, 2014

Seeing Double...

Hello again! As I was making the first of the today's cards, I happened to glance to the side at the pieces left from cutting the patterned papers, and realized they were just the right size to make an A2 card at the same time...so that's what I did. :)

The hot temps lately got me in the mood for monochromatic whites, so I paired a more taupe-based white with a cream-based white, and used all shades of white embellishments with the exception of one deeply colored rose in the center. There's no sentiment on either card yet...but there's plenty of "white space" left (oh, I can hear your collective groans all the way out here on the left coast at that sad attempt at a play on words...ha) if I choose to add one later on.

The square version...


And some close-ups of the flower cluster...each card has one of the gem-filled metal flowers as one of it's three largest flowers in the cluster...


And the A2-sized version of the same design...


Supplies: (the same for both cards)
Patterned paper:   Basic Grey Basics White (6x6 pad)
Dies:   Poppystamps Mod Flower Border and Massa Leaf Background
Flowers:   Wild Orchid Crafts          Pearls:   Recollections          Metal gem flowers:   local craft store
Miscellaneous:   white cording, cheesecloth, cardboard (painted)


Thanks for stopping by today!


Wednesday, October 2, 2013

A Little Change is Good...

Today's card is a little change of pace for me...no flowers and lace here...because today's card is another masculine birthday card.

I was playing around with the pad of burlap paper that I mentioned a couple posts back, trying to determine what would cut well with it and what wouldn't.  I decided to play with Spellbinders' Grateful Lattice die, and had a go at trying to cut the burlap paper with it.  It did cut, but not without many, many passes through the machine, adding a shim here and there. I kept all the little "inside" pieces, thinking I'd come up with some fun way to use them sooner or later.

When I had determined the colors I wanted to use for this card, I remembered those little shaped burlap pieces, and they actually helped decide the overall design of the card for me...


I cut another full lattice piece from cream cardstock for the front of the card, and decided to cut part of it away to make room to stamp a birthday sentiment.  Then I took some of those little burlap pieces from my burlap lattice, and popped them up with foam tape inside the cream cardstock in a fun and random placement...


In the center of the card, I used some metal embellishments, twine, cheesecloth, a cardstock flourish, and some dark pewter beads in a cluster...


And the piece of the cardstock lattice I cut off the front?  I decided to use it on the inside of the card, and glued the burlap pieces down flat inside the lattice, instead of popping them up with foam tape...


Supplies:
Dies:   Spellbinders Grateful Lattice and Foliage Two;   Memory Box Elegant Scrollwork
Sentiment stamp and metal gear:   The Paper Studio          Metal keyhole:   Tim Holtz Ideaology
Pewter pearls:   Creative Imaginations          Metal key:   local craft store          Burlap paper:   DCWV


Thanks so much for visiting today!


Friday, September 27, 2013

White Christmas...

Happy Friday, everyone! I'm ending the week with a monochromatic holiday card made up with the use of several dies, some embossing, and featuring a Lili of the Valley Christmas sentiment stamp as the center of attention.

I wish I could capture in photos how sparkly this card is in real life...between the embossed sentiment, the clear crystals, the shiny gold bells, and the glittery snow on the pine boughs, it really adds a lot of life to this white card...


The side view gives a better perspective of the dimension on the card, and actually, a better view of some of the "sparkle"...


A pearl stick pin balances out the area between the shiny mini bells and the sparkly bough branches in the upper corner...


This time, for the "snow," I used Snow-Tex that has glitter mixed in already...when it dries, you can see the glitter is multi-colored...


The sentiment was stamped with gold ink, then embossed with gold ultra-fine embossing powder...it really highlights the distressed feel of  LOTV's Christmas Grungy Messages stamp...


Supplies:
Sentiment stamp:  Lili of the Valley Set 33, Christmas Grungy Messages
Dies:   Spellbinders Floral Ovals, Twisted Metal Tags& Accents, Labels Twenty Three;
Impression Obsession Pine Branch;   Impression Obsession Twig Wreath (small pine branches)
Embossing folder:   Cuttlebug Geometric Rings
Pearls & crystals:   Prima          Hug Snug seam binding         Maya Road pearl stick pin        Deco Art Glistening Snow-Tex


As a reminder, there are still a few days left in September, so that means a few more days to enter Lili of the Valley's Ribbon and Lace monthly challenge. (The link will always be active over on the right side of my blog so you can check on the current LOTV challenge at any time.)  And have you seen the teaser photos of the new 8x8 paper pads coming soon? (check them out here) Oh my...can't decide which one I like best...LOL

Thanks so much for visiting today...have a wonderful weekend!


Wednesday, September 18, 2013

Cream and Ivory...

Today's card is a true monochromatic little number, with lots of texture from embossing folders, and lots of lacy touches from the edge punch and braided lace across the front. Three different embossing folders were used to make the textured sections across the front...


The side view makes it a bit easier to see the lacy punched edge detail...


The largest rose in the cluster is made using Spellbinders' Rose Creations dies...the smaller flowers are pre-made, but I was pleasantly surprised to see how perfectly they matched...


It's no secret I love using memo pins for sentiment tags...makes it easy when I change my mind and want to use the card for a different occasion...just swap out the tag...plus, it's fun to "gussy up" the memo pins...


Supplies:
Edge punch:   Martha Stewart Embroidery Deep Edge
Embossing folders:   Cuttlebug Polka Dots, Kassies Brocade, Modern Wallpaper
Dies:   Spellbinders Rose Creations;   Spellbinders Floral Flourishes;   Sizzix Flowers Branches & Leaves
Small paper roses:   Wild Orchid Crafts          Stamens:   ChocolateLetters on Etsy
Pearls:   Recollections          Tim Holtz Memo Pin (embellished and painted)


Thanks for visiting today!


Friday, June 14, 2013

Another Lovely Day...

Happy Friday, all!  The card for today is filled with lots of die-cut edges and layers of die cut frames...all in monochromatic tones of cream and tan...just perfect for several different card occasions - birthday, hello, even a wedding or anniversary card...


Leaves and florals on both sides of the center frames...accented with pearls, of course...  :)


A peek at the inside...the decorative lacy die cut edge is only on the front...the inside has the punched scalloped edging...


Supplies:
Dies:   Spellbinders A2 Scalloped Borders One, Opulent Ovals, Classic Ovals Small, Classic Ovals Large;
Sizzix Flowers Branches & Leaves
Embossing folder:   Cuttlebug Swiss Dots       Sentiment stamp:   Papertrey Ink
Paper flowers:   Wild Orchid Crafts       Stamens:  local craft store       Pearls:   Recollections


Thanks for stopping by today!


Sunday, March 3, 2013

TSTR-Frame It

I'm honored to have been asked to be the Guest Designer over at The Shabby Tea Room for the month of March. Tracey is hosting the challenge this week - to use white, with only one other color, and include a frame in our design. I loved making my all-white cards a while back, so adding only one other color is another fun twist...and a frame, too...I couldn't wait to get started.

I used foam tape to "stack" the different layers I used on the front, and the end result turned out that the whole card front became the "frame"...not just the fancy square frame diecut I started with. And believe it or not, there's not a single flower on this card...gasp...I know...but I'm not sick or anything...I just wanted to see if I could do it. LOL

Here's my card for Tracey's challenge...


...and here's the inspiration photo to go along with the challenge...lots of inspiration here, especially for a shabby-chic-style fan like me. The feathery wreath on the chair is what inspired me to use the white fringe trim sewn into a circle beneath the butterfly...


I shabbied up the edges of the little sentiment tag to match the edges of the layers on the card front, and ran the pearl and crystal stick pin through it to act as a "memo pin"...


There are no flowers on the card, but I did use die cut leafy branches with a touch of glitter in two of the diagonal corners...


Supplies:
Dies:  Spellbinders Fleur de Lis Squares, Classic Squares Small, Classic Squares Large;  
Sizzix Flowers, Branches and Leaves
Cuttlebug Geometric Rings embossing folder      Fringe trim:  Frogfeathers on Etsy
Sentiment stamp:  Paper Sweeties      Butterfly:  local scrapbook store
Pearls:  Recollections      Handcrafted stick pin


Thanks for visiting today...I hope your week is starting with a smile!


Friday, February 15, 2013

Going Monochromatic Again...

TGIF...Happy Friday!  It's been another really busy week around here. :)

If you've been seeing my cards for a while, you might recognize the design of today's card. Back in October of last year, I made one using the same die cut for the base, and the same oval die cuts on the front...but it was made in creams and whites.  This time, I wanted to do a monochromatic card in a color I haven't used for that purpose before...and one that's a little harder to find in my stash. :)  I love this (what I call) "hydrangea lavender"...it has an undertone of pink instead of blue.  And how happy was I to find that I actually had three slightly different hues of the same colored cardstock in my stash! But once I pulled all the embellishments together, it just looked a bit dull with everything blending together...so I decided at the last minute to make white the accent color, both with some of the flowers, and by dry-brushing white paint around the edges of the papers and elements.

I changed up the location of the floral cluster this time...to curl around the bottom of the die cut frames...and found a patterned paper to use inside the smallest oval opening that was the perfect blending of all three shades.


Off to the left side, a large cardstock flourish beneath the flowers, and a pretty handcrafted pearl stick pin...I even found a "hydrangea lavender" pearl in my gem stash that blended perfectly!


...and off to the right, the smaller end of the cardstock flourish peeks out behind more mini roses and leaves...you can see more of the light coating of glitter on the smallest oval frame in this photo...


And a peek at the inside...


Supplies:
Patterned paper:  Basic Grey Kioshi collection
Dies:  Spellbinders Grand Labels 4, Floral Ovals, Classic Ovals Large, Classic Ovals Small;  Memory Box Elegant Scrollwork;  My Favorite Things Royal Leaves
Mini roses:  Wild Orchid Crafts      Flat white flower:  Prima      Martha Stewart Medium Branch Punch
Pearls:   Recollections (white), Kaisercraft (lavender)      Handcrafted pearl stick pin


Thanks so much for visiting today...have a wonderful weekend!


Monday, January 28, 2013

A Photo-Heavy Monday...

Sometimes, while cruising around the Web and social media sites, you find someone whose work inspires you in one way or another.  This happens often to me, and most recently from a wonderful card maker "across the pond" who, although she doesn't have a blog yet, shows her wonderful creations on Facebook. Her name is Debbie Stevens, aka Paper-Pastimes, and you can find her Facebook page here if you'd like to join/follow her page to keep up with her creations.  ETA: Debbie also now has a blog...you can find it  here.

Debbie inspired me to use more of my dies on my cards, and especially to do so while using a monochromatic color scheme.  You can see by most of my cards that I'm a big fan of patterned papers, so I love the challenge of creating a card without any patterned papers at all, using only cardstock to create a variety of patterns and dimension.

Today I'm sharing three cards that I made recently, all inspired by Debbie's work. First up, an all-occasion card (the card is actually a light cream color, but it looks much whiter in straight-on photos). On this card, I used several layers, each attached to the card with foam tape. The floral image is adhered to the light brown layer at the bottom of the stack. The next layer up is the dot-embossed cream cardstock with the oval cut out to display the floral image. Next is the Floral Oval die, with the center oval cut out larger than the oval displaying the image. The final layer is the Tiffany Frame die, set slightly inside the oval cut into the center of the larger Floral Oval die.


I pulled the pink color from the rose in the image for the scrunched seam binding bows, and topped them with a single lavender mini rose, some punched branches, and a smattering of small white pearls and clear crystals...


Before adhering it to the card, I coated the Tiffany Frame die with clear glitter for just a touch of texture and sparkle. and added a couple pearls to the top and bottom details...


Supplies:
Dies:  Spellbinders Floral Ovals, Classic Ovals Large and Small; Memory Box Tiffany Frame
Cuttlebug Polka Dots embossing folder      Floral image:  The Graphics Fairy
Paper rose:  Wild Orchid Crafts      Martha Stewart Medium Branch punch
Hug Snug seam binding      Pearls & crystals:  Recollections


The next card is a birthday card for someone I know doesn't follow my blog, so won't see it before I send it out. :)  This time I set the layered sentiment chips inside the cutouts made in the center of the card.  Here's what I'm talking about...


The dry-embossed cream layer has a round cutout to show the solid cream layer at the bottom. It's topped with a round frame with a center circle cutout slightly larger than the one in the lower layer.  Inside that cutout are two sentiment chips of varied size, each adhered to the card with foam tape for dimension...


The floral and bow cluster arcs around the bottom of the round frame...


Supplies:
Dies:  Spellbinders Parisian Motifs, Standard Circles Large and Small; My Favorite Things Royal Leaves; Memory Box Elegant Scrollwork
Sizzix Diamond Embossing Folder      EK Success Scalloped Circle Punch
Sentiment stamp:  Papertrey Ink      Paper flowers:  Wild Orchid Crafts      Crocheted flower: local craft store
Pearls:  Recollections      Hug Snug seam binding
Miscellaneous:  cheesecloth, white acrylic paint


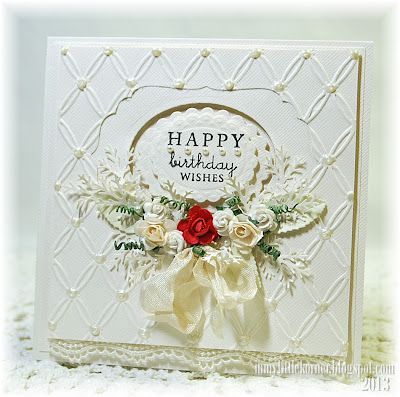
And last, but not least, the first card I made inspired by Debbie's work and had set aside until I completed the other two.  Turns out the timing was perfect, because I found out I had missed the birthday of a special friend, and was especially glad I could send her something she wouldn't have already seen here. LOL    On this white card, the dry-embossed layer is adhered directly to the solid layer beneath it - then both together are adhered to the card with foam tape.  The sentiment chips are "popped up" with foam tape, also.  The bottom of the card is decorated with a fancy-edged lace...


A single red rose in the floral cluster of cream and white roses, and the green wires on each of the mini flowers, are the only parts of the card that aren't white or cream, so they really  stand out against all the other monochromatic textures...


Supplies:
Dies:  Spellbinders Labels Four, Classic Ovals Large, Scalloped Ovals Small, Beaded Ovals;  
My Favorite Things Royal Leaves
Couture Creations Tied Together embossing folder      Martha Stewart Medium Branch punch
Paper roses:  Wild Orchid Crafts      Mini pearls:  Recollections
Lace:  TheFunkieJunkie.com      Viva Decor Pearl Pen-Cream      Hug Snug seam binding


Thanks so much for visiting today...I hope your week is starting with a smile!


Related Posts Plugin for WordPress, Blogger...