Showing posts with label Thanksgiving. Show all posts

Wednesday, August 6, 2014

LOTV - A Time For Giving...

Good Wednesday morning, everyone! Before I share today's card, there are a couple sale offers going on over at Lili of the Valley on the new stamps...and there's still time for you to take advantage of them!

One lasts until tomorrow midnight (UK time)...


And one ends Friday, August 8, midnight (UK time)...


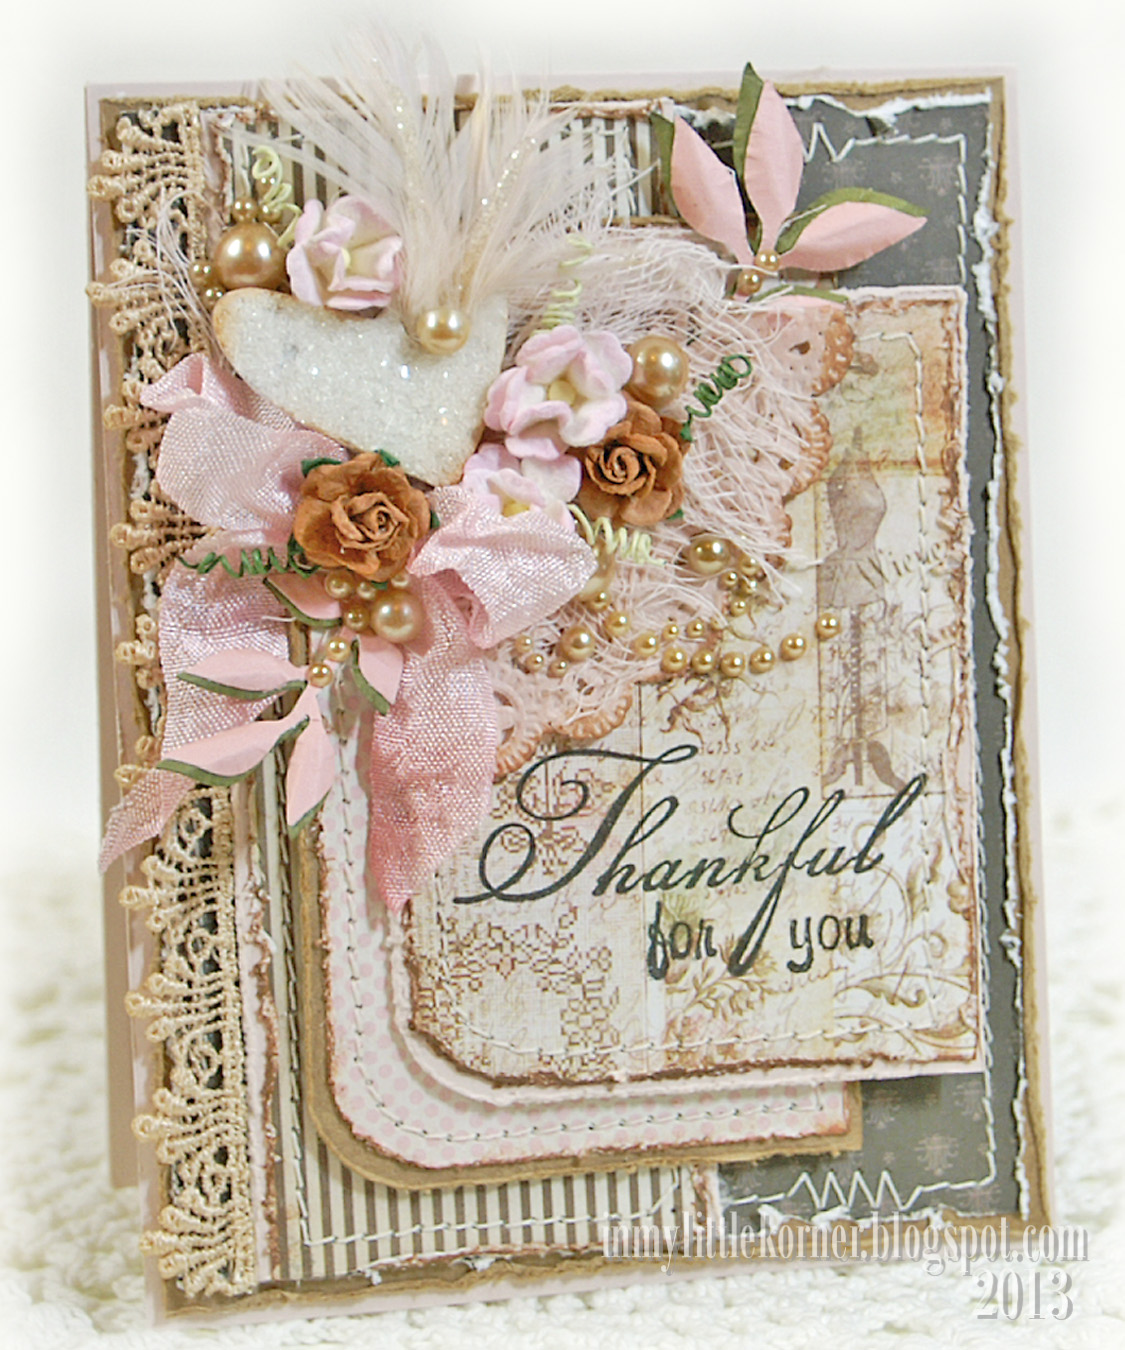
The card I'm sharing today uses one of the sentiments in the new Set 75, Christmas Wishes (the same one pictured in the graphic above), only I've used some of the beautiful new papers from the new Enchantment paper pad and an accent dark purple paper from the new Snow Princess Solids paper pad to make a card geared toward autumn and the season of Thanksgiving...


The clock peeking out behind the floral cluster is a stamp from Set 66, Grunge Elements, watercolored with Distress Inks...


The florals include a larger rust-colored fabric flower from Petaloo, topped with mulberry roses and asters in brown, cream, and purple, accented with golden pearls...


The little frame was created with air-dry clay, then rubbed with brown ink, and finally topped with Frayed Burlap Distress Stickles, for just a bit of vintage sparkle...


Next, the sentiment from the new Christmas Wishes set, stamped onto a banner and inked around the edges for a vintage feel..


The little tag tucked in at the top of the card pulls out to display a second sentiment from Set 58, Pretty Grungy/Good Times...the tag is topped with a spray of raffia with purple twine accents...


Supplies:
Patterned papers:  LOTV Enchantment, and Snow Princess Solids
Stamps:   LOTV Set 75, Christmas Wishes;   Set 66, Grunge Elements;   Set 58, Pretty Grungy/Good Times
Dies:   Sizzix Flowers Branches & Leaves;   Tim Holtz Tattered Banners
Edge punch:   Martha Stewart Swirling Lace          Frame:   Martha Stewart mold & air dry clay
Mulberry flowers:   Wild Orchid Crafts          Fabric flower:  Petaloo            Pearls:  Recollections
Purple twine:   The Twinery
Miscellaneous:   hemp twine, Distress Stickles, Distress Inks, raffia


Thanks for visiting today!


Monday, October 28, 2013

Thankful...

Happy autumn Monday to you! You can tell it's "officially fall" around here because the oak tree out front has finally started dropping leaves all over the front lawn. Sure do love that we have that beautiful big old tree in the front yard, but it sure does make a mess for a few weeks every year! :)

Today's card again has an autumn color scheme, and I'm not sure if it will be a "thank you" card, or a "thanksgiving" card...either way it has the colors of the season set against stark white and kraft tan...


Each cardstock layer has been attached using foam tape to add dimension...it's a bit easier to see from the side view...


The larger flowers are handmade using flat Prima flowers, shaping them with the round end of an embossing tool, then layering them on top of each other. I couldn't resist adding a nice bunch of stamens to the largest orange flower just for fun...


The large orange leaf came off a larger stem of leaves from the craft store...a little gold glitter was added in the spirit of the fall season..


I found a stem of seed pods left from a couple projects from last year...just the right colors for today's card...


Supplies:
Embossing folder:   Sizzix/Tim Holtz Texture Fades/Bricked & Woodgrain
Dies:   Spellbinders Foliage Two          Leaves, Pearls:   Recollections          Small roses:   Wild Orchid Crafts
Large flowers:   Prima (altered)          Stamens:   ChocolateLetters on Etsy          Sentiment stamp:   Fiskars
Miscellaneous:   Wilton doily, large maple leaf, hemp cording, seed stems, cheesecloth


Thanks so much for visiting today...I hope your week is starting with a smile!

Friday, October 18, 2013

Give Thanks...

Happy Friday, all!  No "plum" on today's card...didn't want you to get "plum-tuckered." (groan...sorry for the bad pun.)

Today I have a Thanksgiving card, but not in all the traditional holiday colors. I paired deep gold tones with a patterned paper mixing roses in the same gold tones with pink and aqua. I guess you could say it's "traditional shabby chic colors" meets "traditional Thanksgiving colors."  (Random question - do those of you in countries in the southern hemisphere celebrate a Thanksgiving-themed holiday during your summer months or winter months...and do you have "traditional colors" that go along with it?)


After I added the lace strip between the two patterned papers on the front, it still looked like something was missing. So I die cut a scalloped trim, cut it in half lengthwise, and added 1/2 the strip to the top and bottom of the lace - now it looked substantial enough to support the heavy floral cluster that would sit above it...


I copied the rose pattern on the paper to the colors of the roses in the cluster that sits on top of a piece of scrunched pink cheesecloth and a diecut loopy doily...


then used a dark golden cardstock to cut the leafy stems, inking the edges heavily with dark brown to give them contrast and dimension...


Supplies:
Patterned papers:   Authentique Grace collection/"Delicate" (floral and pink), "Beauty" (gold damask)
Dies:   My Favorite Things Dizzy Border;   Memory Box Quinn Flourish;   Sizzix Flowers Branches & Leaves
Lace:   K&Company          Flowers:   Wild Orchid Crafts          Pearls:   Recollections
Sentiment Rub-on:   Melissa Frances          Miscellaneous:   white hemp cording, cheesecloth


Thanks for visiting today...have a wonderful weekend!


Monday, October 14, 2013

For Our Blessings...

Today's card is a seasonal Thanksgiving card, but I switched colors up a bit and went with plum and rusty-orange. The kraft background of the card is actually a Maya Road square kraft envelope turned on its side, then covered with an inked doily and small snippets of fun papers. You can see the scalloped edge of the envelope flap on the right side of the card...


The largest rose is made with Spellbinders' Rose Creations dies, and it's surrounded with ready-made smaller mulberry roses...the fact that the colors all matched up so well is pure crafty-luck!


A spray of cream and taupe stamens between the rose and the punched maple leaves was added just for fun...


The chipboard fleur-de-lis piece was turned into a frame shape with the help of a circle die cut from the center...


Supplies:
Patterned papers:   Prima Nature Garden;   DCWV gauze paper
Dies:   Spellbinders Rose Creations,   Fleur de Lis Accents,   Standard Circles Large; 
Memory Box Elegant Scrollwork
Punch:   Marvy Uchida Large Maple Leaf          Mini roses:   Wild Orchid Crafts          Lace:   TheFunkieJunkie.com
Stamens:   ChocolateLetters on Etsy          Pearls:   Recollections          Miscellaneous:   Wilton doily


Thanks so much for visiting today...I hope your week is starting with a smile!
  

Monday, September 9, 2013

Thankful for You...

Happy Monday, all!  The other day I had an email from a friend asking when I was going to start making Thanksgiving cards. Well, I did have a "thankful" made up already for today's share, but then I thought...yikes...it IS time to start thinking seriously about getting more made up if I want to be ahead of the holidays.  Yes, I have already shown some Christmas cards, but as I made those up, I was thinking I was REALLY ahead of the game with those...after all, it was still nearly 100 degree summer-hot around here so Christmas felt waaaaaaay off in the future. LOL

As I was pulling papers and accents for today's card, I did have autumn colors on my mind...but then I decided I wanted to use non-traditional fall colors for a while yet, as a nod to our hanging-on-for-dear-life summer. So even though the cream, tans and browns made "the cut," I decided to accent with a pastel pink patterned paper in the mix, and use a few pink florals in the cluster.  And for fun, I used the current Deconstructed Sketch 117 as inspiration for the layout...


Here's Jen's current sketch that was used for inspiration...


The chipboard heart was painted, inked, and coated with clear German glass glitter. It has a little heart punched out in the corner...a perfect place to thread a couple small goose feathers...but not before the feathers are "shabbied" up a bit with a spritz of tea-dye stain, and a light touch of clear glitter run up the center vein...


The flower cluster surrounding the chipboard heart sits on a piece of dyed paper doily, a piece of dyed pink cheesecloth, and has a pretty pink seam binding bow as  "filler"...


Supplies:
Patterned papers:   My Minds Eye Lost & Found/Madison Avenue collection (brown, stripe, pink dots);
Prima Nature Garden collection
Sentiment stamps:   Fiskars          Crocheted lace:   TheFunkieJunkie.com
Dies:   Sizzix Flowers Branches & Leaves          Chipboard heart:   Maya Road          Flowers:   Wild Orchid Crafts
Pearls:   Recollections          Goose coquille feathers:   MoonlightFeatherInc on Etsy
Hug Snug seam binding          Miscellaneous:   cheesecloth, German glass glitter, Wilton doily


Thanks so much for visiting today...I hope your week is starting with a smile!


Sunday, October 28, 2012

TSTR - Hello, Pumpkin

We're just days away from Halloween, so what better time for a challenge from The Shabby Tea Room entitled, "Hello, Pumpkin!"  In addition,  it's my final week as October Guest Designer...and what a fun month of challenges it's been.  I'm very thankful to Debbie for honoring me with the invitation to participate for this month!

Today's card is filled with bright autumn colors...


and was based on this week's adorable inspiration photo provided by our host, Rebecca. We were to use the colors in the photo, and a flower...


Unfortunately for me, you can see where my much used and loved Epson 1900 is on its last legs...the banding I'm getting is very visible in deeply-colored prints, and is not going away with all the usual fixes. If you are using a photo-quality color printer (that uses multiple color cartridges) that you love and would highly recommend, I'm open to suggestions.  I've searched the web, read user reviews, and shopped until my mind is spinning...and still can't hit that "buy" button.  I'm a long-time Epson photo printer fan, but I'm open to alternatives this time around.

But now, back to the fun of today's card. I made a flower cluster with a base of 3 layers of gathered pale orange tulle...that little dress in the photo won my heart over.  Finding flowers in just the right shades wasn't happening, so I had to get to work coloring my own.  I left the gathered cream cotton lace in it's original color, but took one of my cream colored hand crocheted flowers, and spritzed it with a homemade mix of Spiced Marmalade Distress Ink and distilled water...blotting some of the areas off with a paper towel right after spraying to give it more of a variegated look.  The little paper roses also started off in a cream color...I spritzed them first with some Heirloom Gold Perfect Pearls mixed with distilled water, then a spritzing of Mustard Seed Distress Ink and distilled water.


The corner scroll decoration started off gold...a couple colors of acrylic paint (Sable Brown and Vintage White) lightly applied over the gold brought it to the colors I really wanted...


The cotton lace across the front also started out off-white.  A spritizing and (heavier) blotting with the same mix used on the crocheted flower gave it the yellow-orange tones I was looking for...

Supplies:
Patterned papers: Basic Grey Basics/Kraft; Crate Paper Random collection (green)
Dies: Spellbinders Classic Scallop Edgeabilities      Paper roses: CathieFilian.etsy.com
Vintage image: howtogeek.com      Pearls: Recollections and Prima      Tim Holtz memo pin (embellished) 
Hug Snug seam binding
Miscellaneous craft store supplies: tulle, cotton lace, eyelash fiber, crocheted lace, corner scroll   

Thanks for visiting today.  I hope your week is starting with a smile!


Wednesday, October 17, 2012

Thanksgiving joys...

I hope you're having a great week so far.  The last month has seemed to fly by for me...and we're just easing into the holiday season, when time seems to pass doubly-fast!  But I'm starting to enjoy making cards in advance of the holiday season, and today I have another Thanksgiving card to share with you.

This card started as all rectangular, which, to me, seemed to need some easing.  So I rounded the lower corners, added a wide scalloped edge to the left side, the circular heart chipboard frame for the sentiment, and a small piece of scalloped crocheted lace on the lower right.


There's a dusting of large clear coarse glitter on the leaves and grains in the image...but it's hard to photograph the subtle sparkle they add...


Looping some pearl "ribbon" through the dyed scrunched seam binding bows adds a little touch of "bling" without hiding the image and the sentiments...


I love the charm of the vintage sentiments alongside the beautiful images on vintage cards...so I highlighted this one with a chipboard heart circle, inked and lightly dusted with more clear German glass glitter ('tis the season to use glitter!).  The piece of crocheted lace is tucked just under the lower corner of the image block to soften all the edges at the lower corner...

Supplies:
Patterned papers: Authentique Gathering collection      Vintage image: webshots.com
Dies: Spellbinders Classic Scallop Edgeabilities      Chipboard heart frame: Maya Road      Pearls: Recollections
Lace: TheFunkieJunkie.com      Hug Snug seam binding
Miscellaneous: cotton lace, pearl trim, button, clear German glass glitter, Martha Stewart coarse clear glitter

Thanks so much for stopping by to visit today!


Wednesday, October 10, 2012

A Sunshiny Heart...

I love the sentiment in the vintage image on this card. I had printed it out a while back in anticipation of the fall holidays, and realized yesterday...that's now! So here's the first of probably several Thanksgiving cards you'll see here in the next few weeks...


Even the ruler paper had the word "happy" on it...the fact that it still showed after I adhered the image was a "happy" accident...


After painting the chipboard heart frame, I added a coating of clear German glass glitter...I love the texture and slight sparkle this glitter gives to things...


After tucking a few mini banners behind the image, I thought it needed a softer edge, so I crumpled up a small piece of tea-dyed cheesecloth between the image and the banners...

Supplies:
Patterned papers: Echo Park This & That Charming collection; Echo Park Dots & Stripes
Candy Shoppe collection (brown stripe)
Vintage image: Dover Publications      Chipboard heart: Maya Road      Pearls: Recollections
Scalloped lace: TheFunkieJunkie.com (tea-dyed)      Cream paper roses: CathieFilian on Etsy      Hug Snug seam binding
Miscellaneous: clear German glass glitter, button, crochet thread, cheesecloth

Thanks so much for visiting today. I hope you're having a great week so far!

Wednesday, November 23, 2011

For Our Blessings We Are Thankful

An early Happy Thanksgiving wish to you and yours.

Supplies:
Vintage image: The Vintage Workshop      Spellbinders Fleur-de-lis Squares Nestabilities
Laces and trims: Etsy      Fall bead spray: local craft store

Saturday, October 22, 2011

Green Tangerines October, Part 2

You're probably beginning to see that the main theme of the October card kit add-on is "thankful" - just in time for you to make up some fun cards celebrating the upcoming Thanksgiving holiday season.

This first card is a side-step card. I found a great tutorial for this technique here.  The finished size is A2 (4-1/4x5-1/2") so mailing is simple...but wouldn't it also make a fun and festive place card at your Thanksgiving table, with the menu on the left side (you could move the flower cluster to the upper right) and a personalized handwritten message to your guest inside?

For my card, I used a vintage image I found on the net, cropped into a circle, for the decoration on the right side.  The gold cotton lace and the gold adhesive pearls on the doily are from the last card kit, and I added a crocheted flower that I made, along with an inked Wilton doily cut in half, twine, and a couple leaves and flowers from my stash.  The gold and black button, gold bead spray, white loop ribbon, and Happy Thanksgiving sticker are from this month's kit, as are all the papers and cardstock.


This next card uses a technique I've used in months past on other kits - a cutout on the front with the embellishments on the inside showing through.  Here's a little hint to the easiest way I've found to do this: adhere all your patterned papers to the front of the card base first, then die cut or punch out the shape.  This way, all the papers are adhered to your punch-out piece perfectly matching the arrangement of the papers on the outside front, so when you adhere the cutout on the inside of the card, everything will align and match up easily.

The decorative bottom edge on this card was made using the Tim Holtz Ornate On-the-Edge die. I used both the gem circles in the kit on this card- the larger one on the outside of the cutout edge.  Then I punched another circle of off-white cardstock, adhered the turkey sticker in the kit to it, and used the second gem circle around this. I centered this second circle over the first cut-out and attached it to the inside of the card to show through when the card is closed. Everything else on this card is included in your kit, with the exception of the Hug Snug and narrow green ribbon used for the bows. (The sentiment sticker is also in your kit - I adhered it to a piece of cream cardstock then punched out the scalloped circle.)


This final card for today is made up in traditional autumn colors, and just a fun and playful way to say thanks. I added a trio of small white flowers and some dyed Hug Snug seam binding for bows, but all the rest of the materials for this card are in the kit, including the Technique Tuesday sentiment stamp (the same sentiment stamp as used in the "million and one thanks" card posted yesterday). 

The banner flags are cut from the banner patterned paper in the kit. I punched a couple tiny holes in each (I used a large push pin) and threaded a piece of crochet thread through them. The chipboard scalloped frame is dry-brushed with blue acrylic paint.  Again, I handcut the scalloped edge on the brown patterned paper by simply following the edge of the circles in the pattern - easy peasy! 


Tomorrow I'll be back with the last three cards I made up with this month's kit.  They're my attempt at a more "clean and simple" style.

Have a great Saturday!
Related Posts Plugin for WordPress, Blogger...